Shapes
As mentioned before, the shapes in this library are tiles. These classes inherit from the class Tile. So the three methods in the tile used to set its position (setX, setY, setXY) also work for them. As a tile, the position of a shape is also decided by its upper left corner.
Let's take a look at each shape in detail.
🔸Introduction
Line
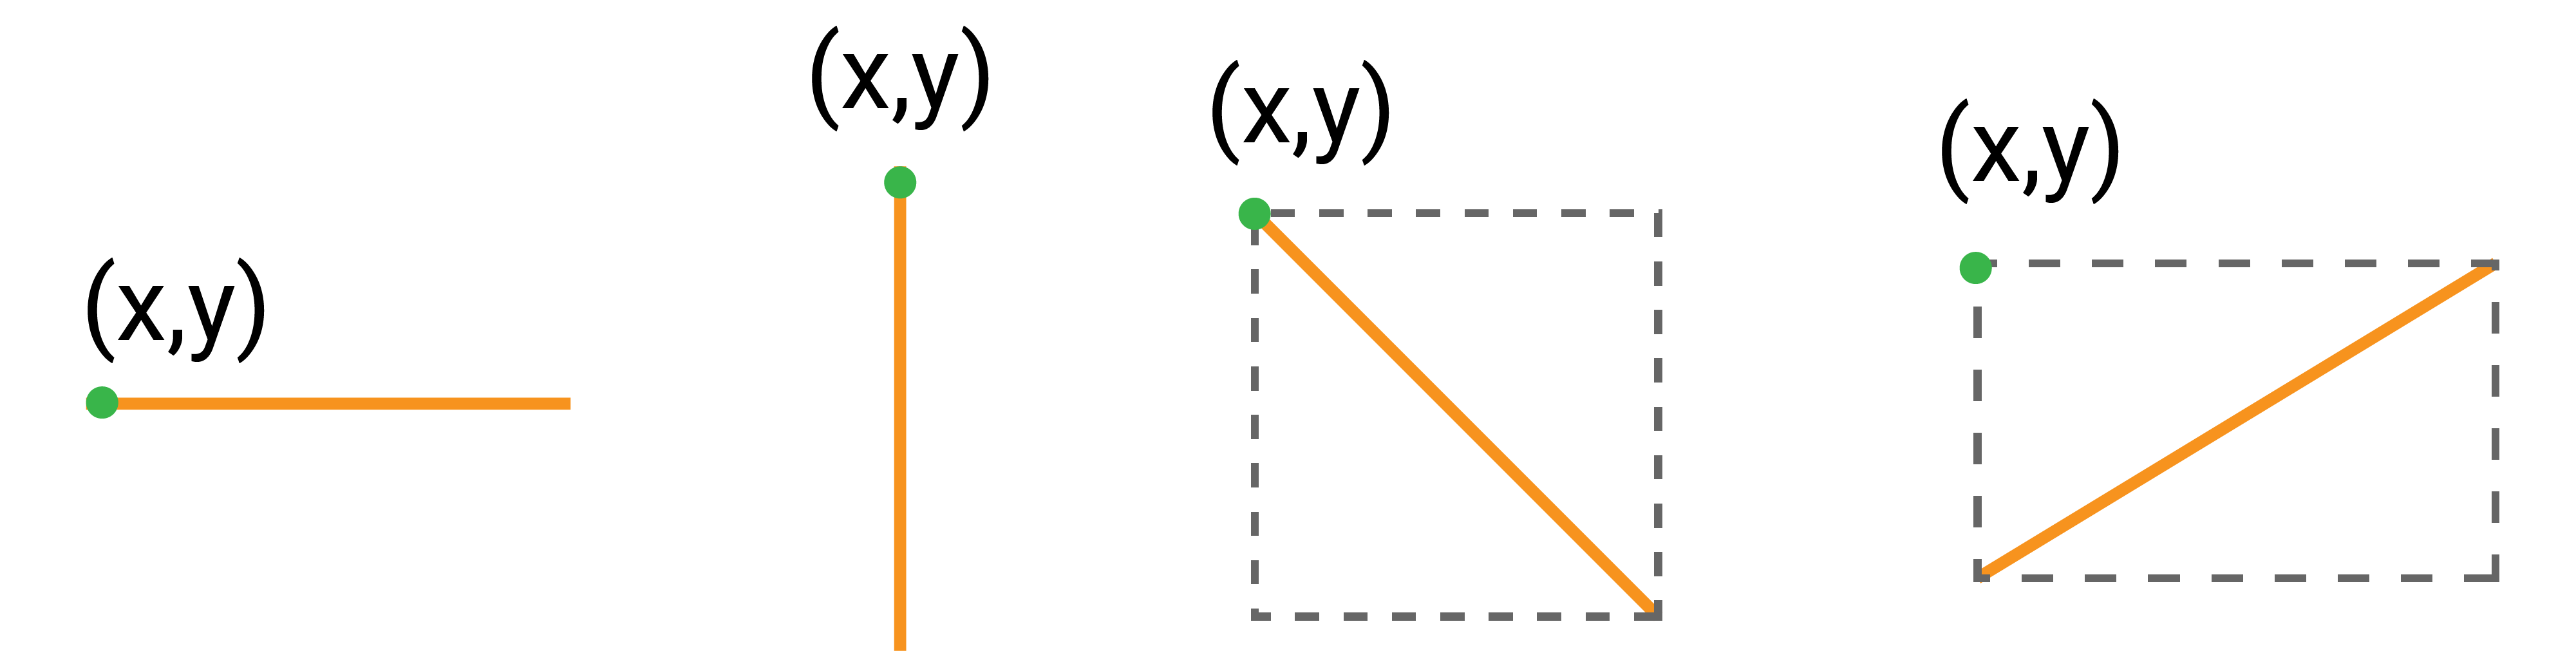
This class allows you to draw lines by setting the two endpoints.
Class
Line - this class is used to draw lines on a screen.
| Method | Explanation |
|---|---|
init(x0:y0:x1:y1:color:) | Create a line. Parameters: - x0, y0: the coordinate of the first point. - x1, y1: the coordinate of the second point. - color: the color of the line in UInt32. |
A line is also a tile. When you move a line, you set the coordinate of its upper left corner.
Here are some examples for drawing lines:
let line1 = Line(x0: 0, y0: 0, x1: 59, y1: 239, color: Color.red)
let line2 = Line(x0: 59, y0: 239, x1: 119, y1: 0, color: Color.orange)
let line3 = Line(x0: 119, y0: 0, x1: 179, y1: 239, color: Color.yellow)
let line4 = Line(x0: 179, y0: 239, x1: 239, y1: 0, color: Color.green)

Rect
This class allows you to draw rectangles. You can set its size, position, and color.
The upper left vertex is the starting point of a rectangle. After setting its width and height, the rest three other vertices are thus decided.
Class
Rect - this class is used to draw a rectangle on a screen.
| Method | Explanation |
|---|---|
init(x:y:width:height:fill:outline:stroke:) | Create a rectangle. Parameter: - x, y: the coordinate of upper left corner of the rectangle. - height, width: the height and width of the rectangle to decide its size. - fill: the color of the rectangle. - outline: the color of the outline. - stroke: the width of the outline, 1 by default. It takes up the rectangle's inner area and doesn't change the size of the entire shape. |
fill(color:) | Fill the inner area of the rectangle with the specified color. |
setOutline(color:) | Set the color of the stroke. |
Let's see how you create rectangles:
let rect1 = Rect(x: 0, y: 0, width: 65, height: 50, fill: Color.yellow, outline: Color.orange, stroke: 2)
let rect2 = Rect(x: 10, y: 150, width: 40, height: 40, fill: Color.yellow)
let rect3 = Rect(x: 100, y: 0, width: 65, height: 50, outline: Color.orange)

RoundRect
This class allows you to draw rounded rectangles. You can regard it as a combination of 4 lines and 4 quarter circles.
Class
RoundRect - this class is used to draw a rounded rectangle on a screen.
| Method | Explanation |
|---|---|
init(x:y:width:height:radius:fill:outline:stroke:) | Create a rounded rectangle. Parameter: - x, y: the coordinate of upper left corner of this tile.- height, width: the height and width of the rounded rectangle.- radius: the radius of the rounded corner which is a quarter circle.- fill: the color of the shape.- outline: the color of the outline.- stroke: the width of the outline, 1 by default. It takes up the rounded rectangle's inner area and doesn't change the size of the shape. |
fill(color:) | Fill the rounded rectangle with the specified color. |
outline(color:) | Set the color of its outline. |
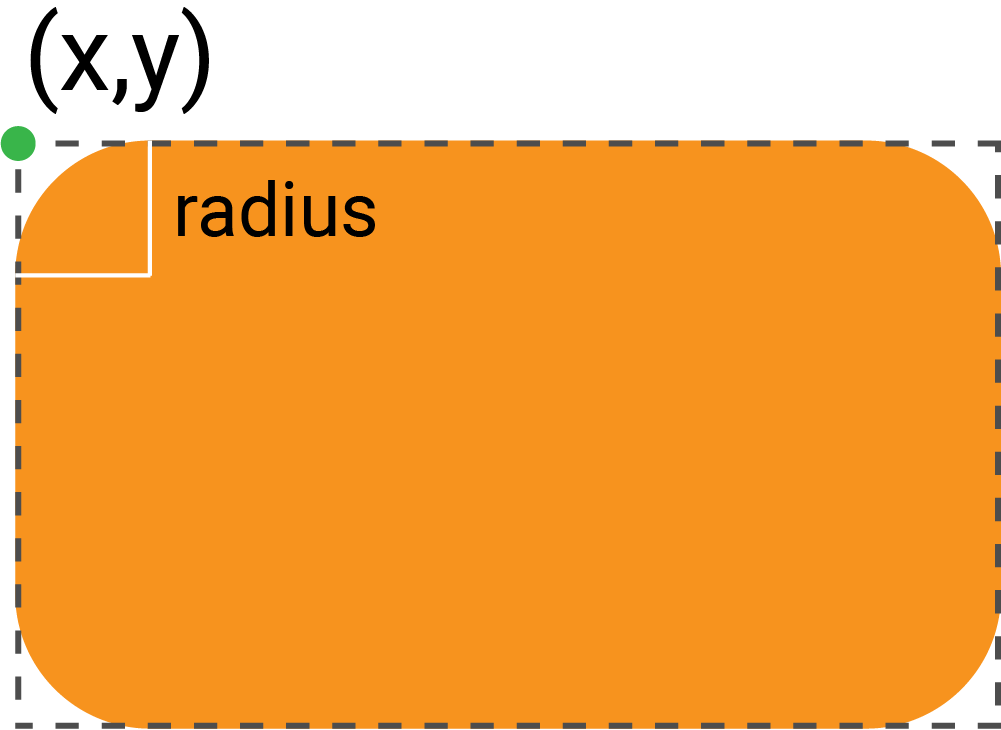
In the image below, the orange area is a rounded rectangle. The dashed line marks all pixels for this tile. The coordinate you set when creating a rectangle is the upper left vertex of the tile, marked with a green dot.
Let's look at some examples:
let roundRect1 = RoundRect(x: 15, y: 20, width: 55, height: 70, radius: 5, fill: Color.magenta, outline: Color.white, stroke: 3)
let roundRect2 = RoundRect(x: 100, y: 50, width: 70, height: 70, radius: 5, fill: Color.magenta)
let roundRect3 = RoundRect(x: 40, y: 40, width: 55, height: 70, radius: 5, outline: Color.white, stroke: 2)

Circle
This class allows you to draw circles on a screen.
As you create a circle, its position is decided by its center. To move it, you set the coordinate of the upper left corner of the tile.
Class
Circle - this class is used to draw a circle on a screen.
| Method | Explanation |
|---|---|
init(x:y:radius:fill:outline:stroke:) | Create a circle. Parameters: - x, y: the position of the circle by setting the center. - radius: the radius of the circle. - fill: the color of the shape. - outline: the color of the outline. - stroke: the width of the outline, 1 by default. It takes up the inner area and does not change the size of the shape. |
fill(color:) | Set the color of the circle. |
outline(color:) | Set the color of its outline. |
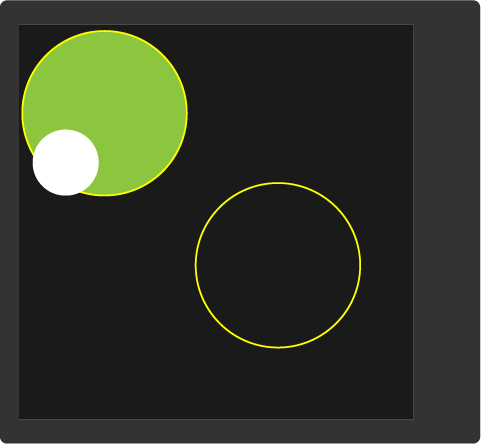
Let's create some circles:
let circle1 = Circle(x: 50, y: 50, radius: 50, fill: Color.green, outline: Color.yellow, stroke: 2)
let circle2 = Circle(x: 30, y: 80, radius: 20, fill: Color.white)
let circle3 = Circle(x: 150, y: 150, radius: 50, outline: Color.yellow)
Triangle
You can use it to create triangles. 3 vertices are needed to decide a triangle.
Class
Triangle - this class is used to draw a triangle on a screen.
| Method | Explanation |
|---|---|
init(x0:y0:x1:y1:x2:y2:fill:outline:) | Create a rounded rectangle. Parameters: - x0, y0, x1, y1, x2, y2: the coordinates of 3 vertices.- fill: the color of the triangle. - outline: the color of the outline. |
fill(color:) | Change the color of the triangle. |
Let's draw triangles:
let triangle1 = Triangle(x0: 0, y0: 0, x1: 0, y1: 100, x2: 50, y2: 50, fill: Color.purple, outline: Color.red)
let triangle2 = Triangle(x0: 100, y0: 30, x1: 39, y1: 135, x2: 161, y2: 135, fill: Color.lime, outline: Color.white)

Polygon
It allows you to draw a random shape. You can set any number of points. Then they will be connected in order and create a closed shape.
Class
Polygon - this class is used to draw a polygon on a screen.
| Method | Explanation |
|---|---|
init(_:outline:) | Create a polygon. Parameters: - points: an array of coordinates of all vertices. - outline: the color of the stroke. |
Let's create some polygons:
let points1 = [(100,50), (52,85), (71,140), (129,140), (148,85)]
let pentagon = Polygon(points, outline: Color.red)

let points2 = [(170,115), (130,115), (110,150), (130,185), (170,185), (190,150)]
let hexagon = Polygon(points2, outline: Color.green)

You could get the coordinates of regular polygons using this online tool. You could also create a random shape with this online geometry tool and get the coordinates.
🔸Project
1. Simple shapes drawing
The first project gets a quick view of all shapes.

// Import the SwiftIO library to set SPI communication and MadBoard to use pin id.
import SwiftIO
import MadBoard
// Import the driver for the screen and graphical library for display.
import ST7789
import MadDisplay

// Initialize the pins for the screen.
let spi = SPI(Id.SPI0, speed: 30_000_000)
let cs = DigitalOut(Id.D9)
let dc = DigitalOut(Id.D10)
let rst = DigitalOut(Id.D14)
let bl = DigitalOut(Id.D2)
// Initialize the screen with the pins above.
let screen = ST7789(spi: spi, cs: cs, dc: dc, rst: rst, bl: bl, rotation: .angle90)

let display = MadDisplay(screen: screen)
let group = Group()

// Create two lines and append them to the group.
let line1 = Line(x0: 0, y0: 119, x1: 240, y1: 119, color: Color.white)
let line2 = Line(x0: 119, y0: 0, x1: 119, y1: 240, color: Color.white)
group.append(line1)
group.append(line2)

// Create a rectangle and add it to the group.
let rect = Rect(x: 10, y: 10, width: 80, height: 90, fill: Color.orange, outline: Color.white)
group.append(rect)

// Create a circle and add it to the group.
let circle = Circle(x: 175, y: 50, radius: 35, fill: Color.blue)
group.append(circle)

// Create a rounded rectangle and add it to the group.
let roundRect = RoundRect(x: 0, y: 130, width: 60, height: 30, radius: 5, fill: Color.yellow)
group.append(roundRect)

// Create a triangle and add it to the group.
let triangle = Triangle(x0: 130, y0: 200, x1: 160, y1: 140, x2: 200, y2: 180, fill: Color.lime, outline: Color.white)
group.append(triangle)

// Set the vertices of a star and use them to create a star.
let points = [(85,150), (92,172), (115,172), (95,186), (105,210), (85,194), (65,210), (75,186), (55,172), (78,172)]
let polygon = Polygon(points, outline: Color.red)
group.append(polygon)

// Display all shapes on the screen.
display.update(group)

while true {
    sleep(ms: 1000)
}
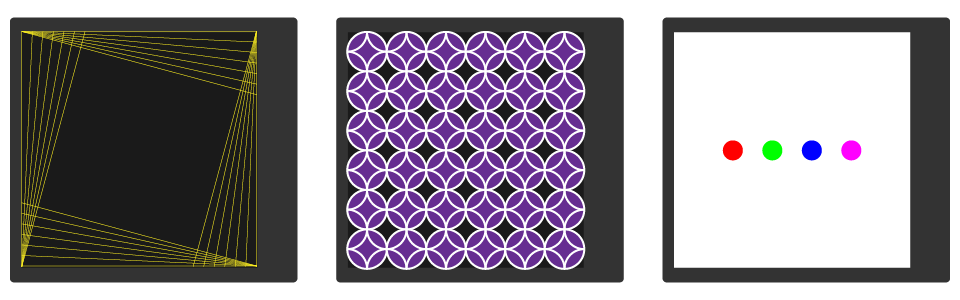
2. Shape animation
In this project, you'll use some shapes above to make some patterns to create a simple animation.
Example code
// import the SwiftIO library to set SPI communication and MadBoard to use pin id.
import SwiftIO
import MadBoard
// Import the driver for the screen and graphical library for display.
import ST7789
import MadDisplay

// Initialize the pins for the screen.
let spi = SPI(Id.SPI0, speed: 30_000_000)
let cs = DigitalOut(Id.D9)
let dc = DigitalOut(Id.D10)
let rst = DigitalOut(Id.D14)
let bl = DigitalOut(Id.D2)

// Initialize the screen with the pins above.
let screen = ST7789(spi: spi, cs: cs, dc: dc, rst: rst, bl: bl, rotation: .angle90)
// Create an instance using the screen for dispay later.
let display = MadDisplay(screen: screen)

let group = Group()

// Draw yellow lines on the screen.
for y in stride(from: 0, to: 80, by: 10) {
    drawLine(x0: 0, y0: 0, x1: 239, y1: y, color: Color.yellow)
}

for x in stride(from: 239, to: 160, by: -10) {
    drawLine(x0: 239, y0: 0, x1: x, y1: 239, color: Color.yellow)
}

for y in stride(from: 239, to: 160, by: -10) {
    drawLine(x0: 239, y0: 239, x1: 0, y1: y, color: Color.yellow)
}

for x in stride(from: 0, to: 80, by: 10) {
    drawLine(x0: 0, y0: 239, x1: x, y1: 0, color: Color.yellow)
}

// Update the screen each time you draw a line.
func drawLine(x0: Int, y0: Int, x1: Int, y1: Int, color: UInt32) {
    let line = Line(x0: x0, y0: y0, x1: x1, y1: y1, color: color)
    group.append(line)
    display.update(group)
}

// Draw a black rectangle as backgroud to hide the lines.
// It will move gradually from the right.
let blackBg = Rect(x: 240, y: 0, width: 240, height: 240, fill: Color.black)
group.append(blackBg)
for x in stride(from: 240, through: 0, by: -20) {
    blackBg.setX(x)
    display.update(group)
}

// Fill the screen with circles.
for y in stride(from: 20, to: 280, by: 40) {
    for x in stride(from: 20, to: 280, by: 40) {
        let circle = Circle(x: x, y: y, radius: 20, fill: Color.purple, outline: Color.white, stroke: 2)
        group.append(circle)
    }
}
display.update(group)

for y in stride(from: 0, to: 280, by: 40) {
    for x in stride(from: 0, to: 280, by: 40) {
        let circle = Circle(x: x, y: y, radius: 20, outline: Color.white, stroke: 2)
        group.append(circle)
    }
}

display.update(group)
sleep(ms: 1000)

// Remove all tiles in the group to clear the screen.
while group.getLength() > 0 {
    group.pop()
}
display.update(group)

// Draw a white rectangle used as background later.
let whiteBg = Rect(x: 0, y: 0, width: 240, height: 240, fill: Color.white)
group.append(whiteBg)
display.update(group)
sleep(ms: 1000)

// Create four circles used for animation later.
let circle0 = Circle(x: 10, y: 119, radius: 10, fill: Color.red)
let circle1 = Circle(x: 50, y: 119, radius: 10, fill: Color.lime)
let circle2 = Circle(x: 90, y: 119, radius: 10, fill: Color.blue)
let circle3 = Circle(x: 130, y: 119, radius: 10, fill: Color.magenta)
let circles = [circle0, circle1, circle2, circle3]

// Create a subgroup for the circles.
let circleGroup = Group()
group.append(circleGroup)

while true {
    // Add the circle to the circleGroup and move the circleGroup to display it on the middle of the screen.
    // You will see the circles appear one after another on the screen.
    for i in 0..<circles.count {
        circleGroup.append(circles[i])
        circleGroup.setX(109 - i * 20)
        display.update(group)
        sleep(ms: 1000)
    }

    // Remove the circles from the circleGroup and display the circleGroup on the middle of the screen.
    // You will see circles disappear one by one.
    for i in (0..<circles.count).reversed() {
        circleGroup.remove(circles[i])
        circleGroup.setX(129 - i * 20)
        display.update(group)
        sleep(ms: 1000)
    }
}