MadDisplay
If you have dealt with Adobe photoshop or illustrator, you must be familiar with the operations based on different layers. And that's the point of this library. You can create and group different elements as you like to form a wonderful display.
🔸Introduction
There are four core concepts for this library:
- Bitmap: it stores indexed colors for all pixels. The actual color values are defined in a Palette.
- Palette: it stores all colors that the bitmap needs in order.
- Tile: it combines the bitmap and palette to get colored pixels.
- Group: a group can contain one or several tiles and even groups. It is what you display on a screen.
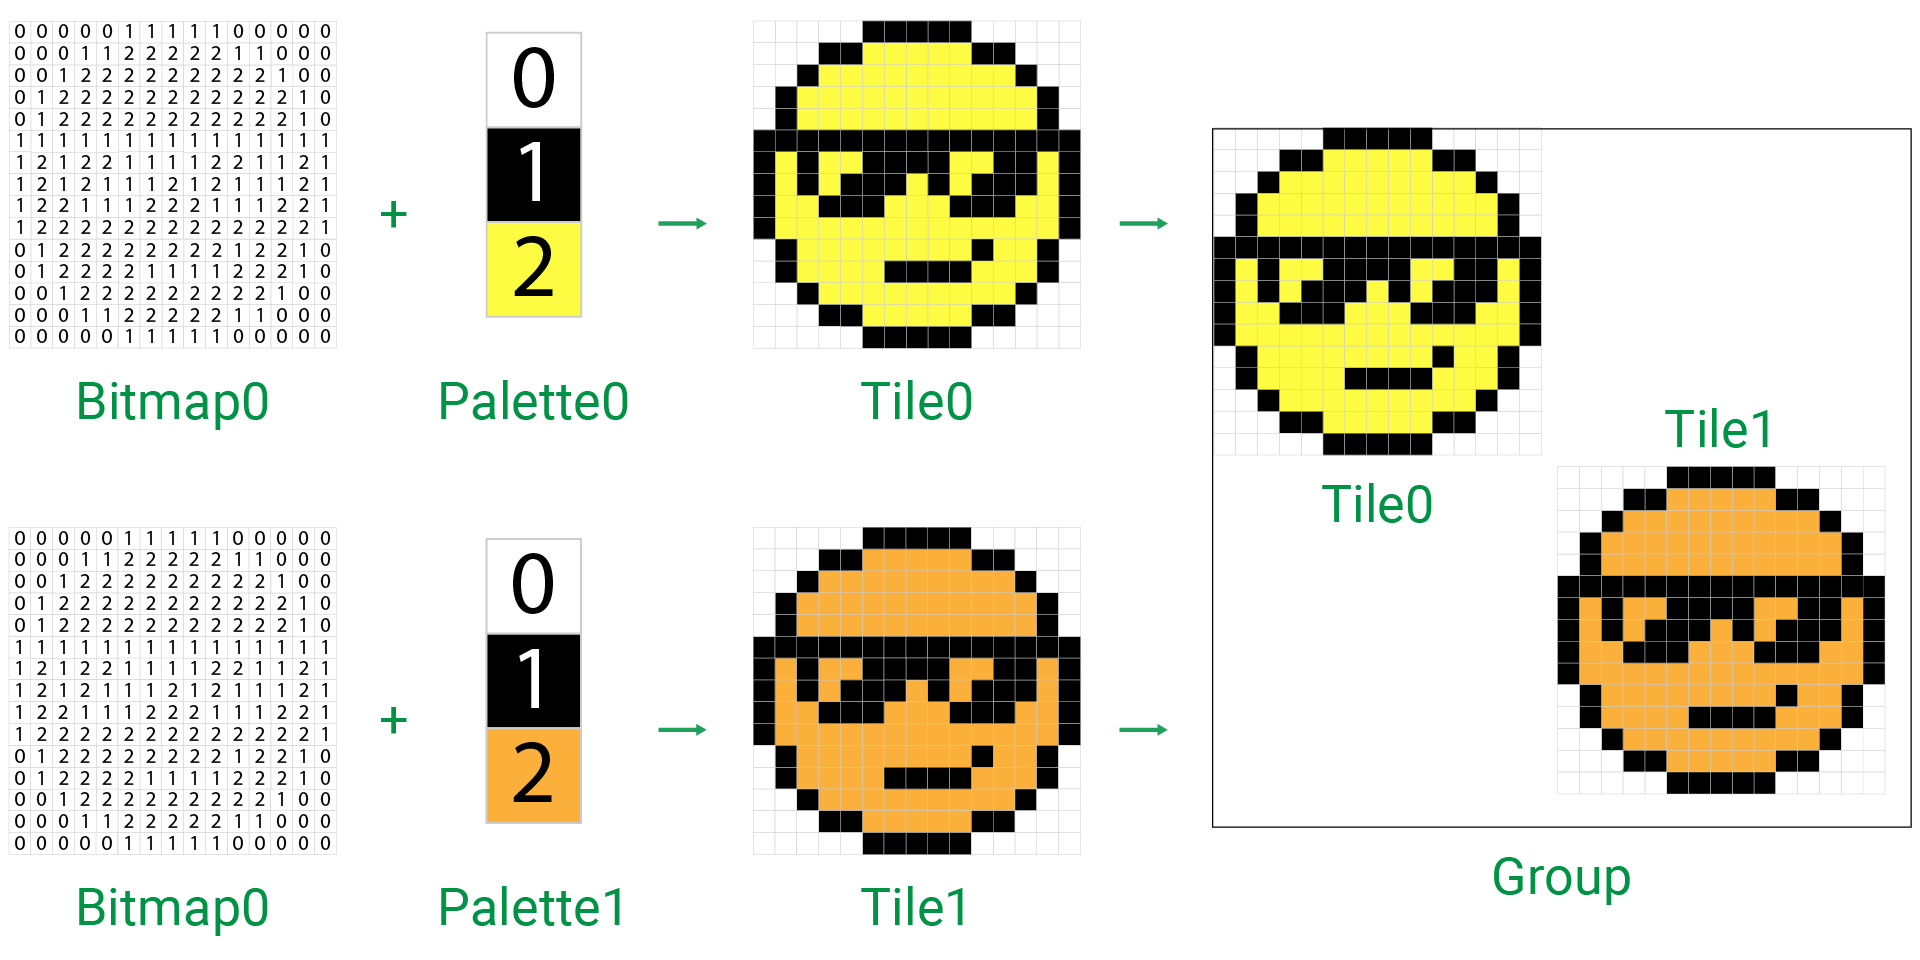
The image below shows how it works in general:
- first create a bitmap where all pixels are filled with indexed colors.
- create a palette with actual colors. Each color has an index that matches with those on the bitmap.
- combine the bitmap and palette to get a tile. All pixels are filled with RGB colors now.
- add tiles (and groups) to a final group. That group contains the graphics in order and wait to be displayed on a screen.

In this way, you can well organize the elements for the display and easily change or move any of the elements without messing up the whole display.
Let's begin with a simple project to understand them better. Here is the sample code:
// Import the SwiftIO library to set SPI communication and MadBoard to use pin id.
import SwiftIO
import MadBoard
// Import the driver for the screen and graphical library for display.
import ST7789
import MadDisplay

// Initialize the pins for the screen.
let spi = SPI(Id.SPI0, speed: 30_000_000)
let cs = DigitalOut(Id.D9)
let dc = DigitalOut(Id.D10)
let rst = DigitalOut(Id.D14)
let bl = DigitalOut(Id.D2)

// Initialize the screen with the pins above.
let screen = ST7789(spi: spi, cs: cs, dc: dc, rst: rst, bl: bl, rotation: .angle90)

// Create an instance using the screen for dispay later.
let display = MadDisplay(screen: screen)

// Create a palette with four colors.
let palette = Palette()
palette.append(Color.white)
palette.append(Color.black)
palette.append(Color.red)
palette.append(Color.yellow)

// Create a bitmap by setting its size and color count.
let bitmap = Bitmap(width: 200, height: 200, bitCount: 2)

// Set the pixels (50,50) to (150,150) with fourth color in the palette.
for x in 50...150 {
    for y in 50...150 {
        bitmap.setPixel(x:x, y:y, 3)
    }
}

// Create a tile with the given bitmap and palette and set its location.
let tile = Tile(x: 20, y: 20, bitmap: bitmap, palette: palette)

// Create a group and append the tile into it.
let group = Group()
group.append(tile)

// Display the group on the screen.
display.update(group)

while true {
    sleep(ms: 1000)
}
After you download the code, you will see the screen as below:
Now, let's break it down to understand how these parts work.
Palette
Palette is an ordered color table that contains all the color values for a bitmap. The index of colors starts from 0.
Class
Palette - this class provides ways to add and change colors for a palette.
| Method | Explanation |
|---|---|
init(count:) | Initialize a palette to store color values. Parameter: - count: the number of colors. The default count is 0 which means an empty palette. |
append(:) | Add color to the end of a palette. Parameter: - color: a color value in UInt32. |
subscript(index:) | Access the color by using its index. It can used to change a specified color in palette with another color. |
Let's say you will create a palette with 4 colors: white, balck, red, yellow.
There are two ways to get the palette:
-
create a palette with four colors in total. By default, all colors are black. Then you replace each color by using its index with the desired color.
let palette = Palette(count: 4)
palette[0] = 0xFFFFFF
palette[1] = 0x000000
palette[2] = 0xFF0000
palette[3] = 0xFFFF00 -
or create an empty palette and then add the colors one by one in order.
let palette = Palette()
palette.append(0xFFFFFF)
palette.append(0x000000)
palette.append(0xFF0000)
palette.append(0xFFFF00)
You may find the colors directly defined by hex value are not so straightforward. You will have to think that the value of red is 0xFF0000 before setting the color. So there is a predefined struct - Color to simplify this process. It contains several commonly used colors. So the statements above can be:
let palette = Palette()
palette.append(Color.white)
palette.append(Color.black)
palette.append(Color.red)
palette.append(Color.yellow)
BTW, maybe you remember that the LCD needs 16-bit colors. However, the colors here are UInt32. Well, RGB888 is the most frequently-used format. Red, green, and blue take respectively 8 bits. The library has done the conversion for you. So you don't need to worry about it.
Bitmap
A bitmap is a collection of pixels. Each pixel stores an index of a palette. Have you seen some coloring books? You use colors with corresponding numbers to paint it. The uncolored original marked with color numbers works similar to the bitmap here.
The width and height of the bitmap decide its size. The bit count decides the total amount of possible colors. It can be 1, 2, 4, 8, 16, 32. If the bit count is 1, a pixel can have 2 possible colors, and the bitmap can use two colors.
Let's look at some of the basic API for this class:
Class
Bitmap - this class is used to create a bitmap and set all its pixels with indexed colors.
| Method | Explanation |
|---|---|
init(width:height:bitCount:) | Initialize a bitmap. Its width and height should not exceed those of the screen. By default, all pixels adopt the first color in a palette. Parameters: - width: the width of the bitmap. - height: the height of the bitmap. - bitCount: the amount of possible colors. |
setPixel(x:y:_:) | Set the color index of a pixel. Parameters: - x and y: coordinates of the pixel. They start from 0, so their maximum values are width-1 and height-1 respectively. - value: a color index in a palette. |
Let's create a bitmap and set pixels using the palette created above.
let bitmap = Bitmap(width: 200, height: 200, bitCount: 2)

for x in 50...150 {
    for y in 50...150 {
        bitmap.setPixel(x:x, y:y, 3)
    }
}
Here the bitmap is 200x200, 40000 pixels in total. It has 4 possible colors (0, 1, 2, 3). By default, all pixels are set to the value of 0, which is the first color of the palette. So they are white by default. Then you set the pixels from (50,50) to (150,150) on the middle of the bitmap and paint them with the fourth color (index 3) in the palette.

Tile
Each pixel on a bitmap has an index whose color info is in a palette. Now it's time to fill the colors. A tile combines them to get colored pixels.
Class
Tile - it sets all pixels of a bitmap to corresponding colors in a palette.
| Method | Explanation |
|---|---|
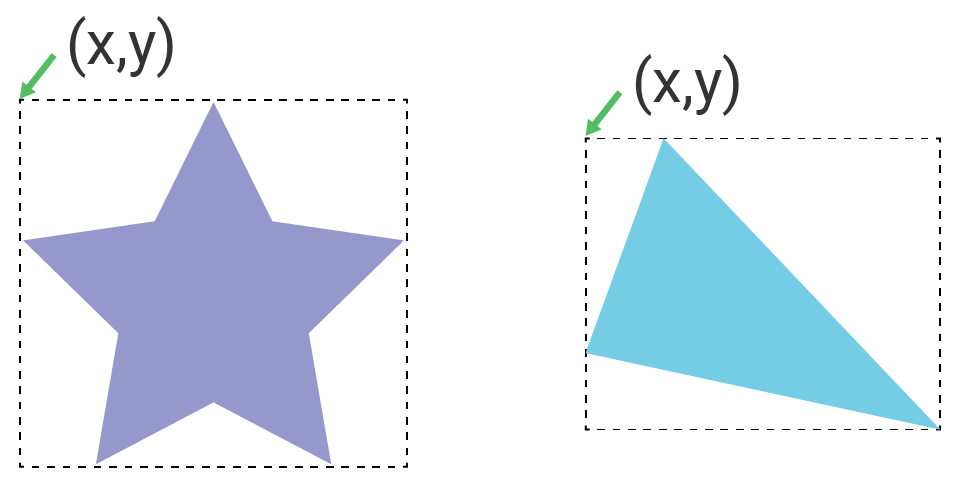
init(x:y:bitmap:palette:) | Initialize a tile with the given bitmap and palette. Parameters: - x, y: the position of the tile by defining the coordinate of the upper left corner, (0,0) by default. - bitmap, tile: the bitmap and its palette to form the tile. |
setX(:_) | Move the tile horizontally. Parameter: - x: the x coordinate of the destination relative to its group to place the tile. It can be positive or negative. |
setY(:_) | Move the tile vertically. Parameter: - y: the y coordinate of the destination relative to its group to place the tile. It can be positive or negative. |
setXY(x:y:) | Set the coordinate of the upper left corner of the tile to move the tile. Parameters: - x, y: the x, y-coordinate of the destination relative to its group to place the tile. They can be positive or negative. |
Let's create a tile using the bitmap and palette above:
let tile = Tile(x: 20, y: 20, bitmap: bitmap, palette: palette)
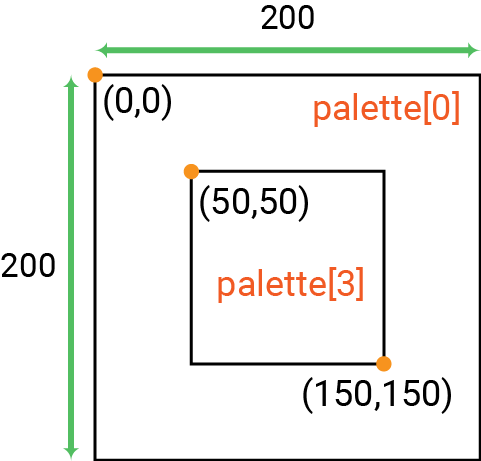
As the image below, the middle area of the tile is in yellow, and the rest is in white. (20,20) decides the tile's position relative to the group to which it belongs.
A bitmap can use different palettes to get different colors. Just like coloring books can be painted with a different combination of colors.
The tile will be added to a group later. A tile's area is always a rectangle, no matter how it looks. The coordinates of the upper left corner decide the position of a tile and can be positive or negative. It is relative to the group to which it belongs.

There are some predefined shapes, such as line, rectangle, circle, etc. They are also tiles. You will look into them in more detail later.
Group
A group is like a container. You add all tiles or other groups to it to arrange them. It is what you will display on a screen at last. With a group, you can control all its content together, for example, resize them, move them, etc. Likewise, in photo or video editing softwares, you group the elements to organize your work and change them more easily.
A tile (or a group) can only belong to one group and cannot be added to several groups.
Class
Group - it allows you to create a group to manage other elements including tiles or groups.
| Method | Explanation |
|---|---|
init(x:y:scale:) | Initialize a group. Parameters: - x and y: the position of the group on the screen. - scale: the scale to resize the group. By default, it's 1, which means the original size. Its value is always an integer and should not be smaller than 1. |
append(_ group:) | Add a subgroup to the group. It will overlap the elements you added before. Parameter: - group: a group to be added. |
append(_ tile:) | Add a tile to the group. It will overlap the elements you added before. Parameter: - tile: a tile to be added. |
let group = Group()
group.append(tile)
It will add the tile to the group. The group is placed on (0,0) by default. While the tile is set to (20,20) relative to group. So their positions are as below:
The group is the final composition of all graphics. It will ont be displayed on the screen.
Display
Finally, it's time for the display. You will use the class MadDisplay to display the group above.
Class
MadDisplay - it allows you to display the specified group on a screen.
| Method | Explanation |
|---|---|
init(screen:colorSpace:) | Initialize a display and get the screen ready. Parameters: - screen: the screen you will use to display the image. It adopts a protocol, and so does the instances of the screen ST7789.- colorSpace: it decides how the pixels on the screen are displayed, including color depth, etc. It is nil, so it will adopt the setting in the screen instance. |
update(_:) | Show the group on the screen. Every time there is a change in the group, you need to update again to show it on the screen. Parameter: - group: the group to be displayed. |
let spi = SPI(Id.SPI0, speed: 30_000_000)
let cs = DigitalOut(Id.D9)
let dc = DigitalOut(Id.D10)
let rst = DigitalOut(Id.D14)
let bl = DigitalOut(Id.D2)

let screen = ST7789(spi: spi, cs: cs, dc: dc, rst: rst, bl: bl, rotation: .angle90)

let display = MadDisplay(screen: screen)

display.update(group)
You need to initialize the screen and pass it to MadDisplay. After updating the display, the screen shows the group.
Any elements added or changed in a group will not show on a screen automatically. You need to update the display again in order to see the changes.
Coordinate
You may notice that bitmap, tile and group all use coordinates. It may seem so confusing at the beginning. Let's get this clear!
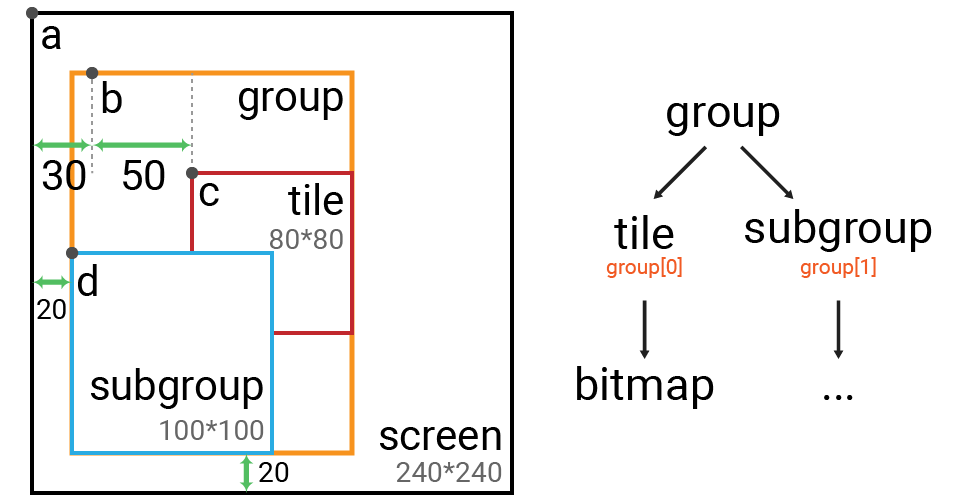
In the image below,
-
the group is what will be displayed on the screen. It contains a tile and a subgroup. Point a is the origin of the screen. The location of the group is set by the coordinates of the point b relative to point a. So b is (30,30).
-
a tile is a colored bitmap, so all its pixels have the same position as its bitmap. Point c is its origin. The tile's location is relative to the group to which it belongs. In other words, the point b serves as its origin and the coordinate of c is relative to b. So it's (50,50) relative to b and (80,80) relative to the screen.
-
the bitmap has its own coordinate system to locate all pixels. The point c is its origin (0,0). All other pixels have coordinates relative to c.
-
Both tile and subgroup are in the group. Their locations in the group are determined respectively by the coordinates of point c and d relative to point b. The coordinate of d is (-10,90) relative to b and (20,120) to the screen. And the subgroup overlaps the tile. You can use group[0] to access the tile and group[1] to access the subgroup.

🔸Projects
1. Random particle animation
In this project, you will see multiple small squares appear randomly on the screen. And their color also changes randomly.
Actually, all squares come from one bitmap. This bitmap is used to generate multiple tiles in different positions.
Example code
// Import the SwiftIO library to set SPI communication and MadBoard to use pin id.
import SwiftIO
import MadBoard
// Import the driver for the screen and graphical library for display.
import ST7789
import MadDisplay

// Initialize the pins for the screen.
let spi = SPI(Id.SPI0, speed: 30_000_000)
let cs = DigitalOut(Id.D9)
let dc = DigitalOut(Id.D10)
let rst = DigitalOut(Id.D14)
let bl = DigitalOut(Id.D2)

// Initialize the screen with the pins above.
let screen = ST7789(spi: spi, cs: cs, dc: dc, rst: rst, bl: bl, rotation: .angle90)

// Create an instance using the screen used to display graphics.
let display = MadDisplay(screen: screen)

// Create a palette with one color.
let palette = Palette()
palette.append(Color.white)

// Create an array of colors used to change the palette later.
let colors = [Color.white, Color.yellow, Color.magenta, Color.lime, Color.cyan]

// Create a bitmap with 10*10 pixels used as a basic element for the display.
let bitmap = Bitmap(width: 10, height: 10, bitCount: 1)

let group = Group()

while true {
    // Generate a random value for new tile's coordinate.
    let x = Int.random(in: 0...239)
    let y = Int.random(in: 0...239)

    // Create a tile with the bitmap and palette.
    // All pixels will be filled with palette[0] be default.
    // Append the tile to the group and display it on the screen.
    let tile = Tile(x: x, y: y, bitmap: bitmap, palette: palette)
    group.append(tile)
    display.update(group)

    // Replace the first color in the palette with a random color in the array.
    // It will change the color of all tiles later.
    palette[0] = colorsrandomElement()!

    sleep(ms: 100)
}
2. Spiral animation
In this second project, squares will appear one by one on the screen following a spiral path. After filling the screen, they will disappear one by one.
Example code
// Import the SwiftIO library to set SPI communication and MadBoard to use pin id.
import SwiftIO
import MadBoard
// Import the driver for the screen and graphical library for display.
import ST7789
import MadDisplay

// Initialize the pins for the screen.
let spi = SPI(Id.SPI0, speed: 30_000_000)
let cs = DigitalOut(Id.D9)
let dc = DigitalOut(Id.D10)
let rst = DigitalOut(Id.D14)
let bl = DigitalOut(Id.D2)

// Initialize the screen with the pins above.
let screen = ST7789(spi: spi, cs: cs, dc: dc, rst: rst, bl: bl, rotation: .angle90)

// Create an instance using the screen used to display graphics.
let display = MadDisplay(screen: screen)

// Store the colors for the palette.
let colors = [Color.red, Color.yellow, Color.lime, Color.cyan, Color.magenta, Color.orange]

// Create a palette and add two colors to it.
let palette = Palette()
palette.append(Color.black)
palette.append(colors.randomElement()!)

// The size of the bitmap, which means the size of the squares that appear on the screen.
var step = 20

// Create a bitmap.
// The middle area will be filled with the second color in the palette.
// So it looks like a colored square with black stroke.
let bitmap = Bitmap(width: step, height: step, bitCount: 1)
for x in (step / 4)...(step / 4 * 3) {
    for y in (step / 4)...(step / 4 * 3) {
        bitmap.setPixel(x: x, y: y, 1)
    }
}

let group = Group()

// The starting coordinate for the tiles.
var xmin = 0
var xmax = 240 - step
var ymin = 0
var ymax = 240 - step

// Create tiles with the given bitmap and palette.
// Add them to the group and update the display.
// So a square appears on the screen at specified position.
func displaySquare(x: Int, y: Int) {
    let tile = Tile(x: x, y: y, bitmap: bitmap, palette: palette)
    group.append(tile)
    display.update(group)
    sleep(ms: 20)
}

// Remove the last tile from the group and repeat it until the group is empty.
// You will see squares disppear from the screen in order.
func removeSquare() {
    while group.getLength() > 0 {
        group.pop()
        display.update(group)
        sleep(ms: 20)
    }
}

while true {
    // A cycle consists of four steps: a row on top, a column at left, a row on bottom, and a column at right.
    // They create a clockwise path.

    for x in stride(from: xmin, to: xmax, by: step) {
        displaySquare(x: x, y: ymin)
    }

    for y in stride(from: ymin, to: ymax, by: step) {
        displaySquare(x: xmax, y: y)
    }

    for x in stride(from: xmax, to: xmin, by: -step) {
        displaySquare(x: x, y: ymax)

    }

    for y in stride(from: ymax, to: ymin, by: -step) {
        displaySquare(x: xmin, y: y)
    }

    // Change the range to draw smaller spiral path.
    xmax -= step
    ymax -= step
    ymin += step
    xmin += step

    // Once the screen is filled, remove the squares one by one anticlockwise.
    // Change the palette's color to change the color for next animation.
    if xmin >= xmax {

        sleep(ms: 200)
        removeSquare()
        sleep(ms: 200)

        xmin = 0
        xmax = 240 - step
        ymin = 0
        ymax = 240 - step

        palette[1] = colors.randomElement()!
    }

}