Mission11_Reproduce_Mission10
This mission is similar to Mission10. You will display the temperature on the LCD. But you will use an external library to realize it.
What you need
The parts you will use are all included in the Maker kit.
- SwiftIO board
- Shield
- Humiture sensor
- 16x2 LCD
- 4-pin cable
Circuit
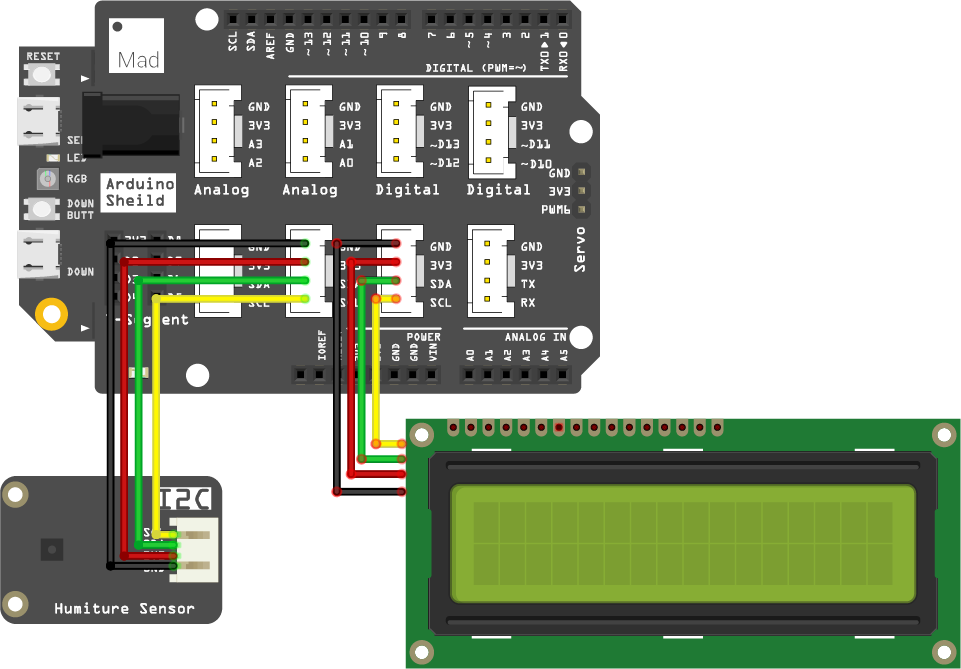
- Plug the shield on top of the SwiftIO board.
- Connect the humiture sensor and the LCD to I2C0. There are three available pins, you could choose any two.

Example code
Open the project Mission11_Reproduce_Mission10 in the folder MadExamples/Examples/MakerKit if you downloaded the folder.
- Mission11_Reproduce_Mission10.swift
- Package.swift
import SwiftIO
import MadBoard

// Import LCD1602 and SHT3x driver from MadDrivers which is an online git repo
import LCD1602
import SHT3x

@main
public struct Mission11_Reproduce_Mission10 {
    public static func main() {
        // Initialize the LCD and sensor to use the I2C communication.
        let i2c = I2C(Id.I2C0)
        let lcd = LCD1602(i2c)
        let sht = SHT3x(i2c)

        while true{
            // Read and display the temperature on the LCD and update the value every 1s.

            let temp = sht.readCelsius()

            lcd.write(x: 0, y: 0, "Temperature:")
            lcd.write(x: 0, y: 1, temp)
            lcd.write(x: 4, y: 1, " ")
            lcd.write(x: 5, y: 1, "C")

            sleep(ms: 1000)
        }
    }
}
// swift-tools-version:5.7
// The swift-tools-version declares the minimum version of Swift required to build this package.
import PackageDescription
let package = Package(
    name: "Mission11_Reproduce_Mission10",
    dependencies: [
        // Dependencies declare other packages that this package depends on.
        .package(url: "https://github.com/madmachineio/SwiftIO.git", branch: "main"),
        .package(url: "https://github.com/madmachineio/MadBoards.git", branch: "main"),
        .package(url: "https://github.com/madmachineio/MadDrivers.git", branch: "main"),
    ],
    targets: [
        // Targets are the basic building blocks of a package. A target can define a module or a test suite.
        // Targets can depend on other targets in this package, and on products in packages this package depends on.
        .executableTarget(
            name: "Mission11_Reproduce_Mission10",
            dependencies: [
                "SwiftIO",
                "MadBoards",
                // use specific library would speed up the compile procedure
                .product(name: "SHT3x", package: "MadDrivers"),
                .product(name: "LCD1602", package: "MadDrivers")
            ]),
        .testTarget(
            name: "Mission11_Reproduce_Mission10Tests",
            dependencies: ["Mission11_Reproduce_Mission10"]),
    ]
)
Code analysis
In the previous mission, the code includes the two files to configure the LCD and humiture sensor. However, there is a more convenient way - using libraries and you don't need to add hardware drivers to your projects.
Simply put, a library contains a block of code for specific functionality. You can import it to any of your projects to realize those functionalities.
Now, you will use the online libraries - LCD1602 and SHT3x in your code. They are in the MadDriver that contains all hardware libraries. You need to indicate its location in the file Package.swift as above. Thus you don't need to add these files to your project and just import them to your code. They will be downloaded automatically when building your project.
The code in the file Mission11_Reproduce_Mission10.swift is the same as that in mission10.
Reference
I2C - use the I2C protocol to communicate with other devices.
LCD1602 - display some characters on a 16x2 LCD.
SHT3x - measure temperature and humidity and communicate using I2C protocol.
MadBoard - find the corresponding pin ids of your board.