Mission9_LCD
If you want to show some messages or display data, an LCD is a great choice. You can find various LCDs. In this mission, you will look at a 16x2 character LCD and display the phrase "Hello World" on it.
What you need
The parts you will need are all included in the Maker kit.
- SwiftIO board
- Shield
- 16x2 LCD
- 4-pin cable
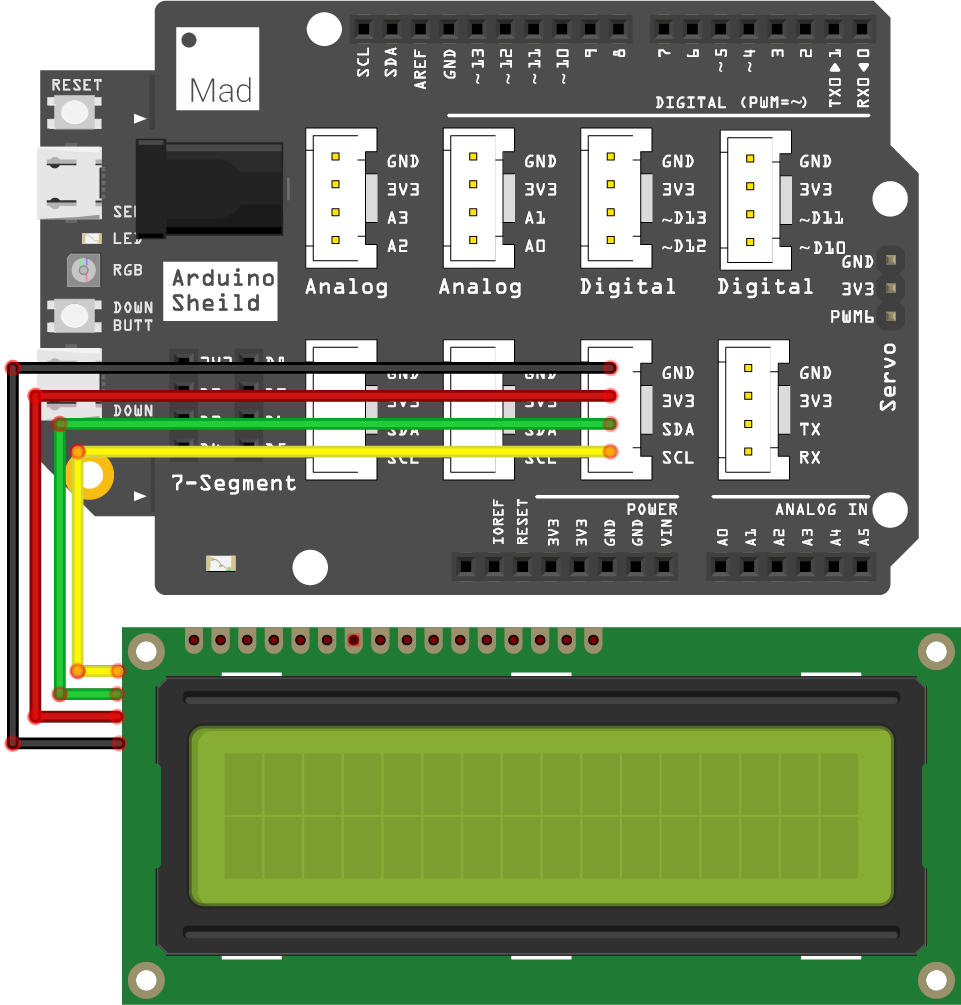
Circuit
- Plug the shield on top of the SwiftIO board.
- Connect the LCD to the pins I2C0. You can see there are three available I2C0. You could choose any of them.
Example code
Open the project Mission9_LCD in the folder MadExamples/Examples/MakerKit if you downloaded the folder.
- Mission9_LCD.swift
- LCD1602.swift
import SwiftIO
import MadBoard

@main
public struct Mission9_LCD {
    public static func main() {
        // Initialize the I2C0 and the lcd.
        let i2c = I2C(Id.I2C0)
        let lcd = LCD1602(i2c)

        // Set the display area and print the message on the LCD.
        lcd.write(x: 0, y: 0, "Hello World!")

        while true {

        }
    }
}
import SwiftIO

final public class LCD1602 {

    private enum Command: UInt8 {
        case clearDisplay   = 0x01
        case returnHome     = 0x02
        case entryModeSet   = 0x04
        case displayControl = 0x08
        case cursorShift    = 0x10
        case functionSet    = 0x20
        case setCGRAMAddr   = 0x40
        case setDDRAMAddr   = 0x80
    }

    private struct FunctionMode: OptionSet {
        let rawValue: UInt8

        static let _4BitMode = FunctionMode([])
        static let _8BitMode = FunctionMode(rawValue: 0x10)

        static let _1Line = FunctionMode([])
        static let _2Line = FunctionMode(rawValue: 0x08)

        static let _5x8Dots = FunctionMode([])
        static let _5x10Dots = FunctionMode(rawValue: 0x04)
    }

    private struct ControlMode: OptionSet {
        let rawValue: UInt8

        static let displayOff = ControlMode([])
        static let displayOn = ControlMode(rawValue: 0x04)

        static let cursorOff = ControlMode([])
        static let cursorOn = ControlMode(rawValue: 0x02)

        static let blinkOff = ControlMode([])
        static let blinkOn = ControlMode(rawValue: 0x01)
    }

    private struct EntryMode: OptionSet {
        let rawValue: UInt8

        static let entryRight = EntryMode([])
        static let entryLeft = EntryMode(rawValue: 0x02)

        static let entryShiftDecrement = EntryMode([])
        static let entryShiftIncrement = EntryMode(rawValue: 0x01)
    }

    private struct ShiftMode: OptionSet {
        let rawValue: UInt8

        static let cursorMove = ShiftMode([])
        static let displayMove = ShiftMode(rawValue: 0x08)

        static let moveLeft = ShiftMode([])
        static let moveRight = ShiftMode(rawValue: 0x04)
    }

    let i2c: I2C
    let address: UInt8

    private var funntionModeConfig: FunctionMode
    private var controlModeConfig: ControlMode
    private var entryModeConfig: EntryMode
    private var shiftModeConfig: ShiftMode

    public init(_ i2c: I2C, address: UInt8 = 0x3E,
                columns: UInt8 = 16, rows: UInt8 = 2, dotSize: UInt8 = 8) {

        guard (columns > 0) && (rows == 1 || rows == 2)
                && (dotSize == 8 || dotSize == 10) else {
            fatalError("LCD1602 parameter error, init failed")
        }

        self.i2c = i2c
        self.address = address

        funntionModeConfig = FunctionMode([])
        controlModeConfig = ControlMode([.displayOn, .cursorOff, .blinkOff])
        entryModeConfig = EntryMode([.entryLeft, .entryShiftDecrement])
        shiftModeConfig = ShiftMode([])

        if rows > 1 {
            funntionModeConfig.insert(._2Line)
        }

        if dotSize != 8 && rows == 1 {
            funntionModeConfig.insert(._5x10Dots)
        }

        writeConfig(funntionModeConfig, to: .functionSet)
        sleep(ms: 5)

        writeConfig(funntionModeConfig, to: .functionSet)
        sleep(ms: 1)

        writeConfig(funntionModeConfig, to: .functionSet)
        writeConfig(funntionModeConfig, to: .functionSet)

        leftToRight()
        noAutoScroll()
        clear()
        turnOn()
    }

    public func clear() {
        writeCommand(.clearDisplay)
        sleep(ms: 2)
    }

    public func home() {
        writeCommand(.returnHome)
        sleep(ms: 2)
    }

    public func turnOn() {
        controlModeConfig.insert(.displayOn)
        controlModeConfig.remove(.displayOff)
        writeConfig(controlModeConfig, to: .displayControl)
    }

    public func turnOff() {
        controlModeConfig.insert(.displayOff)
        controlModeConfig.remove(.displayOn)
        writeConfig(controlModeConfig, to: .displayControl)
    }

    public func cursorOn() {
        controlModeConfig.insert(.cursorOn)
        controlModeConfig.remove(.cursorOff)
        writeConfig(controlModeConfig, to: .displayControl)
    }

    public func cursorOff() {
        controlModeConfig.insert(.cursorOff)
        controlModeConfig.remove(.cursorOn)
        writeConfig(controlModeConfig, to: .displayControl)
    }

    public func cursorBlinkOn() {
        controlModeConfig.insert(.blinkOn)
        controlModeConfig.remove(.blinkOff)
        writeConfig(controlModeConfig, to: .displayControl)
    }

    public func cursorBlinkOff() {
        controlModeConfig.insert(.blinkOff)
        controlModeConfig.remove(.blinkOn)
        writeConfig(controlModeConfig, to: .displayControl)
    }

    public func leftToRight() {
        entryModeConfig.insert(.entryLeft)
        entryModeConfig.remove(.entryRight)
        writeConfig(entryModeConfig, to: .entryModeSet)
    }

    public func rightToLeft() {
        entryModeConfig.insert(.entryRight)
        entryModeConfig.remove(.entryLeft)
        writeConfig(entryModeConfig, to: .entryModeSet)
    }

    public func autoScroll() {
        entryModeConfig.insert(.entryShiftIncrement)
        entryModeConfig.remove(.entryShiftDecrement)
        writeConfig(entryModeConfig, to: .entryModeSet)
    }

    public func noAutoScroll() {
        entryModeConfig.insert(.entryShiftDecrement)
        entryModeConfig.remove(.entryShiftIncrement)
        writeConfig(entryModeConfig, to: .entryModeSet)
    }

    public func scrollLeft() {
        shiftModeConfig.insert([.displayMove, .moveLeft])
        shiftModeConfig.remove([.cursorMove, .moveRight])
        writeConfig(shiftModeConfig, to: .cursorShift)
    }

    public func scrollRight() {
        shiftModeConfig.insert([.displayMove, .moveRight])
        shiftModeConfig.remove([.cursorMove, .moveLeft])
        writeConfig(shiftModeConfig, to: .cursorShift)
    }

    public func clear(x: Int, y: Int, count: Int = 1) {
        guard count > 0 else {
            return
        }

        let data: [UInt8] = [0x40, 0x20]

        setCursor(x: x, y: y)
        for _ in 1...count {
            i2c.write(data, to: address)
        }
        setCursor(x: x, y: y)
    }

    public func setCursor(x: Int, y: Int) {
        guard x >= 0 && y >= 0 else {
            return
        }
        let val: UInt8 = y == 0 ? UInt8(x) | 0x80 : UInt8(x) | 0xc0
        writeCommand(val)
    }

    public func write(x: Int, y: Int, _ str: String) {
        setCursor(x: x, y: y)
        writeData(str)
    }

    public func write(x: Int, y: Int, _ num: Int) {
        write(x: x, y: y, String(num))
    }

    public func write(x: Int, y: Int, _ num: Float, decimal: Int? = 1) {
        if let decimal = decimal {
            if decimal <= 0 {
                write(x: x, y: y, String(Int(num)))
                return
            }

            var mul = 1
            for _ in 0..<decimal {
                mul *= 10
            }
            let expandValue = Int(num * Float(mul))
            write(x: x, y: y, String(Float(expandValue) / Float(mul)))
        } else {
            write(x: x, y: y, String(num))
        }
    }
}

extension LCD1602 {

    private func writeCommand(_ command: Command) {
        writeCommand(command.rawValue)
    }

    private func writeCommand(_ value: UInt8) {
        let data: [UInt8] = [0x80, value]
        i2c.write(data, to: address)
    }

    private func writeConfig<T: OptionSet>(_ config: T, to command: Command) {
        let value = config.rawValue as? UInt8
        guard  value != nil else {
            return
        }
        writeCommand(value! | command.rawValue)
    }

    private func writeData(_ str: String) {
        let bytes: [UInt8] = Array(str.utf8)
        var data: [UInt8] = [0x40, 0]

        for byte in bytes {
            data[1] = byte
            i2c.write(data, to: address)
        }
    }
}
Background
16x2 LCD
This kind of LCD has 16 columns and 2 rows. So it can display 32 characters. Each character consists of 5 columns and 8 rows, that is, 40 pixels.
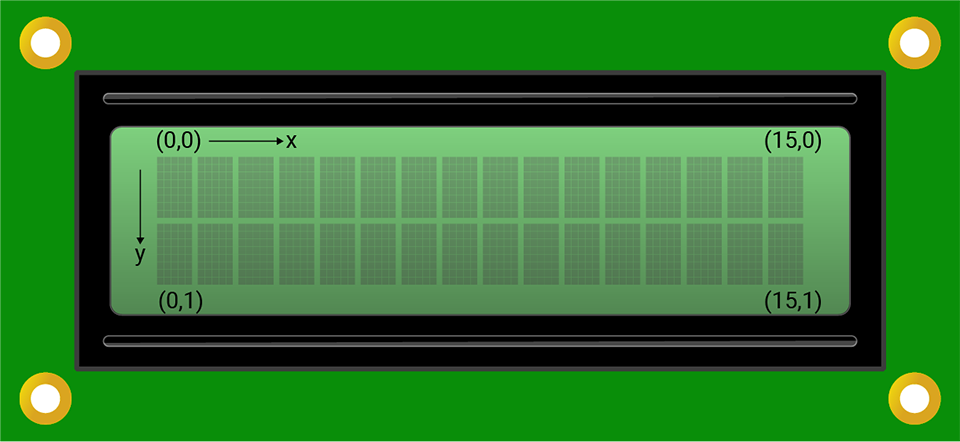
The upper left corner is the origin (0,0). Its coordinate system is as above.
This LCD supports I2C communication. All the commands to control it are in its datasheet. But you don't need to worry about it. The file LCD1602.swift in your project has done the work for you. You can directly use the methods to control your LCD.
I2C
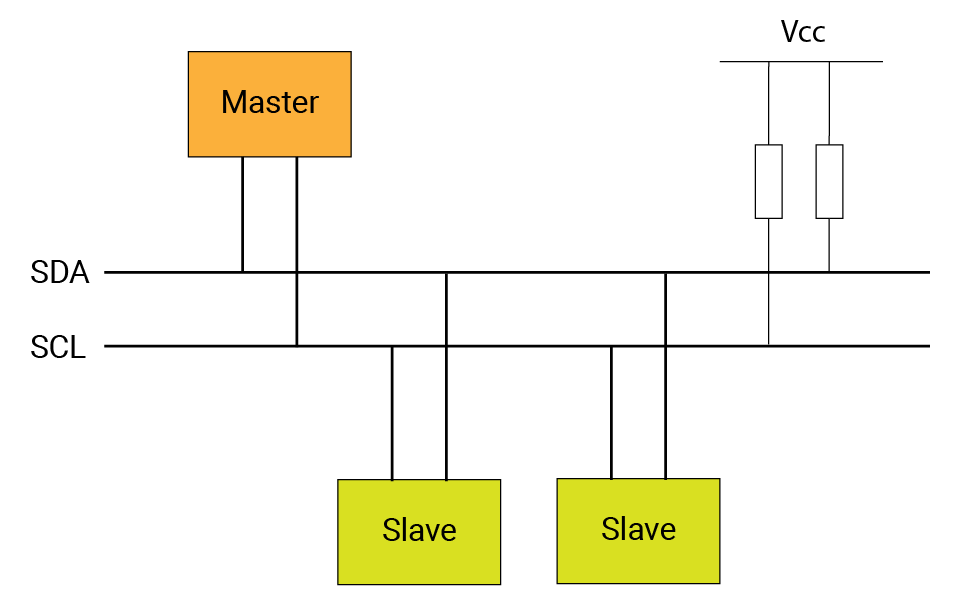
Inter-integrated circuit, I2C (I two C or I squared C) for short, is a protocol suitable for short-distance communication. It allows multiple slave devices to communicate with one master device using merely two wires, which constitutes its advantage compared to other protocols.
For the communication protocols, there are always master and slave devices. Master device controls the communication process. Slave devices would respond to the master device when it's called. In our projects, the SwiftIO board is always the master, and the other devices serve as slaves.
The two wires contain an SCL and an SDA line:
-
SCL (serial clock) carries the clock signal generated by the master. With a preset speed, the devices know the time to transmit each bit and can predict if the data transmission is completed. Thus, it can ensure synchronous data transmission between devices.
-
SDA (serial data) is the data line. All the data is transferred on this line by master or slave devices. And the data is usually in bytes. Each communication protocol specifies its own system about how the data is sent. That's a little complicated, and you don't have to understand it when using it.
Why can only two wires support multiple devices without confusion? That is because each I2C device has its unique address. You can always find it in its datasheet. At the beginning of the communication, the master will send the address of the device that is wanted. Only the corresponding device would respond and prepare for the following process. Thus there won't be confusion among different devices.
In brief, if you want to communicate with some devices, you need to find the corresponding data of the command in the datasheet, then send the data according to the rules of communication protocol.
Code analysis
The file LCD1602.swift has configured the LCD according to its datasheet. It is included in the project, so you can directly use these methods to control your LCD.
Let's look at the file Mission9_LCD.swift.
import SwiftIO
import MadBoard
Import the two libraries: SwiftIO and MadBoard. SwiftIO is used to control the input and output of all boards. MadBoard defines the pin name of the board.
let i2c = I2C(Id.I2C0)
let lcd = LCD1602(i2c)
Initialize the I2C interface. To initialize the LCD, you need to tell the I2C interface, and the other parameters already have a default value.
lcd.write(x: 0, y: 0, "Hello World!")
Then you will use the method write(x:y:_:) to display the string. It has three parameters. At first, you need to set the coordinate of the start point. Here you start from the origin (0,0). The third parameter is the content you would like to display. It is a string. So you add the content within the double quotation marks.
Since the text would always display on the LCD, you can write it above the loop. Even if there is nothing in the loop, you need to add it to your code.
Reference
I2C - use the I2C protocol to communicate with other devices.
MadBoard - find the corresponding pin ids of your board.