Mission6_Seven_Segment_Display
You can see 7-segment displays everywhere used to display digits, like in a timer, clock, etc. In this mission, you are going to learn how it works and show a number on it. Let's start!
What you need
The parts you will need are all included in the Maker kit.
- SwiftIO board
- Shield
- 7-segment display
Circuit
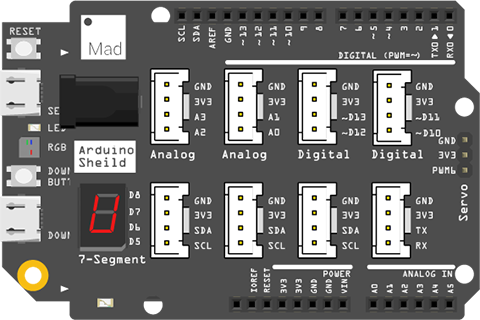
- Plug the shield on top of your SwiftIO board.
- Connect the 7-segment display to the pins reserved for it on the shield, as shown below. Make sure the decimal point is at the bottom.
Example code
Open the project Mission6_Seven_Segment_Display in the folder MadExamples/Examples/MakerKit if you downloaded the folder.
- Mission6_Seven_Segment_Display.swift
- SevenSegment.swift
import SwiftIO
import MadBoard

@main
public struct Mission6_Seven_Segment_Display {
    public static func main() {
        let number = 6
        let sevenSeg = SevenSegment()

        while true {
            sevenSeg.print(number)
        }
    }
}
// Import the SwiftIO library to use everything in it.
import SwiftIO
// Import the board library to use the Id of the specific board.
import MadBoard

final class SevenSegment {
    // Initialize the seven digital pins connected to the segment pins.
    static let a = DigitalOut(Id.D8)
    static let b = DigitalOut(Id.D7)
    static let c = DigitalOut(Id.D6)
    static let d = DigitalOut(Id.D5)
    static let e = DigitalOut(Id.D4)
    static let f = DigitalOut(Id.D2)
    static let g = DigitalOut(Id.D3)
    let leds = [a, b, c, d, e, f, g]

    // Use binary data to store the status of each segment for the numbers 0 - 9.
    // For each data, the last bit represents A and the second bit represents G.
	let ledState: [UInt8] = [
            0b00111111, 0b00000110, 0b01011011, 0b01001111, 0b01100110,
            0b01101101, 0b01111101, 0b00000111, 0b01111111, 0b01101111
        ]

    public func print(_ number: Int) {
        // Get the last digit of the number.
        let num = number % 10
        // Find the corresponding binary data.
        let value = ledState[num]

        // Get the value of each bit to determine whether the relevant segment is on or off.
        for i in 0..<7{
            let state = (value >> i) & 0x01
            if state == 0 {
                leds[i].write(true)
            } else {
                leds[i].write(false)
            }
        }
    }
}
Background
7-segment display
Why is it called a 7-segment display? Yeah, that's because it contains seven segments 🤣. They are A, B, C, D, E, F, G, which are 7 LEDs. You can control them separately.
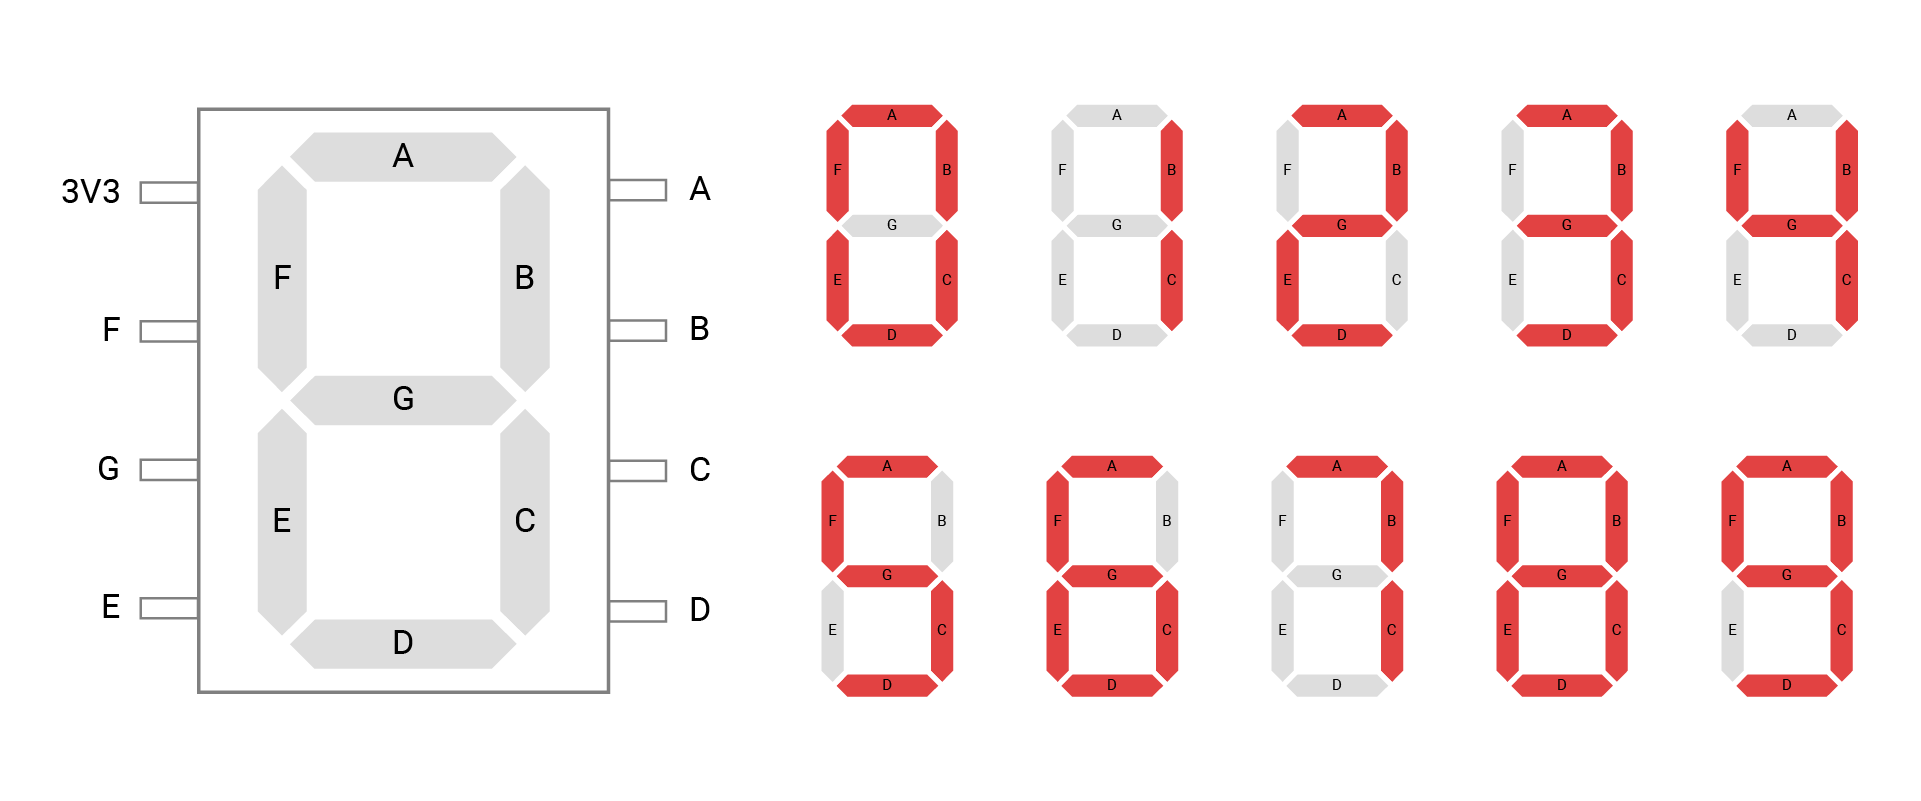
The anodes of 7 LEDs are connected together. You can see a pin for the power connection. If you want A to be illuminated, that pin needs a low voltage.
The image above shows how you can show numbers 0-9 on a seven-segment. For example, to display the number 3, you will turn on A, B, C, D, G, and turn off E, F.
Code analysis
In this mission, you will separate the code into two files. It makes your code more clear and organized.
- The file
SevenSegment.swiftsets the 7-segment display and provides some easy-to-use functionalities. - The file
Mission6_Seven_Segment_Display.swiftshows a digit on the 7-segment display.
SevenSegment.swift
Let's look at this file in detail.
import SwiftIO
import MadBoard
As always, import the necessary libraries: SwiftIO and MadBoard. SwiftIO is used to control the input and output of your board. MadBoard defines the pin ids.
final class SevenSegment {

}
Then you will group the code in a class named SevenSegment. Briefly speaking, the class is like a template to create many instances with similar characteristics. It usually has methods (function in a class) and properties (constant or variable in a class).
A class can be inherited, but with the keyword final, it cannot be inherited any longer.
The class is a reference type. So if you create an instance and assign it to different constants, they all point to the same one. If you change any of the instances, all will change with it. That is why the class is used in your projects. Since the corresponding hardware is unique, any setting will cause changes in the hardware.
static let a = DigitalOut(Id.D8)
static let b = DigitalOut(Id.D7)
static let c = DigitalOut(Id.D6)
static let d = DigitalOut(Id.D5)
static let e = DigitalOut(Id.D4)
static let f = DigitalOut(Id.D2)
static let g = DigitalOut(Id.D3)
Initialize the 7 digital pins. To better identify the segments later, you name these pins as a, b, c... The pins should match the segments, or the final display will go wrong.
The keyword static makes these properties belong to the class, rather than to any instance of the class.
let leds = [a, b, c, d, e, f, g]
To simplify the code, put them into an array. In this way, you can iterate them instead of dealing with them one by one manually.
An array is a collection of ordered values of the same type. To access its element, you can use its index. The index starts from 0. led[0] matches a in the array.
let ledState: [UInt8] = [
    0b00111111, 0b00000110, 0b01011011, 0b01001111, 0b01100110,
    0b01101101, 0b01111101, 0b00000111, 0b01111111, 0b01101111
]
This array stores the LED states of numbers from 0 to 9.
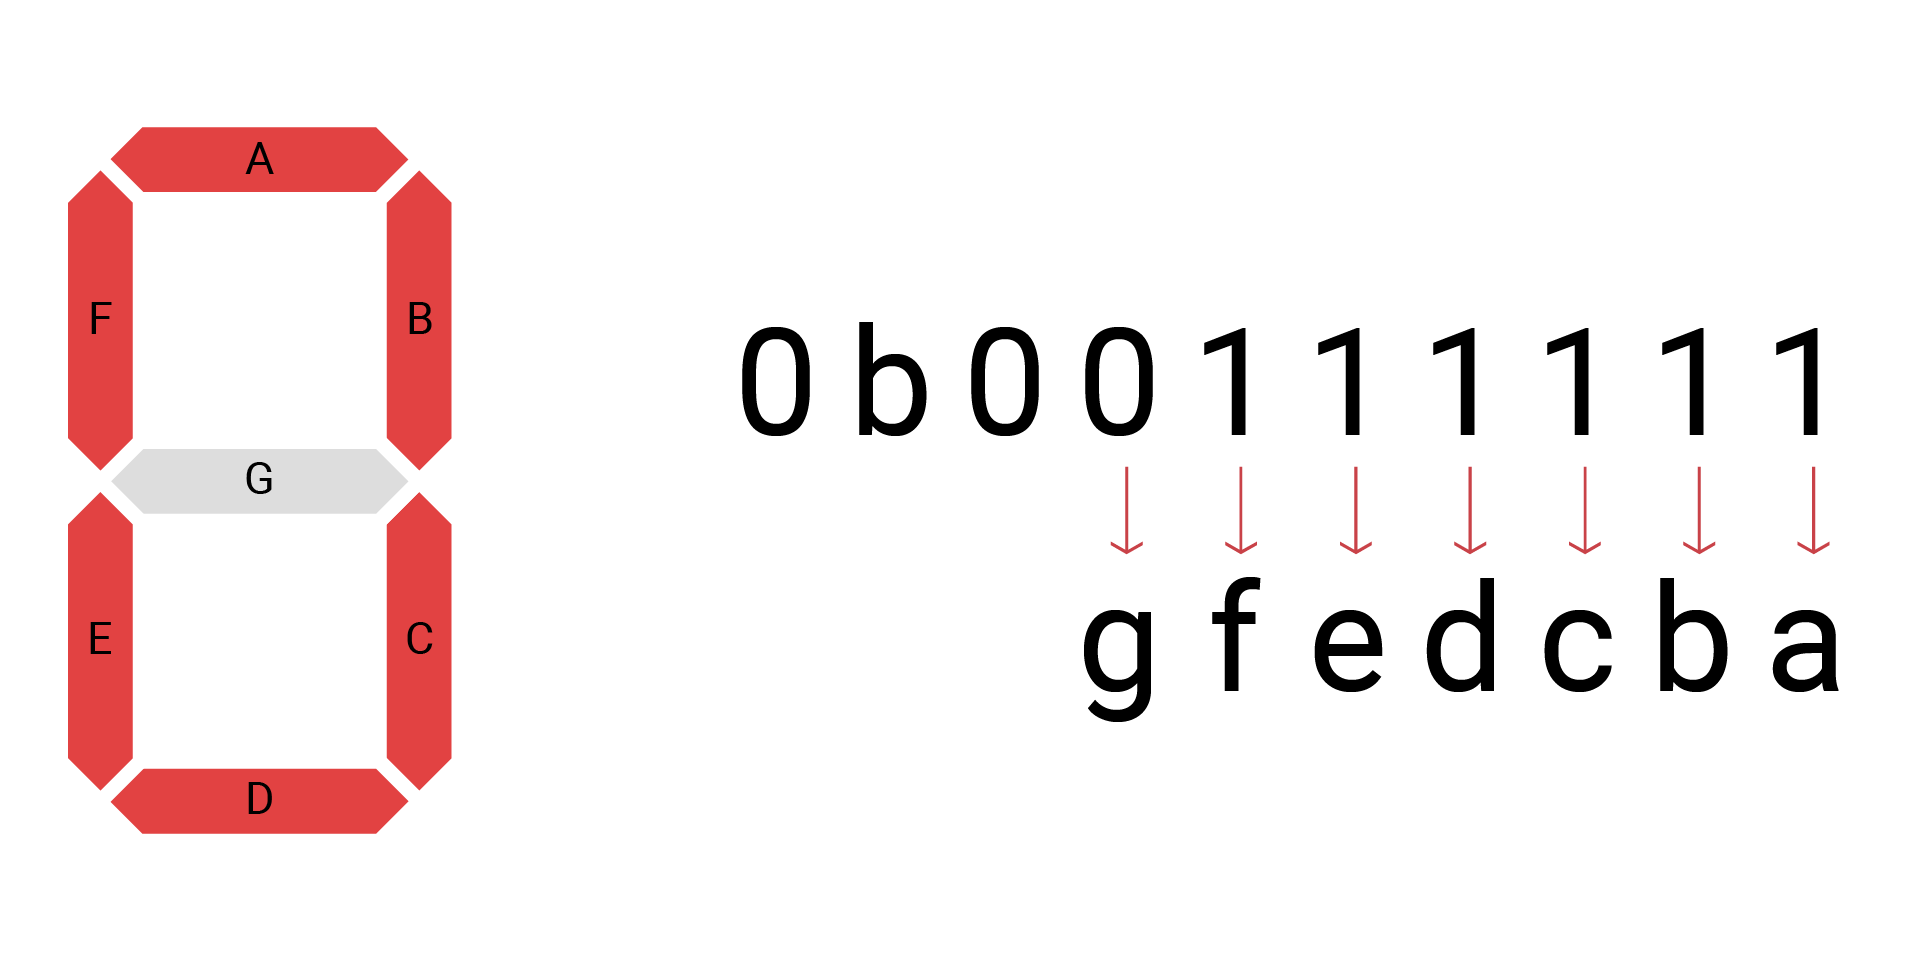
How does it work? There are 7 LEDs in total, so you can use a byte to represent its states. Each bit corresponds to an LED. 1 means the LED is on, 0 means off. The image below shows the digit 0:
- You will start from the least significant bit and reserve that bit for a.
- For digit 0, all segments need to light on except g. So the last seven bits are all 1.
- The most significant bit doesn't match any LED, and you can leave it as 0.
- Then you need to tell the computer the type of this data. So add 0b for binary numbers.
public func print(_ number: Int) {

}
After the preparation above, you are ready to set the 7-segment display.
You will create a method to show the number you pass to it. So it needs only a number as its parameter. The keyword public is used for access control.
let num = number % 10
Declare a constant to store the digit to be displayed. Since the 7-segment display can only show one digit, you use the remainder operator %. The number will be divided by 10 to get the remainder. For example, if the number is 45, num will be 5.
let value = ledState[num]
The num is then used as an index to access the elements in the array ledState. In this way, you get the exact value that stores the states of each LED. If num is 5, the value will be 0b01101101.
for i in 0..<7 {

}
There are 7 LEDs in total, so you will iterate 7 times using a for-in loop. Here you will use the loop with a numeric range. ..< is the half-open range operator, which means i starts from 0 to 7 but doesn't include 7.
At first, i equals 0. After the code inside the brackets is executed, i will be 1 and restarts the code. Then repeat the process until all number is reached.
let state = (value >> i) & 0x01
This statement is to get the value of each bit. Let's look at the operators here:
>>: right shift, all bits will move to the right. The bits on the right will be discarded, and 0 will be added to the empty bits on the left.&: bitwise AND operator, it will calculate each corresponding bit of two data. Only when both two bits are 1, the result will be 1, or it will be 0.
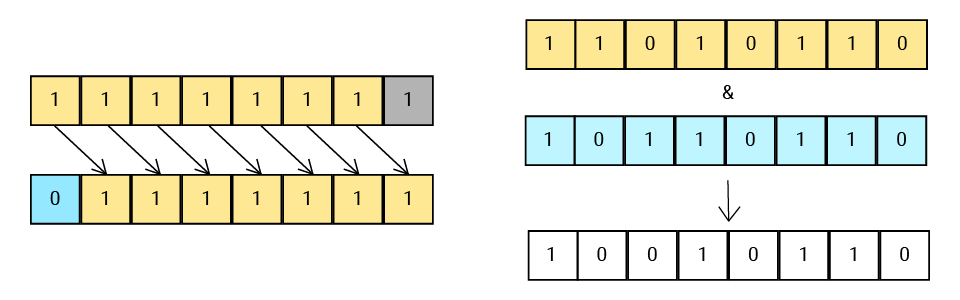
Suppose the value is 0b01011011. At first, i=0, the value doesn't shift and is calculated with 0x01, so the state will be 1, which represents LED a; when i=1, the state equals the last second bit of value, 1, which represents LED b; and so on.

if state == 0 {
    leds[i].write(true)
} else {
    leds[i].write(false)
}
After you get the value of the state, that is, you know the state of the LED, it's time to set the output!
The if-else statement is to decide the output voltage. If the value of state equals 0, write true to turn off the LED. Or, the pin outputs a low voltage to illuminate the LED. As iterating over each bit, the states of all LEDs will be set.
Mission6_Seven_Segment_Display.swift
This file is quite simple since all work related to the 7-segment has been done in the other file. Let's take a quick look.
- Import the libraries.
- Then, of course, set the number you want to display.
- Create an instance of the class
SevenSegment, so you can use its method to display the number. - Use dot syntax to access the method and pass the number to it.
Well, it's done 🥳.
This project uses one way to organize your code. There are still other ways, and you'll look into them later.
Reference
DigitalOut - set whether a digital pin outputs a high or low voltage.
MadBoard - find the corresponding pin ids of your board.