Mission2_RGB_LED
After successfully getting an LED to work, let's try more LEDs. In this project, you'll build your first circuit and make three LEDs blink one after another repeatedly.
What you need
The parts you will need are all included in the Maker kit.
- SwiftIO board
- Breadboard
- Red, green, and blue LEDs
- Resistor
- Jumper wires
Circuit
Let's know something about the breadboard first. The one in the kit is a tiny and simplified version. You can find many holes in it. Each upper or lower five sockets vertically beside the gap in the middle are connected as shown below. It is very convenient for your project prototype.

- Place three LEDs on different columns.
- The long leg of each LED connects to a digital pin: red LED connects to D16, green LED connects to D17, blue LED connects to D18.
- The short leg is connected to a resistor and goes to the pin GND.
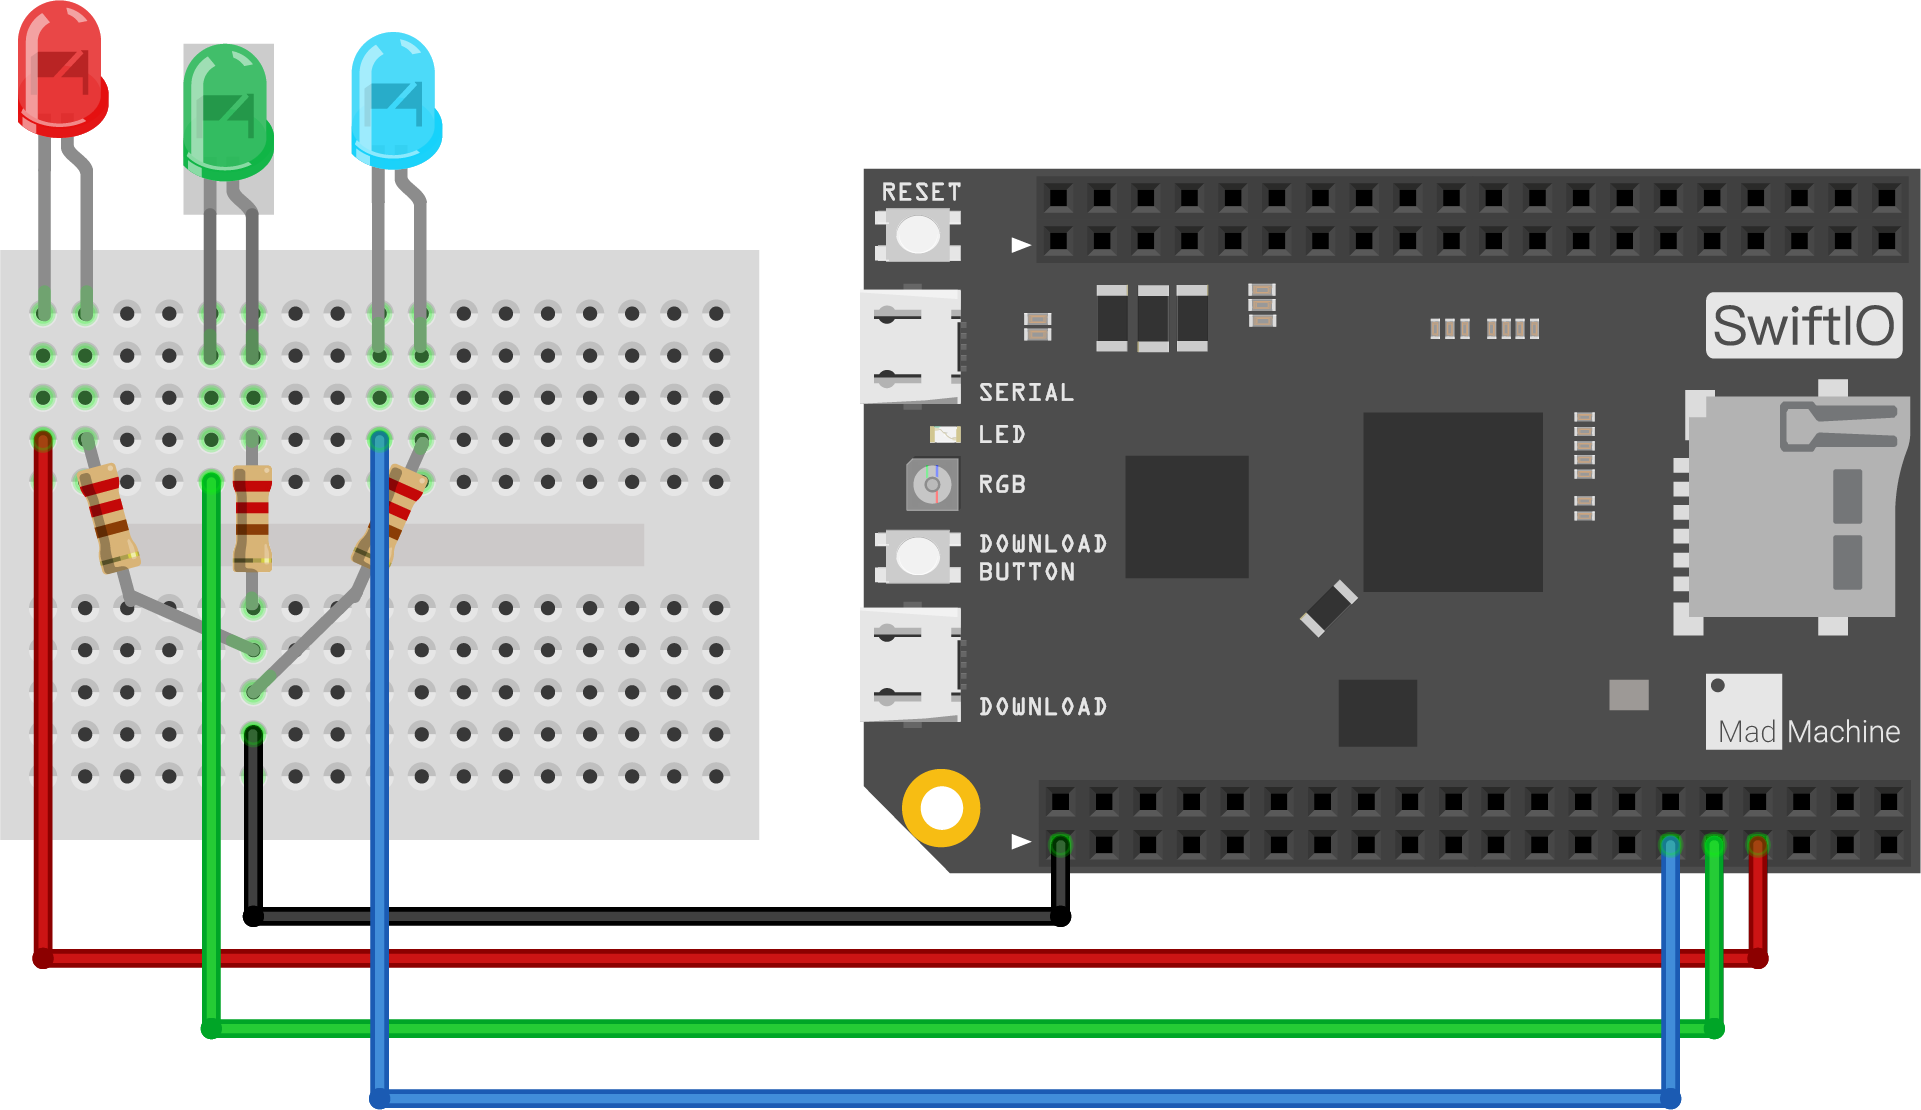
This way of circuit connection requires a high voltage to turn on the LED. Go back to this LED part in the last mission if you forget.
BTW, you can usually find that the red jumper wires are for power, and the black ones are for ground. Of course, it's not a must.
The resistance of the resistor is not absolute, as long as it is bigger than the minimum requirement to resist the voltage. However, the brightness of the LED will be influenced by the resistor: the higher the resistance, the dimmer the LED.
Example code
Open the project Mission2_RGB_LED in the folder MadExamples/Examples/MakerKit if you downloaded the folder.
import SwiftIO
import MadBoard

@main
public struct Mission2_RGB_LED {
    public static func main() {
        // Initialize three LEDs.
        let red = DigitalOut(Id.D16)
        let green = DigitalOut(Id.D17)
        let blue = DigitalOut(Id.D18)

        while true {
            // Turn on red LED for 1 second, then off.
            red.write(true)
            sleep(ms: 1000)
            red.write(false)

            // Turn on green LED for 1 second, then off.
            green.write(true)
            sleep(ms: 1000)
            green.write(false)

            // Turn on blue LED for 1 second, then off.
            blue.high()
            sleep(ms: 1000)
            blue.low()
        }
    }
}
Code analysis
import SwiftIO
import MadBoard
First, import the two libraries: SwiftIO and MadBoard to use everything in it. SwiftIO is used to control the input and output of the board. MadBoard defines the pin name of the board.
let red = DigitalOut(Id.D16)
let green = DigitalOut(Id.D17)
let blue = DigitalOut(Id.D18)
The class DigitalOut allows you to set the pin to output high or low voltage. You need to initialize three output pins: D16, D17, and D18 that the LEDs connect. Only after initialization, the pins can output designated levels. And by default, the pin state is false, which means the three LEDs are off.
while true {
}
To make the LED blink repeatedly, you need to write the code in the dead loop while true. The code inside it will run all the time unless you power off the board.
red.write(true)
sleep(ms: 1000)
red.write(false)
In the loop, you will turn on three LEDs one by one. The operations are similar. Let's look at the red LED.
At first, the pin outputs a high voltage to light the LED. After 1s, turn off the LED with a low voltage. So the LED will be on for 1s and then be turned off.
The following LED turns on immediately and repeats the process above. Thus three LEDs blink in turns.
This is the most direct way to blink these LEDs. You could also write your own code to get the same effect. Furthermore, let's design more interesting light effects!
Reference
DigitalOut - set whether a digital pin outputs a high or low voltage.
sleep(ms:) - suspend the microcontroller's work for a specified time, measured in milliseconds.
MadBoard - find the corresponding pin ids of your board.