Breathing LED
You may notice the breathing light on your phone when a new message comes. It smoothly changes from dark to bright and back to dark. In this project, let's try to realize it using an LED.
What you need
- SwiftIO Micro (or SwiftIO board)
- Breadboard
- LED
- 330ohm resistor
- Jumper wires
Circuit
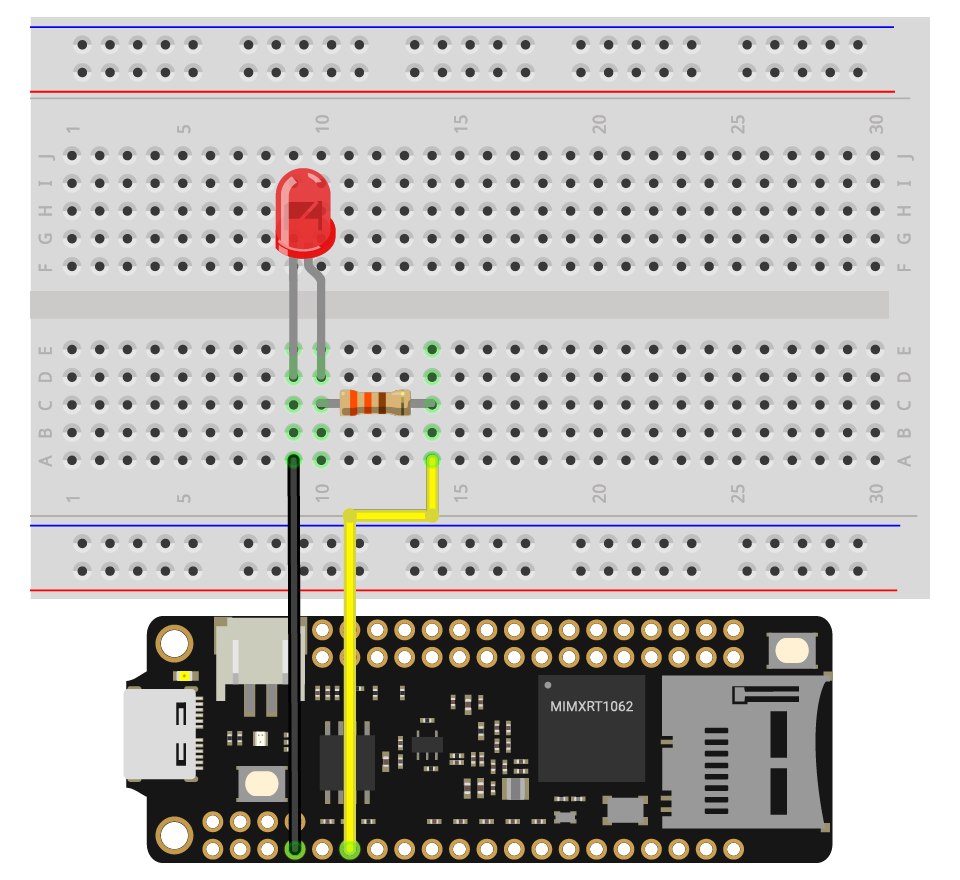
Let's build the circuit as below.
- Place the LED onto the breadboard.
- The long leg (anode) of the LED goes to PWM0A through a resistor.
- The short leg (cathode) of the LED connects to GND.
Example code
Open the project BreathingLED in the folder MadExamples/Examples/GettingStarted if you downloaded the examples.
// Brighten or dim the LED by changing the duty cycle of PWM signal.

// Import the library to enable the relevant classes and functions.
import SwiftIO
import MadBoard

@main
public struct BreathingLED {

    public static func main() {
        // Initialize the PWM pin the LED is connected to, with other parameters set to default.
        let led = PWMOut(Id.PWM0A)

        // Initialize a variable to store the value of duty cycle.
        var value: Float = 0.0

        // Change the brightness from on to off and off to on over and over again.
        while true {
            // Brighten the LED in two seconds.
            while value <= 1.0 {
                led.setDutycycle(value)
                sleep(ms: 20)
                value += 0.01
            }
            // Keep the duty cycle between 0.0 and 1.0.
            value = 1.0

            // Dimming the LED in two seconds.
            while value >= 0 {
                led.setDutycycle(value)
                sleep(ms: 20)
                value -= 0.01
            }
            // Keep the duty cycle between 0.0 and 1.0.
            value = 0.0
        }
    }
}
Background
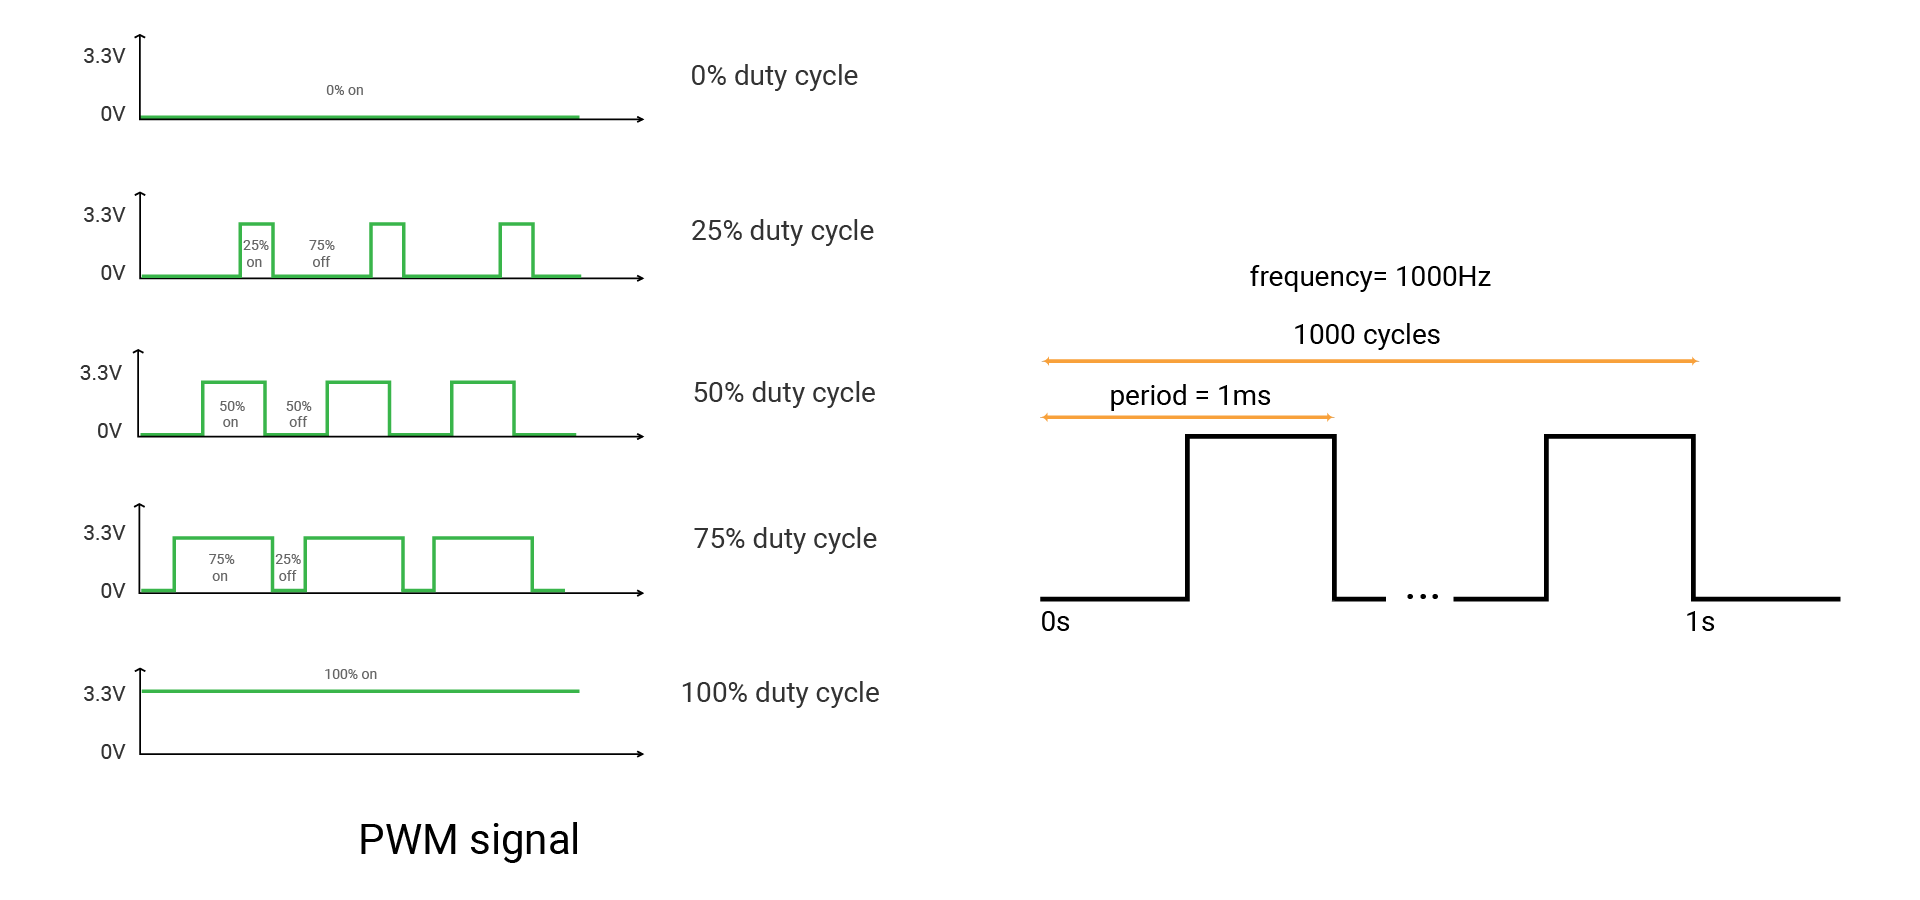
Pulse Width Modulation (PWM)
Pulse Width Modulation (PWM) can simulate analog results digitally. The signal is still a square wave that switches between on and off. The duration of the "on-time" is called the pulse width. So this technique will change the duration of high level relative to low level. In this way, it will simulate the voltage between fully open (3.3 volts) and off (0 volts).
In this case, if you repeat this switching pattern with LEDs fast enough, the signal seems to be a stable voltage between 0 and 3.3v. And the LED would show different brightness.
Now come more concepts. A fixed time period consists of on and off time. The duration or period is the inverse of the PWM frequency. For example, when the PWM frequency is 500 Hz, one period is 2 milliseconds.
The duty cycle is the percentage of on-time of output signal during one period. Its range is 0-1.
- 1 means the output is always on.
- 0 means the voltage is always low.
- And the signal with a 0.5 duty cycle is on for 50% of the time and off for 50% of the time.
Why PWM instead of analog signal?
Unlike incandescent light bulbs, LEDs (and some other devices) can only operate under certain voltages. Lowering the voltage on LEDs wouldn't result in lower brightness. The LED will turn off if the voltage isn't high enough.
However, you can use PWM to control the overall power output of the LEDs. The LED is flashing, but it is imperceptible to your eyes. So it seems that this LED is darker or brighter.
BTW, most mobile phones use the same method to control the brightness of the screen. However, if the flashing frequency is too low (the screen is very dark), it may be harmful to your eyes.
Code analysis
let led = PWMOut(Id.PWM0A)
Initialize the PWM pin that the LED connects to.
You may notice the pin names of PWM are a little strange, with "A" or "B" after the number. That indicates the PWM pins are paired, like PWM3A and PWM3B. Two paired pins can only share the same frequency.
var value: Float = 0.0
The duty cycle would change to adjust the brightness of the LED, so you need a variable to store its value. var is the keyword to declare a variable. Its value can change after it has been assigned.
value is explicitly declared as a floating-point number type. This is very important when the type is easy to be confused. For example, 0.0 may be float or double. Each numeric type has a different range of numbers.
while value <= 1.0 {
    led.setDutycycle(value)
    sleep(ms: 20)
    value += 0.01
}
This while loop increases the duty cycle to gradually brighten the LED.
.setDutyCyclemethod allows you to set the duty cycle of PWM.- Each time, you will increase the value by 0.01.
- The brightening process lasts for 2 seconds.
To ensure a smooth brightness change, you need to set an appropriate value change and sleep time.
value = 1.0
After finishing the first loop, the value is about 1.01. So this statement is to keep it within the specified range.
The second while loop is similar but dims the LED.
Reference
PWMOut - set the PWM signal.
-
init(_:frequency:dutycycle:)- initialize a PWM pin. You need to tell the id of a specified pin to initialize it. The frequency and duty cycle have their default value. You can set their values or change them later. -
setDutycycle(_:)- set the on-time of the signal to change the average voltage.
MadBoard - find the corresponding pin id of your board.