File system
If you use a computer, you're likely familiar with the concept of a file system. By sorting your files into various folders, you can keep everything neat and easy to find. In this tutorial, we'll explore how to use the file system to manage and organize your project files.
Learning goals
- Understand how to download the Resources folder to your board.
- Learn how to read files from SD/flash.
🔸Projects
1. Reading files
Let's begin by reading a text file and a WAV file.
Project overview
- Read a text file and print its content.
- Read a music file and play it using a speaker.
Example code
You can download the project source code here.
import SwiftIO
import MadBoard

@main
public struct ReadingFiles {
    public static func main() {
        let speaker = I2S(Id.I2S0, rate: 16_000)

        do {
            // let file = try FileDescriptor.open("/SD:/Resources/Document/hello.txt")
            let file = try FileDescriptor.open("/lfs/Resources/Document/hello.txt")

            // Repositions the offset to the end of the file.
            // Get the current offset to get file size.
            try file.seek(offset: 0, from: FileDescriptor.SeekOrigin.end)
            let size = try file.tell()

            // Reposition the offset to the beginning of the file and start reading.
            var buffer = [UInt8](repeating: 0, count: size)
            try file.read(fromAbsoluteOffest: 0, into: &buffer)

            print(String(decoding: buffer[0..<size], as: UTF8.self))

            try file.close()
        } catch {
            print(error)
        }

        do {
            // let file = try FileDescriptor.open("/SD:/Resources/Music/twinkle-twinkle-little-star.wav")
            let file = try FileDescriptor.open("/lfs/Resources/Music/twinkle-twinkle-little-star.wav")

            try file.seek(offset: 0, from: FileDescriptor.SeekOrigin.end)

            // WAV file header size.
            let headerSize = 0x2C
            let size = try file.tell() - headerSize

            var buffer = [UInt8](repeating: 0, count: size)
            try file.read(fromAbsoluteOffest: headerSize, into: &buffer, count: size)

            try file.close()

            speaker.write(buffer)
        } catch {
            print(error)
        }

        while true {
        sleep(ms: 1000)
        }
    }
}
2. Writing CSV file
CSV (Comma-Separated Values) is a simple file format used to store tabular data. In this project, you will store temperature readings in a CSV file along with the corresponding time.
Project overview
- Read the time and temperature at the start of every minute, when the seconds value is 0.
- Write these values to the CSV file in the appropriate format.
- Read the CSV file and print its content.
Example code
You can download the project source code here.
import SwiftIO
import MadBoard
import SHT3x
import PCF8563

@main
public struct WritingCSVFile {
    public static func main() {
        let i2c = I2C(Id.I2C0)
        let humiture = SHT3x(i2c)
        let rtc = PCF8563(i2c)

        // Update the RTC time if it is not current.
        let currentTime = PCF8563.Time(
            year: 2024, month: 6, day: 3, hour: 15,
            minute: 0, second: 0, dayOfWeek: 0
        )
        rtc.setTime(currentTime)

        var written = false

        do {
            // Create a csv file on SD card.
            let file = try FileDescriptor.open("/SD:/temperature.csv", options: .create)
            // Create a table header.
            try file.write("Time, Temperature\n")
            try file.close()
        } catch {
            print(error)
        }

        while true {
            let time = rtc.readTime()

            // Read and store the temperature at the start of every minute.
            if time.second == 0 && !written {
                do {
                    let file = try FileDescriptor.open("/SD:/temperature.csv")
                    // Move file offset to the end in order to store new values.
                    try file.seek(offset: 0, from: FileDescriptor.SeekOrigin.end)

                    // Write time and temperature to the csv file.
                    // CSV uses commas to separate values and newlines to separate records.
                    let temp = humiture.readCelsius()
                    let string = formatDateTime(time) + ", " + String(temp) + "\n"
                    try file.write(string)

                    // Read the file content and print it out.
                    let size = try file.tell()
                    var buffer = [UInt8](repeating: 0, count: size)
                    try file.read(fromAbsoluteOffest: 0, into: &buffer)
                    print(String(decoding: buffer, as: UTF8.self))

                    try file.close()
                } catch {
                    print(error)
                }
                written = true
            } else if time.second == 59 && written {
                written = false
            }

            sleep(ms: 10)
        }

        func formatNum(_ number: UInt8) -> String {
            return number < 10 ? "0\(number)" : "\(number)"
        }

        func formatDateTime(_ time: PCF8563.Time) -> String {
            var string = ""
            string += "\(time.year)" + "/" + formatNum(time.month) + "/" + formatNum(time.day) + " "
            string += formatNum(time.hour) + ":" + formatNum(time.minute) + ":" + formatNum(time.second)
            return string
        }
    }
}
3. Album
In this project, we'll create a digital photo album and display your photo on the screen.
Project overview
- Get a binary file of your photo.
- Read the image data and send it to the screen to display the photo.
Example code
You can download the project source code here.
import SwiftIO
import MadBoard
import ST7789

@main
public struct Album {
    public static func main() {
        let bl = DigitalOut(Id.D2)
        let rst = DigitalOut(Id.D12)
        let dc = DigitalOut(Id.D13)
        let cs = DigitalOut(Id.D5)
        let spi = SPI(Id.SPI0, speed: 30_000_000)
        let screen = ST7789(spi: spi, cs: cs, dc: dc, rst: rst, bl: bl, rotation: .angle90)

        // Read the image from the specified path and display it on the screen.
        do {
            // You can get the binary file of your photo here: https://lvgl.io/tools/imageconverter.
            // The output format should be Binary RGB565 Swap.
            let file = try FileDescriptor.open("/lfs/Resources/Photo/cat.bin")

            var buffer = [UInt16](repeating: 0, count: 240 * 240)

            try buffer.withUnsafeMutableBytes() {
                try file.read(fromAbsoluteOffest: 0, into: $0)
            }

            screen.writeScreen(buffer)

            try file.close()
        } catch {
            print(error)
        }

        while true {
            sleep(ms: 1000)
        }
    }
}
The Online Image Converter on the LVGL website allows you to convert your image to a binary file with raw pixel data. The data can be directly used to draw on a screen. Ensure that the output format matches the screen, which is Binary RGB565 Swap.
🔸API
FileDescriptor
This class allows you to read from and write to a file specified by its file path.
static func open(
    _ path: String,
    _ mode: FileDescriptor.AccessMode = .readWrite,
    options: FileDescriptor.OpenOptions = FileDescriptor.OpenOptions()
) throws -> FileDescriptor
Open or create the file located at the specified path. To create a file, set options to .create. Ensure the directory exists at the given path.
Parameter:
path: the file pathmode: the read and write access to use.options: the behavior for opening the file.
Return value:
- A FileDescriptor for the file.
func read(
    fromAbsoluteOffest offset: Int,
    into buffer: inout [UInt8],
    count: Int? = nil
) throws -> Int
Reads bytes at the specified offset from the file.
Parameter:
offset: the file offset where reading begins.buffer: the buffer to read into.count: the number of bytes to read. If nil, it equals the buffer count.
Return value:
- The number of bytes that were read.
func write(_ string: String) throws -> Int
Writes a string at the current file offset.
Parameter:
string: a string to write.
Return value:
- The number of bytes that were written.
func close() throws
Close the file.
func seek(
    offset: Int,
    from whence: FileDescriptor.SeekOrigin = .start
) throws -> Int
Reposition the file offset. The file's current offset will be whence + offset.
Parameter:
offset: the number of bytes to seek.whence: the reference position used to calculate the new offset:start,endorcurrent.
Return value:
- 0 on success or an error code on failure.
func tell() throws -> Int
Get the current offset.
Return value:
- Current file offset.
🔸Background
File system
Just like a real cabinet helps you organize your physical items, a file system is essential for managing your digital content.
Think of folders as virtual drawers in your digital cabinet. You can group related files together in a folder to keep everything tidy and easy to access. For instance, you might have a "Photos" folder for all your pictures or a "Documents" folder for your work files. With an organized file system, you can quickly locate files based on their names or their folder locations.
In projects, we use the file system to manage resource files like music, images, fonts and more. You have the option to store these resource files either on the onboard flash or on an SD card.
- Onboard Flash: The SwiftIO Micro's onboard flash stores the binary file for your project. Additionally, it offers around 8MB of space for a filesystem, mounted at
/lfs. - SD Card: Alternatively, you can utilize an SD card with the board. SD cards typically come with a built-in file system, such as FAT16, FAT32, or exFAT, mounted at
/SD:.
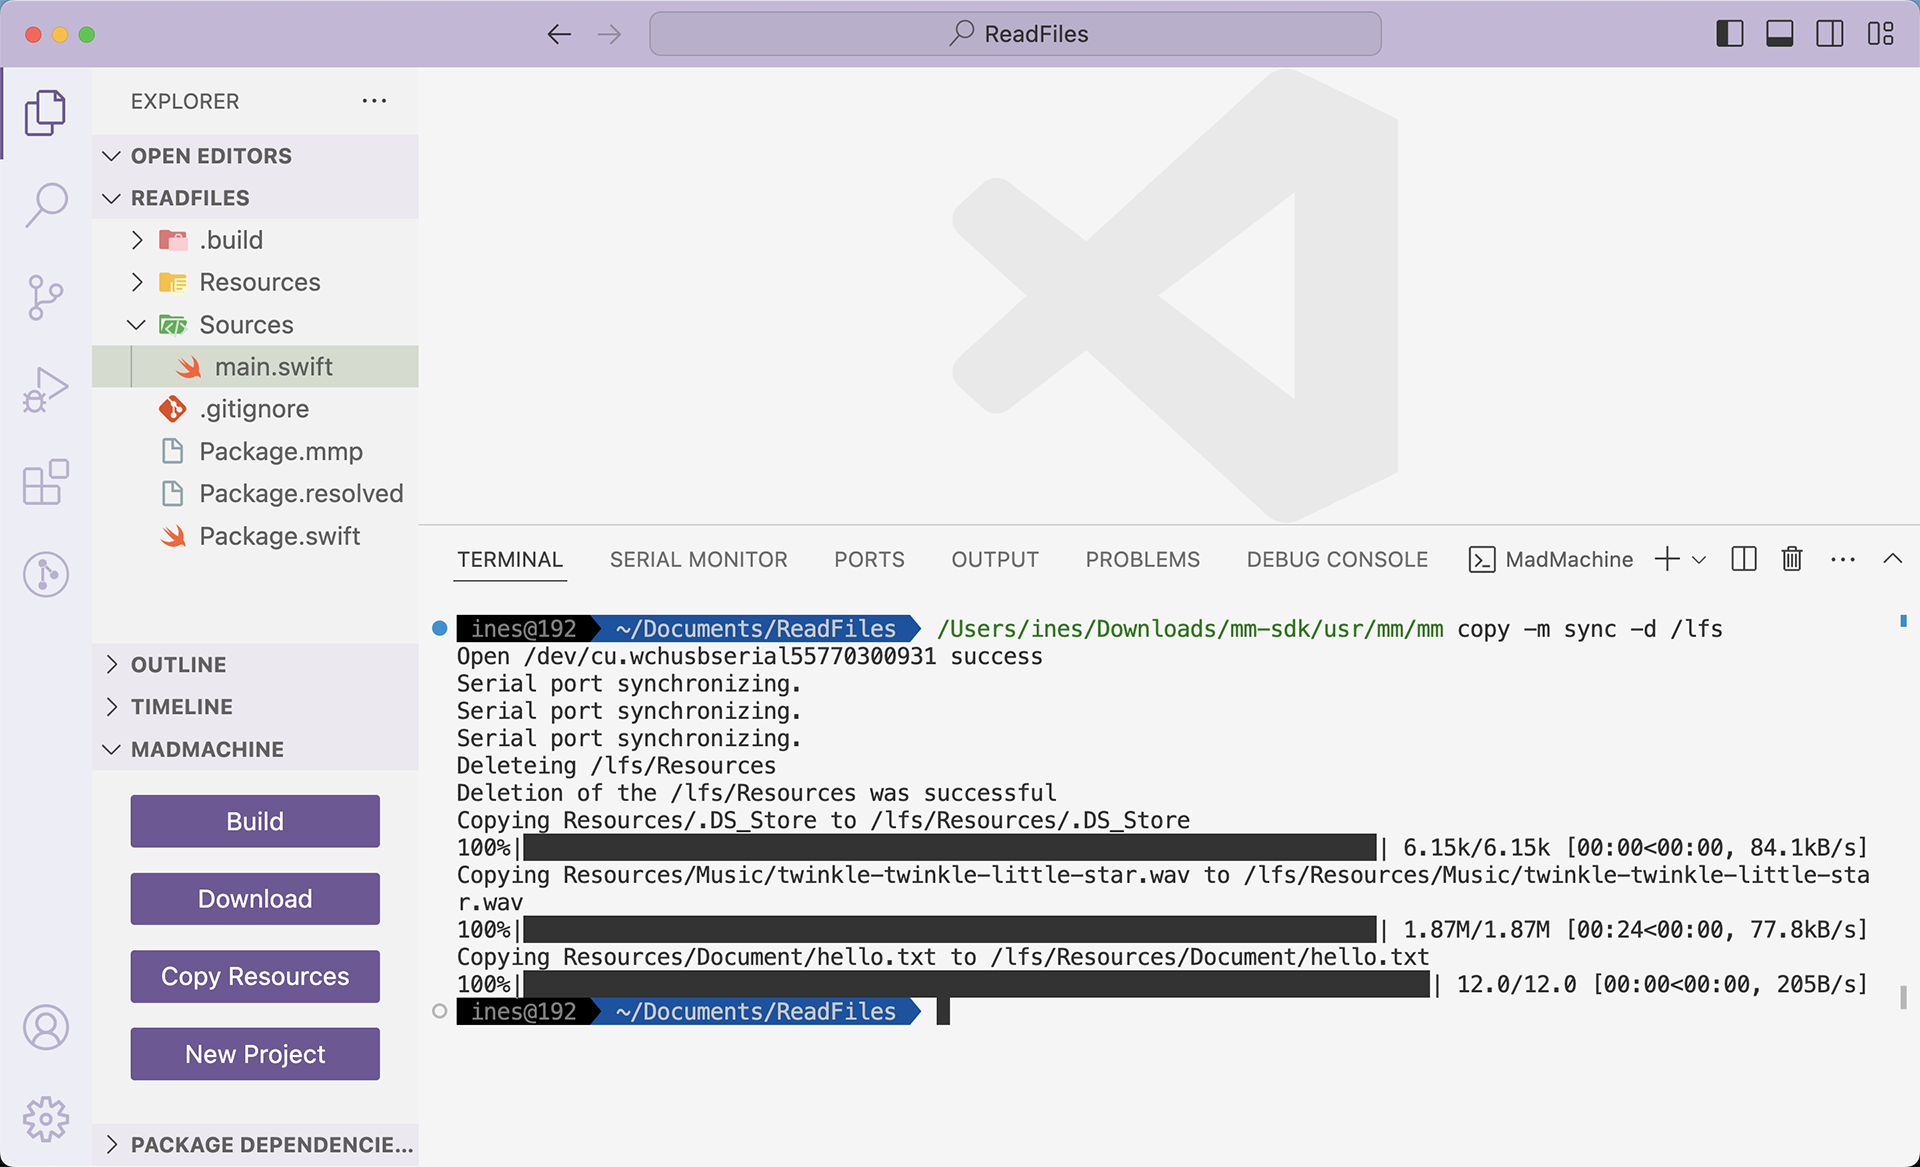
How to download resources
- Create a Resources folder within your project folder to store all necessary files.
- Click the Copy Resources button in the MadMachine extension to copy the entire Resources folder to your desired location.

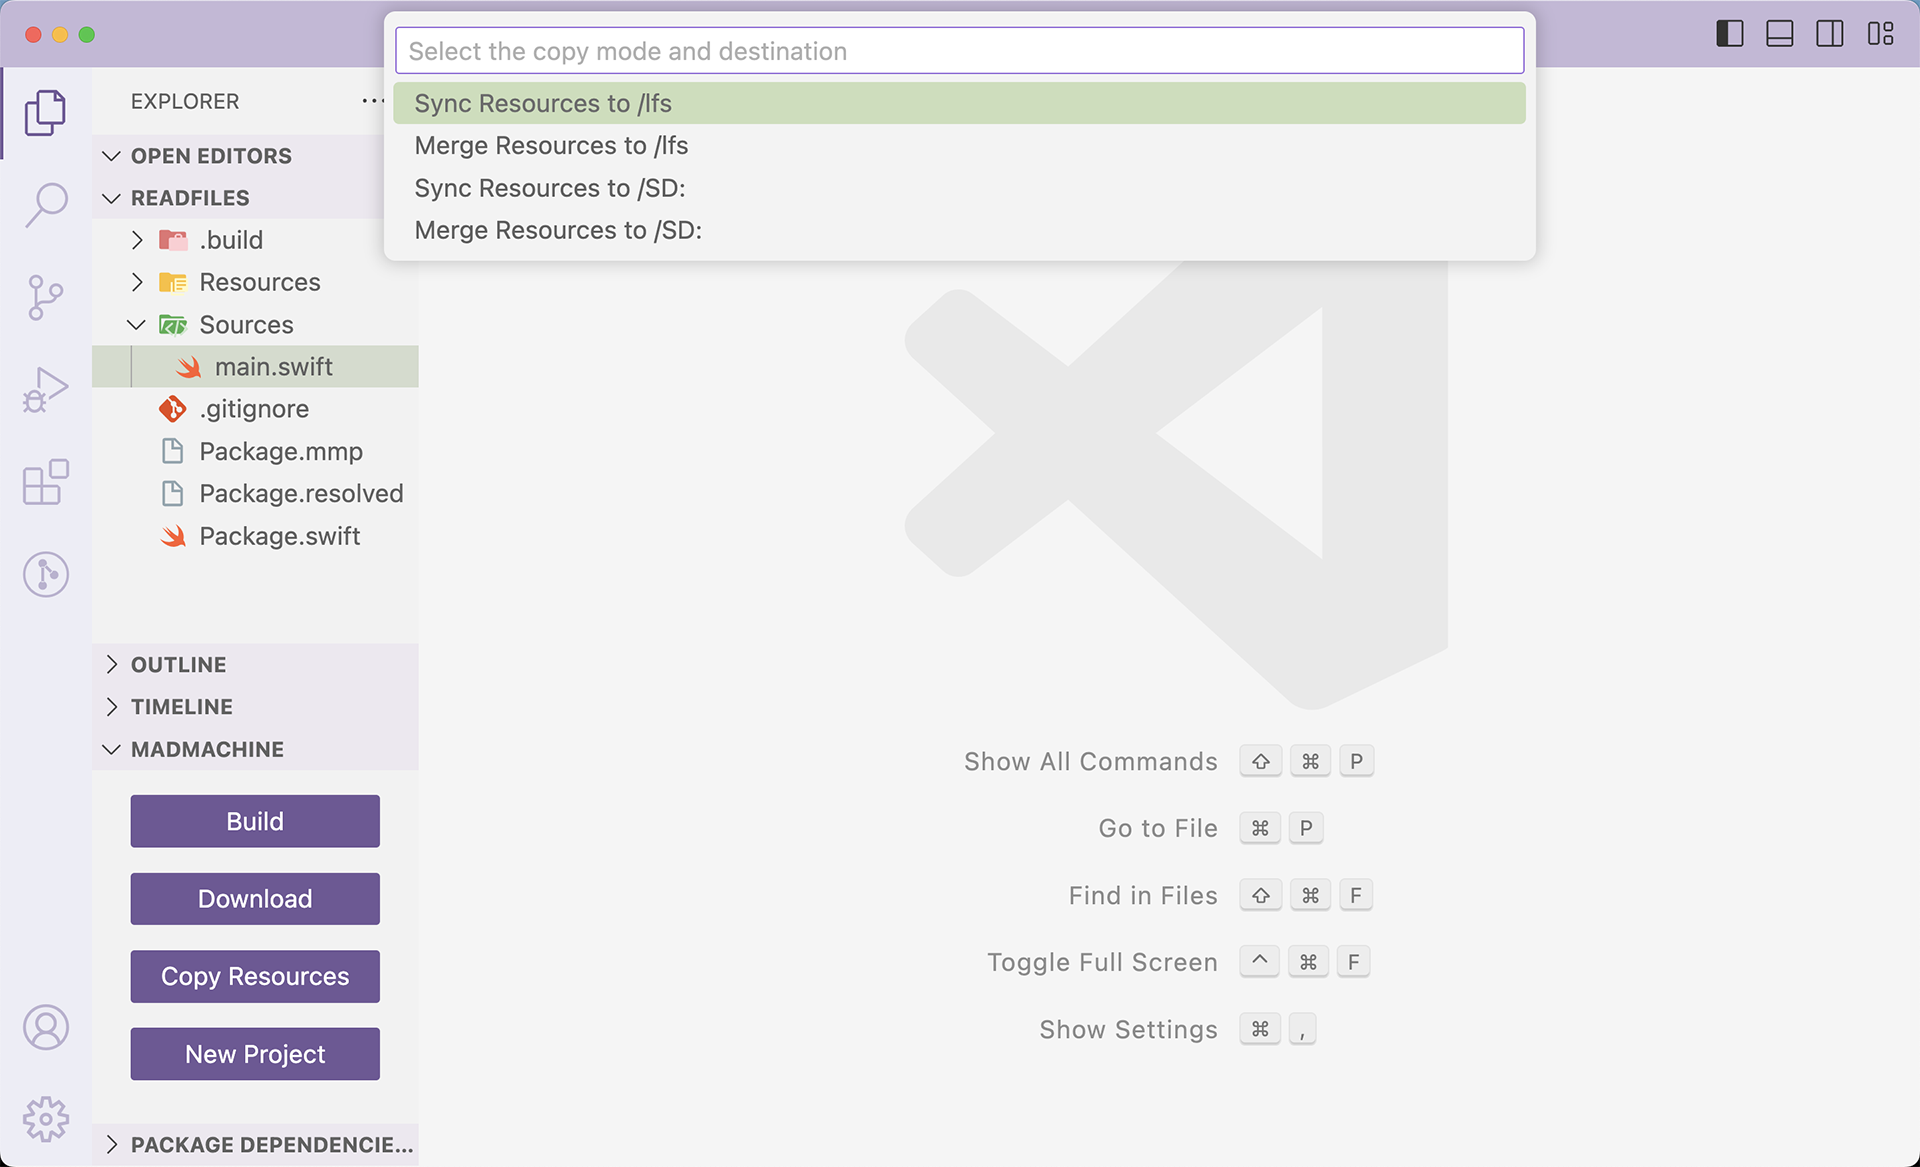
- Choose the destination for your resources:
- flash: mounted at
/lfs. - SD card: mounted at
/SD:.
There are two modes to copy resources to the specified location:
- sync: ensures that the Resources folder on the destination becomes an exact replica of the source by copying new files, updating existing ones, and deleting any extra files in the destination.
- merge: updates the Resources folder on the destination with new and changed files from the source while keeping any extra files in the destination.
After a while, your resources will be successfully downloaded.