LED Control with Buttons
The button is a commonly used input component and is widely used in a light switch, remote control, keyboard, etc, to control the current flow in the circuit. Now it's your turn to build a LED light control using a button. In this tutorial, you'll try different ways to control an LED.
Learning goals
- Know about digital input and the GPIO peripheral.
- Understand how to use a button in your circuit.
- Learn about the pull-up and pull-down resistors.
- Get a rough idea of interrupt and debounce.
- Learn how to detect button states.
- Try to control the LED using the button(s) in different ways.
🔸Circuit - Button
There are two buttons on your kit. They are connected respectively to D1 and D19.
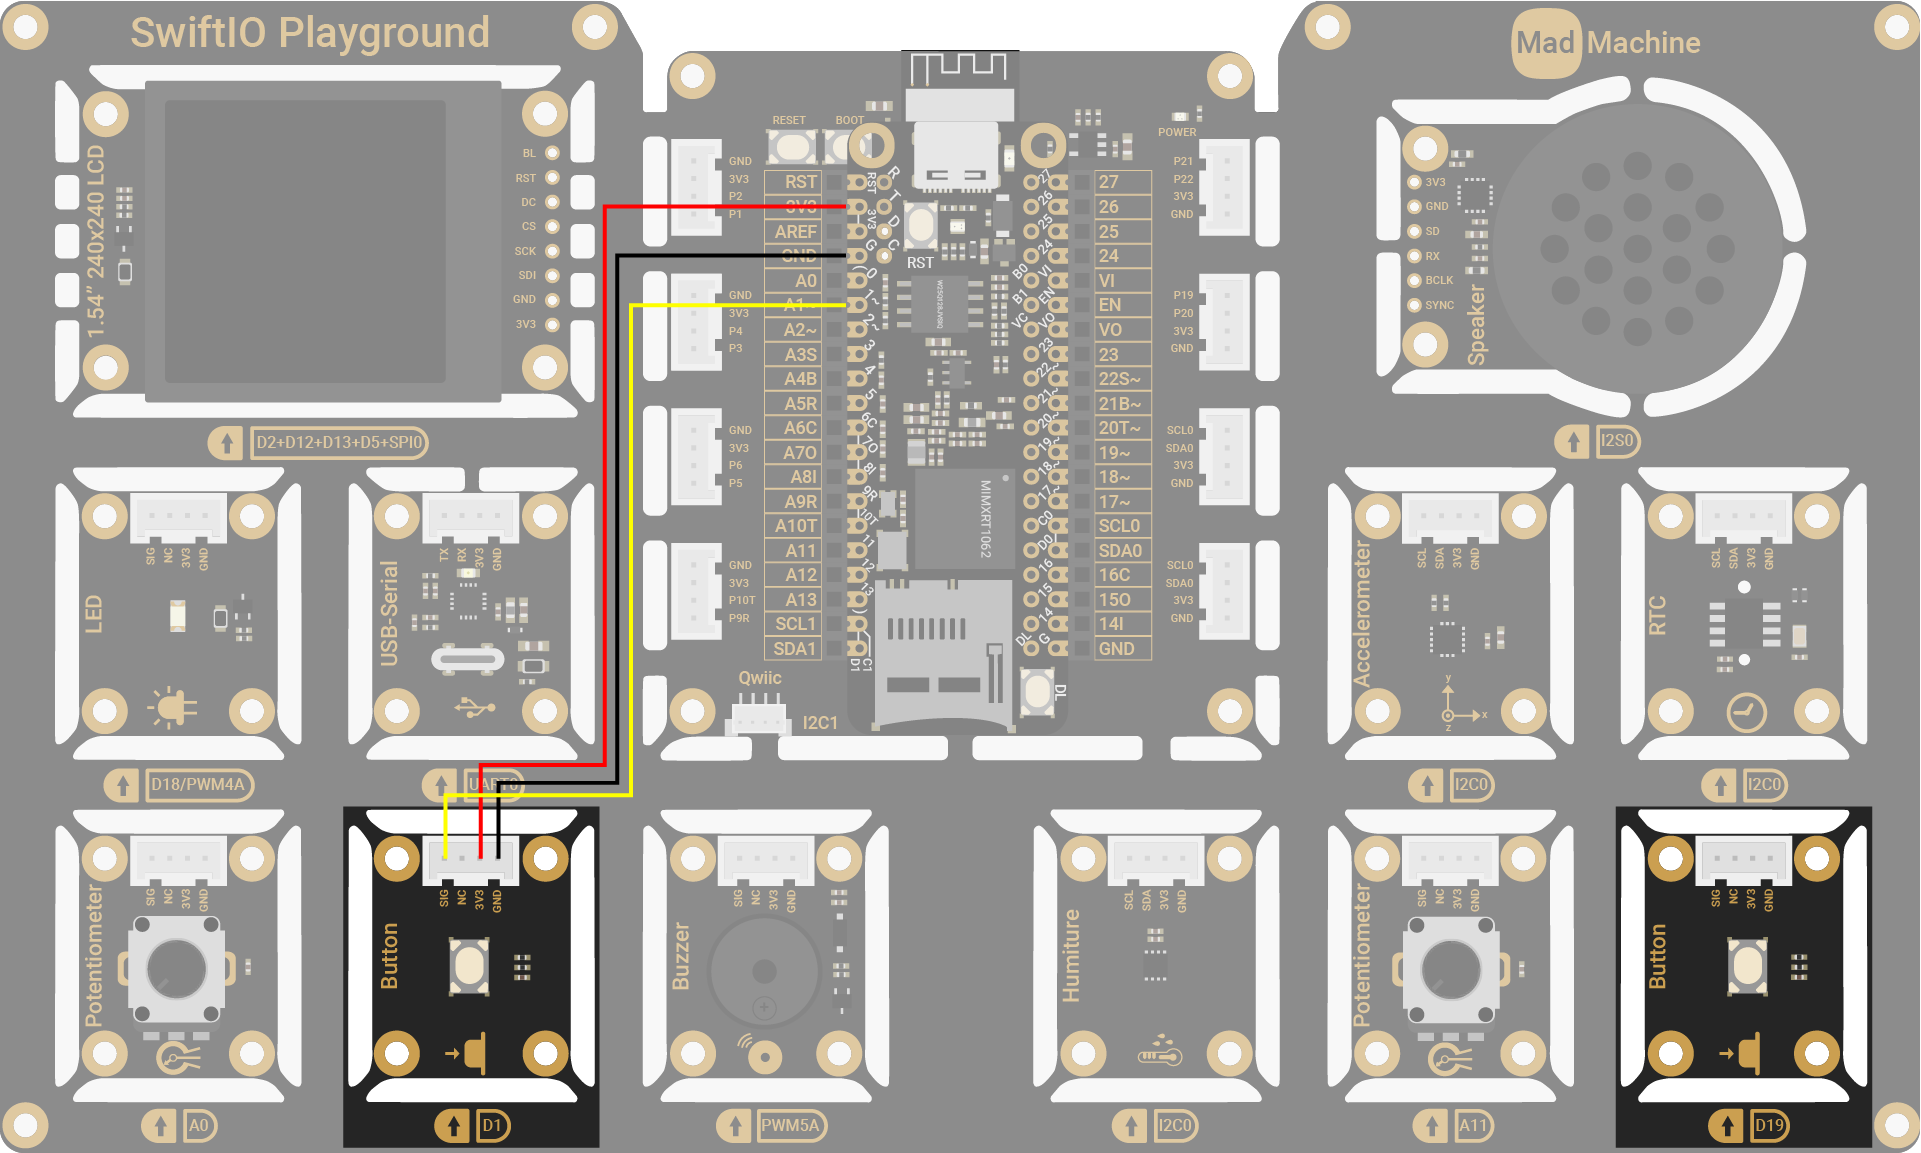
| Button Pin | SwiftIO Micro Pin |
|---|---|
| SIG | D1 |
| NC (Not Connected) | - |
| 3V3 | 3V3 |
| GND | GND |
The circuits above are simplified for your reference. Download the schematics here.
🔸Projects
1. Momentary LED switch
Let's start to build a simple LED switch.
Project overview
- In the beginnning, the button is released/not pressed and the LED stays off.
- After you press the button, the LED turns on. If you hold the button, the LED stays on.
- Once you release the button, the LED turns off.

| Button | released | pressed | released | pressed | released | ... |
|---|---|---|---|---|---|---|
| LED | off | on | off | on | off | ... |
Example code
You can download the project source code here.
// When you press the button, the LED turns on.
// If you continue to hold it, the LED stays on.
// After you release it, the LED turns off.

// Import the SwiftIO library to control input and output and the MadBoard to use the id of the pins.
import SwiftIO
import MadBoard


// Initialize the input pin for the button and output pin for the LED.
let led = DigitalOut(Id.D18)
let button = DigitalIn(Id.D1)

// Keep repeating the following steps.
while true {
    // Read the input pin to check the button state.
    let buttonPressed = button.read()

    // If the value is true which means the button is pressed, turn on the LED. Otherwise, turn off the LED.
    if buttonPressed == true {
        led.write(true)
    } else {
        led.write(false)
    }

    // Alternatively
    // led.write(button.read())

    sleep(ms: 10)
}
Code analysis
let button = DigitalIn(Id.D1)
The button is an instance created for the DigitalIn class. As usual, the id of the pin is necessary. It's the pin the button connects: D1.
And there is another parameter mode with a default value pullDown, which means a pull-down resistor connected to the pin. There are two more options: pullUp (pull-up resistor), pullNone (no pull resistors).
let buttonPressed = button.read()
Use the instance method read() to get the pin state. The return value tells you if it is high or low voltage, which means if the button is pressed.
if buttonPressed == true {
    led.write(true)
} else {
    led.write(false)
}
The microcontroller will judge the value read from the pin. When the value equals true, it means the button is pressed, so make the board output a high voltage to turn on the LED.
BTW, the statements above can be simplified as:
led.write(button.read())
You might notice two similar symbols are so confusing: = and ==. Well, = is to assign value to a constant or variable, while == compares if values are equal.
sleep(ms: 10)
This short period aims to slow the reading process. As usual, each button press takes at least a few 10ms. So the microcontroller doesn't need to run too quickly.
2. LED switch using interrupt
In the previous project, the microcontroller is doing nothing but check the input value over and over again to wait for a button press. But what if you want to do something else in the loop? When should the microcontroller check the pin state? It's hard to decide. So there comes another important mechanism - interrupt for the digital input.
In this project, the LED changes state between on and off every time you press the button.
Project overview
- In the beginnning, the button is released/not pressed, the LED stays off.
- If you press the button, the LED turns on immediately.
- When you release the button, the LED state remains unchanged.
- If you press the button again, the LED turns off immediately.
| Button | released | pressed | released | pressed | released | pressed | ... |
|---|---|---|---|---|---|---|---|
| LED | off | on | on | off | off | on | ... |
Example code
You can download the project source code here.
// Toggle the LED after you press the buttton by detecting the rising edge.

// Import the SwiftIO library to control input and output and the MadBoard to use the id of the pins.
import SwiftIO
import MadBoard


// Initialize the input pin for the button and output pin for the LED.
let button = DigitalIn(Id.D1)
let led = DigitalOut(Id.D18)

// Define a new function used to toggle the LED.
func toggleLed() {
    led.toggle()
}

// Set the interrupt to detect the rising edge. Once detected, the LED will change its state.
button.setInterrupt(.rising, callback: toggleLed)

// Keep sleeping if the interrupt hasn't been triggered.
while true {
    sleep(ms: 1000)
}
Code analysis
func toggleLed() {
    led.toggle()
}
This newly declared function would be passed as a parameter for the interrupt. It needs no parameter and doesn't have return values, which meets the requirement for the Interrupt Service Routine (ISR).
toggle() can reverse the output from the current state to the other, from low to high, or from high to low.
BTW, changing digital output level normally can be finished quickly, so it can be set as ISR. Except that, operations with other IO ports shouldn't be used as ISR.
button.setInterrupt(.rising, callback: toggleLed)
The interrupt will be triggered when a rising edge is detected. The rising edge here corresponds to the moment the button is pressed.
The parameter callback needs a specified type of function: () -> void. It means the function has no parameters and returns values. This parameter calls the function toggleLed defined above. Thus, once there is a rising edge, the microcontroller will go to toggle the output. After finishing, the microcontroller returns to the previous task, in this case, sleeping again.
These statements (lines 13-18) can be simplified as:
button.setInterrupt(.rising) {
    led.toggle()
}
Actually, a function can accept another function as its parameters, as long as the passed-in function follows the specified pattern.
Let's see an example!
func add1(_ num: Int) -> Int {
    return num + 1
}

func multiply3(_ num: Int) -> Int {
    return num * 3
}

func arithmetic(num: Int, formula: (Int) -> Int) -> Int {
    return formula(num)
}

var value = 5
// 6
value = arithmetic(num: value, formula: add1)
// 18
value = arithmetic(num: value, formula: multiply3)
The function arithmetic needs a number and a formula to compute the number. The formula accepts an integer and returns an integer: (Int) -> Int. The other two functions add1 and multiply3 is in the same pattern. So arithmetic can accept either them as a parameter, as well as other functions of this pattern. In this way, the function arithmetic becomes general purpose and can apply different methods of computation.
while true {
    sleep(ms: 1000)
}
The sleep time can be a random value. It makes the board sleep while interrupt doesn't occur and decreases power consumption. Without it, the board will run extremely quickly again and again but do nothing.
3. Toggle LED switch
In this project, the LED state changes right after you release the button that has been pressed. If you press and hold the button, the LED state keeps the same. After you release the button, the LED is toggled.
Project overview
- In the beginnning, the button is released/not pressed, the LED stays off.
- If you press the button, the LED stays off. When you hold the button, the LED stays off.
- Once you release the button, the LED turns on.
- After you press and release the button again, the LED turns off.
| Button | released | pressed | released | pressed | released | pressed | released | ... |
|---|---|---|---|---|---|---|---|---|
| LED | off | off | on | on | off | off | on | ... |
Example code
You can download the project source code here.
// After the button (D1) is pressed and released, the LED (D19) is toggled.

// Import the SwiftIO library to control input and output and
// the MadBoard to use the id of the pins.
import SwiftIO
import MadBoard


// Initialize the input pin for the button and output pin for the LED.
let led = DigitalOut(Id.D18)
let button = DigitalIn(Id.D1)

var buttonPressed = false

while true {
    // If buttonPressing is false, the button is released.
    // Besides, if buttonPressed is true, it means the button has been pressed.
    // So it checks if the button has been pressed and released.
    // If so, toggle the LED.
    let buttonPressing = button.read()
    if !buttonPressing && buttonPressed {
        led.toggle()
    }
    // Store the latest button state.
    buttonPressed = buttonPressing
    sleep(ms: 10)
}
Code analysis
var buttonPressed = false
A variable, like a constant, is a container for a value but can be changed with other values of the same type.
In this case, it stores whether you pressed the button, which is used to compare with the latest state (whether you are pressing the button). Thus, you can infer if the button is pressed or released. These are possible situations:
- If the
buttonPressedis low and the latest reading is still low, the button is always released. - If the
buttonPressedis low and the latest reading is high, the button is just pressed. - If the
buttonPressedis high and the latest reading is still high, the button is being held/pressed. - If the
buttonPressedis high and the latest reading is low, the button is just released.
It is important to clarify all the possible button state changes in advance when working on projects that involve buttons.
if !buttonPressing && buttonPressed {
    led.toggle()
}
When you are not pressing the button now but did press it, that is, the button is just released, the LED will be toggled.
4. 2-Way LED switches
Pressing any of the two buttons (D1, D19) will toggle the LED state. The state is updated immediately after pressing the button.
Project overview
- In the beginnning, both two buttons are released/not pressed, the LED stays off.
- After any of the two buttons (D1, D19) are pressed, the LED turns on.
- After any of the two buttons (D1, D19) are pressed, the LED turns off.
It works like light switches in your room. You may press any of the switches in different places to toggle the light. The situation when two buttons are pressed at the same time is not considered.
| Button (D1) | released | pressed | released | - | - | pressed | released | ... | ||
|---|---|---|---|---|---|---|---|---|---|---|
| Button (D19) | released | - | pressed | released | pressed | released | - | ... | ||
| LED | off | on | on | off | off | on | on | off | off | ... |
Example code
You can download the project source code here.
// Pressing any of the two buttons (D1, D19) will toggle the LED.
// The LED state is updated after that button is pressed.

// SwiftIO is used to set input and output of the pins.
import SwiftIO
// MadBoard is for pin ids.
import MadBoard


// Initialize the pins for two buttons and the LED.
let button0 = DigitalIn(Id.D1)
let button1 = DigitalIn(Id.D19)
let led = DigitalOut(Id.D18)

// Store if the LED state is toggled after a button press.
// It ensures the LED state doesn't change again when button is being pressed.
var ledToggled = false

// Toggle the LED after any of the two buttons are pressed.
while true {
    // When any of the buttons are pressed, toggle the LED.
    if !ledToggled && (button0.read() || button1.read()) {
        led.toggle()
        ledToggled = true
    }

    // If both buttons are released, update the state to wait for next press.
    if !button0.read() && !button1.read() {
        ledToggled = false
    }

    sleep(ms: 10)
}
Code analysis
if !ledToggled && (button0.read() || button1.read()) {
    led.toggle()
    ledToggled = true
}
When either of the input values is true, one button is pressed.
ledToggled is a supplementary condition to ensure the LED will only be toggled right after a button is pressed. After ledToggled is changed to true, even if one button is held and the input reads true, the LED remains unchanged.
if !button0.read() && !button1.read() {
    ledToggled = false
}
In this condition, both input values need to be false, meaning they are all released. Then update ledToggled for the next LED change.
Why not try to adjust the code a bit to make the LED remain unchanged when the button is pressed and toggle right after the button is released👀?
5. On/Off buttons
Two buttons are reserved for the on (D1) and the off (D19) buttons respectively. The LED state is updated only after a press and release.
Project overview
- In the beginnning, both two buttons are released/not pressed, the LED stays off.
- Only after the on buttons (D1) is pressed and then released, the LED turns on.
- Only after the off buttons (D19) is pressed and then released, the LED turns off.
| On Button (D1) | released | pressed | released | - | ... | |
|---|---|---|---|---|---|---|
| Off Button (D19) | released | - | pressed | released | ... | |
| LED | off | off | on | on | off | ... |
Example code
You can download the project source code here.
// Control the LED with two dedicated buttons.
// The button D1 is used to turn on LED and D19 is to turn off it.

// SwiftIO is used to set all input and output.
import SwiftIO
// MadBoard is for pin ids.
import MadBoard


// Initialize the pin for the button used to turn ON LED.
let onButton = DigitalIn(Id.D1)
// Initialize the pin for the button used to turn OFF the LED.
let offButton = DigitalIn(Id.D19)
let led = DigitalOut(Id.D18)

// Store the current LED state.
var ledOn = false

// Store the last button state used to decide whether the button is released now.
var onButtonPressed = false
var offButtonPressed = false

while true {
    if ledOn {
        // If the LED is on, check if the off button (D19) is pressed.
        // If so, turn off the LED after the button is released.

        // Update the OFF button state if it is pressed.
        if offButton.read() {
            offButtonPressed = true
        }

        // If the OFF button has been pressed and is released now, turn off the LED and update all states.
        if offButtonPressed && !offButton.read() {
            led.low()
            offButtonPressed = false
            ledOn = false
        }
    } else {
        // If the LED is off, check if the on button (D1) is pressed.
        // If so, turn on the LED after the button is released.

        // Update the ON button state if it is pressed.
        if onButton.read() {
            onButtonPressed = true
        }

        // If the ON button has been pressed and is released now, turn on the LED and update all states.
        if onButtonPressed && !onButton.read() {
            led.high()
            onButtonPressed = false
            ledOn = true
        }
    }

    sleep(ms: 10)
}
🔸Go further
Congratulations! Now let's dive deeper into something more complicated. Don't be upset if you are confused. This part talks about the signal noise produced by buttons. You could skip this part and go back later as you get more familiar with all knowledge.
Interrupt
With interrupt mechanism, the microcontroller can
- respond instantly to what it is supposed to do, which is vital for time-critical events.
- perform other tasks while the interrupt hasn't been triggered, thus increasing the efficiency.
How does it work?
- Normally the microcontroller executes its main program.
- Once the interrupt occurs, it will suspend the normal execution and then start the task with higher priority, called interrupt handler or ISR (Interrupt Service Routine).
- After finishing ISR, the microcontroller goes back to where it stopped and continues the main program until another interrupt.

About ISR
- Generally, the ISR should be done extremely fast, usually in nanoseconds.
- The functions don't need any parameters and return nothing.
In summary, it's better to change a value/flag for the ISR. Toggling digital output also works because it is executed by the MCU instantaneously. And you should not add print() which takes about several milliseconds, or your program may go wrong somehow.
:::
When does interrupt happen?
An interrupt may come from different sources. Now you are dealing with an interrupt triggered by the input state change. There are three situations in total:
- Rising edge: when the signal changes from low to high.
- Falling edge: when the signal changes from high to low.
- Both of them.

So when setting the interrupt, you need to tell the microcontroller the specific condition to trigger it: rising edge, falling edge, or both edges. Then once the specified edge is detected, the interrupt happens.
The project 2 above shows you how to use interrupt mechanism to detect button state.
Debounce
Expectation
When you press or release a button, the button would immediately come to a stable state, closed or open. So the LED should always be on when pressing the button and turn off once the button is released according to project 1.
Phenomenon
However, the LED may turn on and off several times with a single button press.
Cause
The button has metals inside it which will move as you press or release it. Due to this mechanical structure, there may be several bounces before the internal metals finally settle down. So once the button is pressed or released, it may change several times between two states: establish the connection and disconnect the circuit before coming to a stable state.
The signal state would thus change several times during this short period. It is not visible to your eye. You could observe it by viewing the wave in the oscilloscope. But the microcontroller works fast enough to read the values during this uncertain period and thus regards these noises as multiple presses.

Solution
So you need debounce methods to avoid this situation. There are many solutions, including hardware debounce and software debounce.
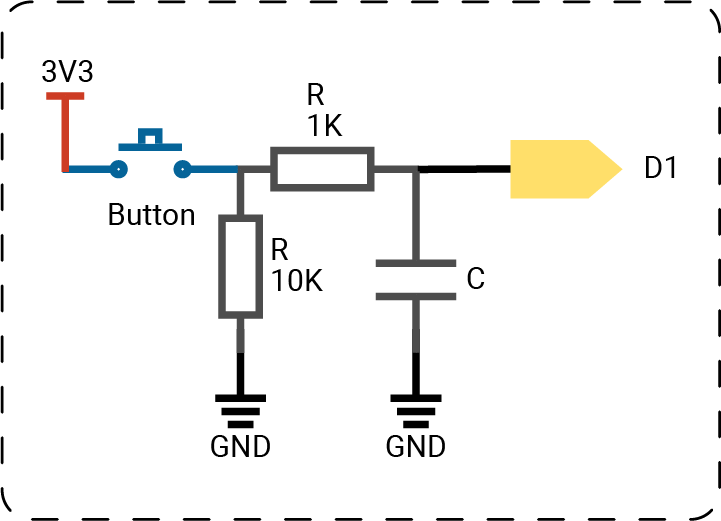
-
Hardware debounce: it lies in eliminating the influence of bounce when designing the circuit.
So does the button module on this kit. Let's talk about one method used for the kit. There are also many other ways, of course. A capacitor (C1) is added to smooth the voltage changes. After the button is pressed or released, the voltage will gradually change to another level rather than accidentally change several times between the two levels.
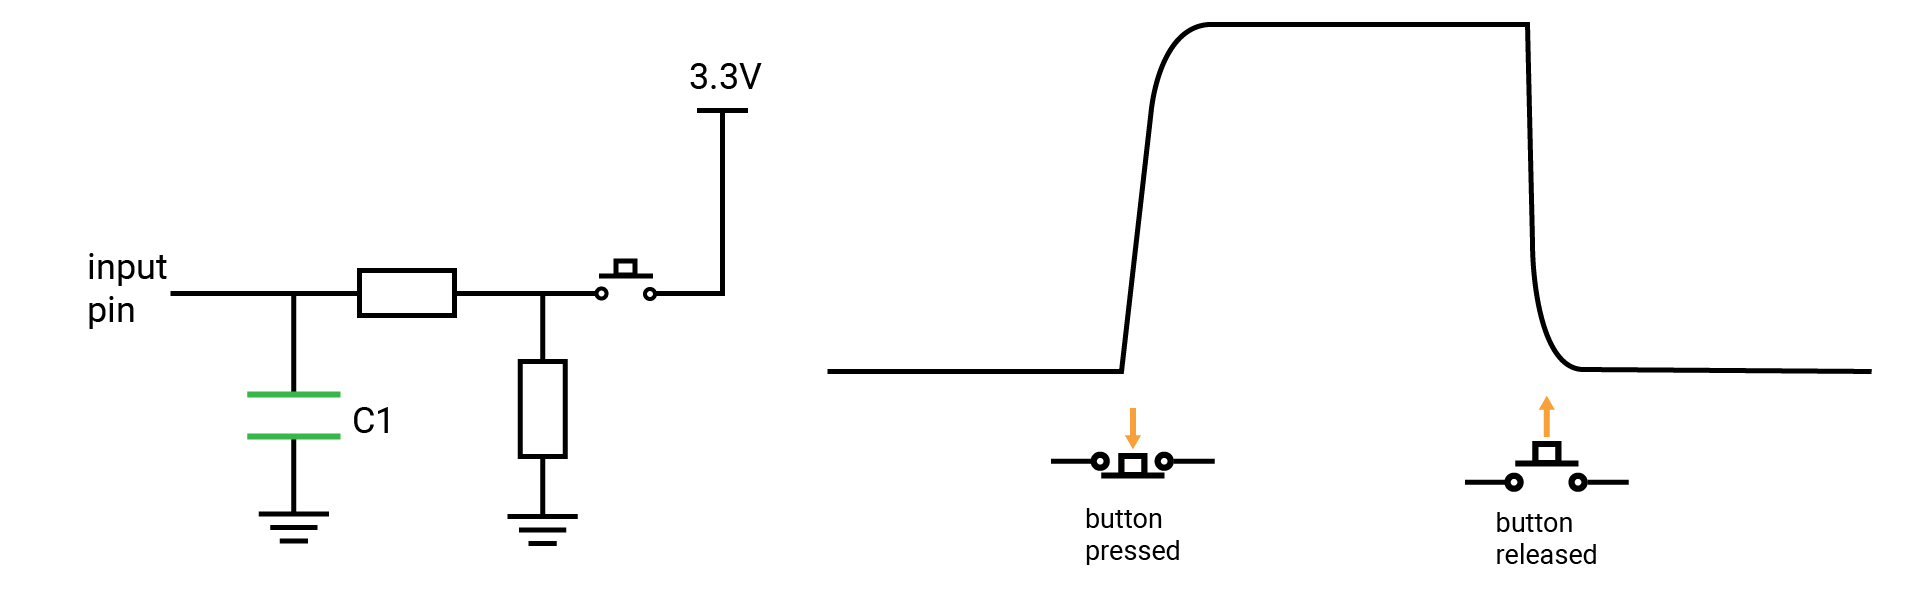
-
Software debounce: when designing the program, you can make the MCU ignore the bounce and wait for the real state.
Usually, you'll check many times or wait a few milliseconds to skip this unstable period. After this period, the value read from the pin should be the one needed. A fast press would typically last at least 50ms.
Debounce example code
// Check if the button is pressed using a debounce method.
// Import the library to enable the relevant classes and functions.
import SwiftIO
import MadBoard

// Initialize the red LED.
let led = DigitalOut(Id.D18)
// Initialize the digital input pin that the button is connected to.
let button = DigitalIn(Id.D1)

// Declare the values to record and judge the button state.
var count = 0
var triggered = false

while true {
  // Read from the input pin.
  let buttonPressed = button.read()

  // Ignore the change due to the noise.
  if buttonPressed {
      count += 1
  } else {
      count = 0
      triggered = false
  }

  // Wait a certain period to check if the button is indeed pressed.
  // Toggle the LED and then reset the value for the next press.
  if count > 50 && !triggered {
      led.toggle()
      triggered = true
      count = 0
  }

  // Wait a millisecond and then read to ensure the current state last for enough time.
  sleep(ms: 1)
}
Since the button module on SwiftIO Playground uses a hardware debounce method, you may not meet this problem so frequently.
🔸API
Let's see the new class you are going to use in this project.
DigitalIn
This class allows you to get the current state of a specified input pin.
| Method | Explanation |
|---|---|
init(_:mode:) | Initialize the digital input pin. Parameter: - idName: the id of the digital pin. - mode: set the pull resistors, pullDown by default. |
read() | Read voltage level from an input pin. - Return value: The voltage represented as true or false. |
setInterrupt(_:enable:callback:) | It allows you to define the interrupt mechanism in your project. Parameter: - mode: set the type of edge to trigger the interrupt: .rising, .falling, .bothEdges. - enable: decide whether to enable the interrupt once you set it. By default, it is true (enabled). - callback: pass in a function as the paramter. The function should need no parameter and returns nothing: () -> void. |
🔸Background
Peripheral - GPIO
The peripheral GPIO is designed to handle digital signals, either input or output. You've tried output in the previous tutorial, and in this tutorial, you will explore how to use the GPIO pins as input.
Digital input signals have two states, commonly referred to as high and low. When an input signal comes in, its voltage will be compared with specific thresholds. If the voltage is higher than the threshold, it's high, and if it's lower, it's low. You can regard it as a multimeter used to measure voltage but only has two results.

Therefore, GPIO input pins can be used to read the state of a switch, button, or other types of digital input device.
🔸New component
Push button
The button module in your kit is a momentary switch. This kind of switch is only activated when holding/pressing it and goes back to its original state once releasing it, i.e. keyboard buttons... While a maintained switch changes its position when actuated and remains in its state until the next action, such as light switches.
The push button typically has four legs. Each two of them are shorted, like 1 and 3, 2 and 4 in the following diagram. If you connect the two legs that are shorted internally, like 1 and 3, the button is of no use since the current flows all the time.
To make things easier, it is a good idea to connect the two legs on a diagonal, like 1 and 4, 2 and 3.
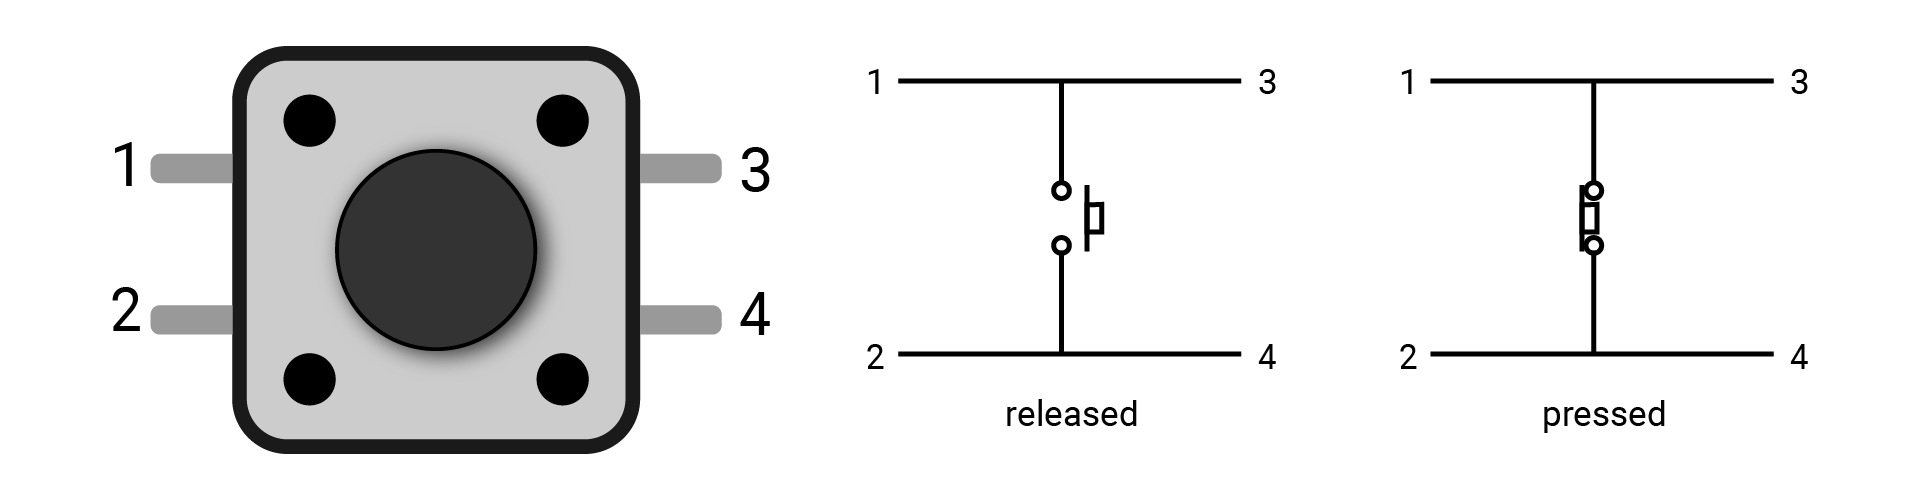
Symbol: 
Let's talk about how the button works in circuits:
- By default, the circuit inside the button is disconnected, therefore blocking the current flow.
- As you press it, the internal metals come into contact, so the current can flow successfully through the circuit.
- Once you release it, the button will go back to its original state and the current is blocked again.
Pull resistor
As you have known, digital input will always be either high or low. But if the input pin is connected to nothing, what will the input value be? High or low?
That's hard to say. The state of that pin will be uncertain and change randomly between high and low states. This state is called floating. To ensure a stable state, a pull-up or pull-down resistor is needed.
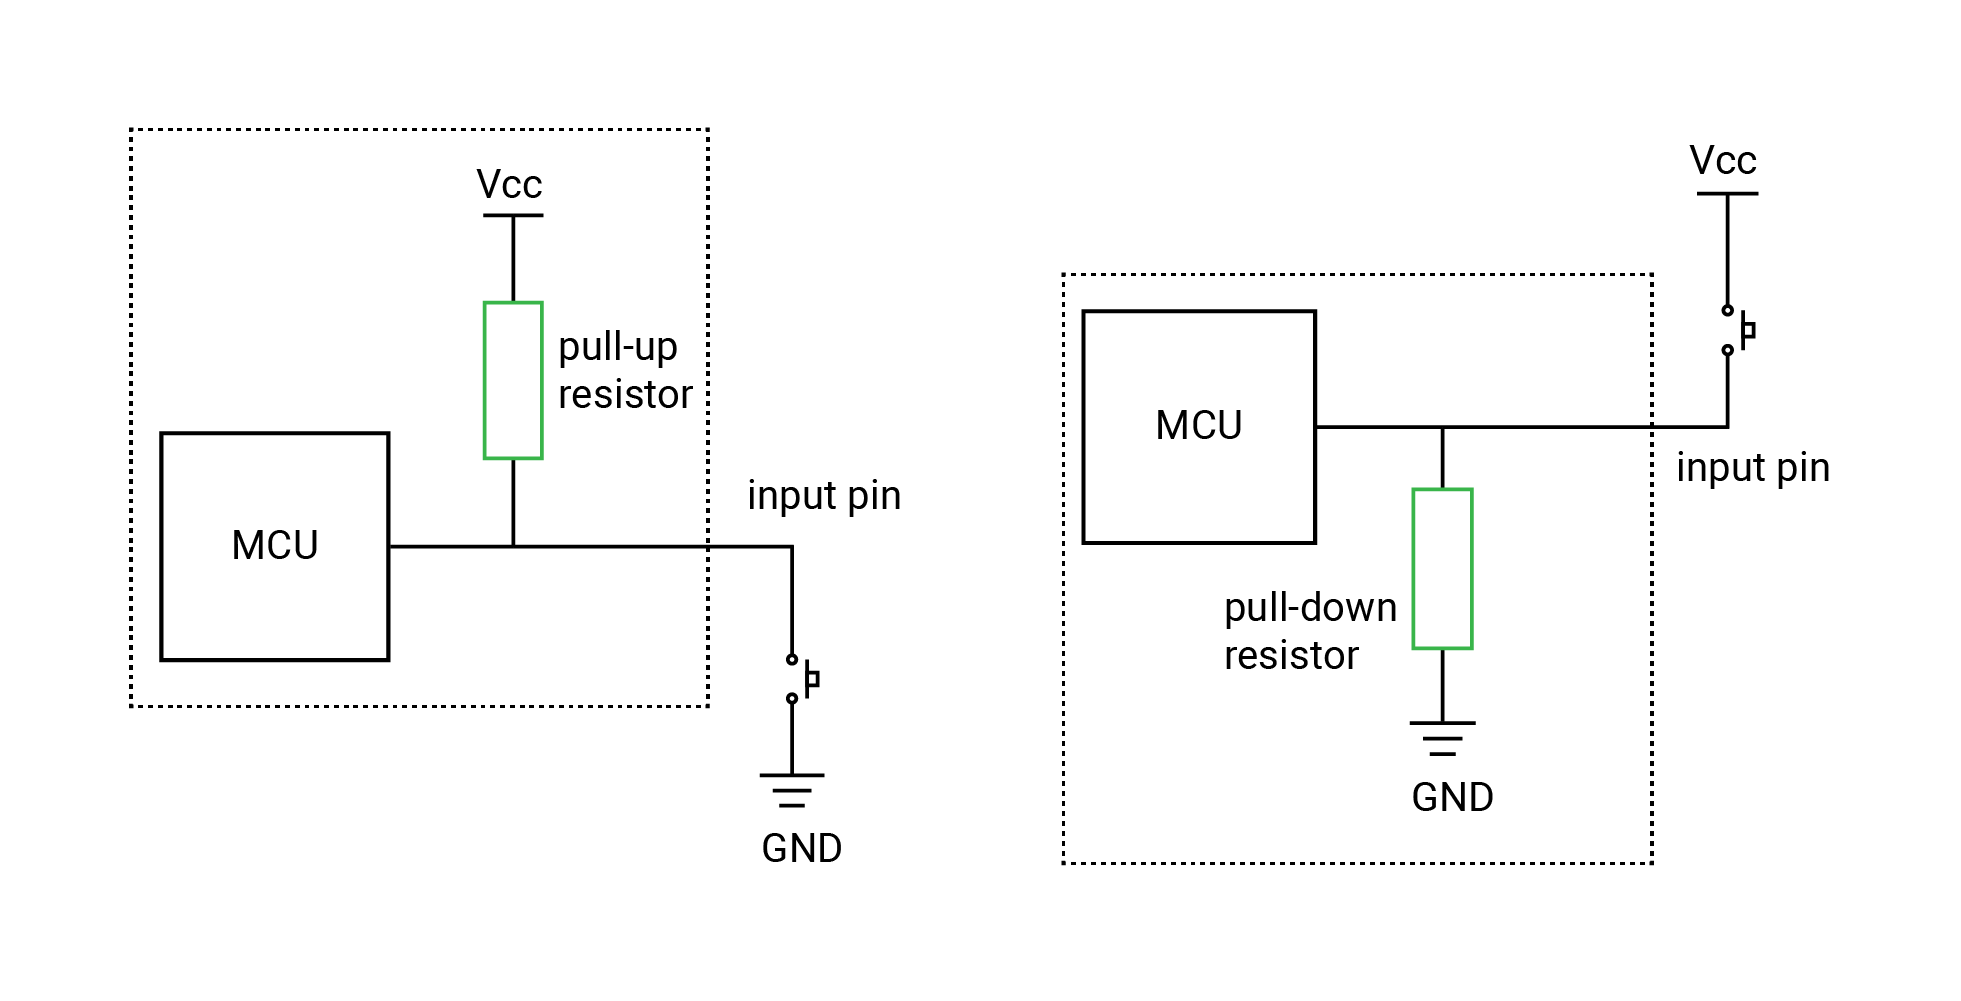
Pull-up resistor
The pull-up resistor connects the input pin to power. In this case, the button should connect to the input pin and ground.
- By default, when the button is not pressed, the input pin reads high.
- If the button is pressed, the current flows from power directly to the ground and the pin reads low level.
Pull-down resistor
The pull-down resistor connects the input pin to ground. If so, the button should connect to the power and input pin.
- By default, the button is not pressed. The pin connects directly to the ground, so the pin keeps in a low state.
- And if you press the button, the pin reads high.
In this way, the input pin is always at a determined state.
You would usually need a pull-up or pull-down resistor with a button. The SwiftIO Micro has internal pull-up and pull-down resistors. By default, the pull-down resistor is chosen. You could change it according to actual usage.