Wi-Fi
Welcome to this tutorial where we delve into the world of Wi-Fi. It's undeniable that Wi-Fi has become an essential part of our daily lives. However, have you ever pondered the mechanics behind the seemingly simple act of entering a Wi-Fi password and gaining internet access on your phone or computer? Let's unravel this mystery together.
The ESP32 is a versatile component widely employed in various projects that require Wi-Fi connectivity. We'll explore Wi-Fi utilizing the ESP32 as a Wi-Fi module.
Learning goals
- Gain a fundamental understanding of Wi-Fi functionality.
- Master the process of connecting the ESP32 to your Wi-Fi network.
- Learn how to exchange data with public servers through HTTP requests.
🔸Circuit - ESP32-C3
The shield on SwiftIO Playground contains ESP32 for Wi-Fi connection.
| ESP32-C3 | SwiftIO Micro Pin |
|---|---|
| UART | UART1 |
| RST | D24 |
| GND | GND |
🔸Projects
1. Joining Wi-Fi
In this project, we'll connect the ESP32 module to Wi-Fi and grab its IP address.
Project overview
- Set up the ESP32 module: reset it and set it to station mode.
- Use SSID and password for Wi-Fi connection.
- Display the IP address assigned to the module by your router or alternative access point (AP).
Example code
You can download the project source code here.
Don't forget to fill in your SSID (Wi-Fi network name) and password before downloading the code.
- main.swift
- Package.swift
import SwiftIO
import MadBoard
import ESP32ATClient

let rst = DigitalOut(Id.D24, value: true)
let uart = UART(Id.UART1, baudRate: 115200)
let esp = ESP32ATClient(uart: uart, rst: rst)

do {
    // If reset failed, you might need to adjust the baudrate.
    try esp.reset()
    print("ESP32 status: \(esp.esp32Status)")

    // Only in 'Station' or 'Station+SoftAP' mode can a connection to an AP be established.
    var wifiMode = ESP32ATClient.WiFiMode.station
    _ = try esp.setWiFiMode(wifiMode)

    wifiMode = try esp.getWiFiMode()
    print("ESP32 WiFi mode: \(wifiMode)")

    // Fill the SSID and password below.
    try esp.joinAP(ssid: "", password: "", timeout: 20000)
    print("ESP32 WiFi status: \(esp.wifiStatus)")

    let ipInfo = try esp.getStationIP()
    print(ipInfo)
} catch {
    print("Error: \(error)")
}

while true {
    sleep(ms: 1000)
}
// swift-tools-version: 5.9
// The swift-tools-version declares the minimum version of Swift required to build this package.

import PackageDescription

let package = Package(
    name: "JoiningWiFi",
    dependencies: [
        // Dependencies declare other packages that this package depends on.
        .package(url: "https://github.com/madmachineio/SwiftIO.git", branch: "main"),
        .package(url: "https://github.com/madmachineio/MadBoards.git", branch: "main"),
        .package(url: "https://github.com/madmachineio/MadDrivers.git", branch: "main"),
    ],
    targets: [
        // Targets are the basic building blocks of a package, defining a module or a test suite.
        // Targets can depend on other targets in this package and products from dependencies.
        .executableTarget(
            name: "JoiningWiFi",
            dependencies: [
                "SwiftIO",
                "MadBoards",
                // Use specific library name rather than "MadDrivers" would speed up the build procedure.
                .product(name: "ESP32ATClient", package: "MadDrivers")
            ]),
    ]
)
2. Weather
If you've ever used a weather app on your phone, here's an exciting opportunity to build your own. Many weather services out there provide APIs, giving you access to their data. In this project, your goal is to send HTTP requests to a weather service, like openweathermap.org, to retrieve the latest weather updates.
Project overview
- Connect ESP32 to Wi-Fi.
- Request current weather from the server using an HTTP GET.
- Decode the JSON-formatted response from the server.
- Print the weather info.
Example code
You can download the project source code here.
- main.swift
- WeatherInfo.swift
- Package.swift
import SwiftIO
import MadBoard
import ESP32ATClient
import ExtrasJSON

let rst = DigitalOut(Id.D24, value: true)
let uart = UART(Id.UART1, baudRate: 115200)
let esp = ESP32ATClient(uart: uart, rst: rst)

do {
    // If reset failed, you might need to adjust the baudrate.
    try esp.reset()
    print("ESP32 status: \(esp.esp32Status)")

    // Only in 'Station' or 'Station+SoftAP' mode can a connection to an AP be established.
    var wifiMode = ESP32ATClient.WiFiMode.station
    _ = try esp.setWiFiMode(wifiMode)

    // Print current Wi-Fi mode.
    wifiMode = try esp.getWiFiMode()
    print("ESP32 WiFi mode: \(wifiMode)")

    // Fill the SSID and password below.
    try esp.joinAP(ssid: "", password: "", timeout: 20000)
    print("ESP32 WiFi status: \(esp.wifiStatus)")

    // Print the assigned IP address.
    let ipInfo = try esp.getStationIP()
    print(ipInfo)
} catch {
    print("Error: \(error)")
}

sleep(ms: 1000)

if esp.wifiStatus == .ready {
    do {
        // Send request to the weather service to obtain current weather.
        // Update the URL with your API key and your city name.
        let response = try esp.httpGet(url: "https://api.openweathermap.org/data/2.5/weather?q=metric&q=YourCity&appid=YourAPIKey", timeout: 30000)

        // Decode the JSON data and print the weather info.
        let weatherInfo = try XJSONDecoder().decode(WeatherInfo.self, from: Array(response.utf8))
        print("City: \(weatherInfo.cityName)")
        print("Weather: \(weatherInfo.weatherConditions[0].main)")
        print("Temp: \(weatherInfo.mainInfo.temp)C")
        print("Humidity: \(weatherInfo.mainInfo.humidity)")
    } catch let error as DecodingError {
        print("JSON Decoding Error: \(error)")
    } catch {
        print("Http GET Error: \(error)")
    }
} else {
    _ = try? esp.readLine(timeout: 1000)
    print("WiFi status: \(esp.wifiStatus)")
}

while true {
    sleep(ms: 1000)
}
// Structs used to decode the JSON data from the weather service.
struct Coordinate: Decodable {
    let longitude: Float
    let latitude: Float

    enum CodingKeys: String, CodingKey {
        case longitude = "lon"
        case latitude = "lat"
    }
}

struct WeatherConditions: Decodable {
    let id: Int
    let main: String
    let description: String
    let icon: String
}

struct MainInfo: Decodable {
    let temp: Float
    let feelsLikeTemp: Float
    let minTemp: Float
    let maxTemp: Float
    let pressure: Int
    let humidity: Int
    let seaLevel: Int
    let groundLevel: Int

    enum CodingKeys: String, CodingKey {
        case temp
        case feelsLikeTemp = "feels_like"
        case minTemp = "temp_min"
        case maxTemp = "temp_max"
        case pressure
        case humidity
        case seaLevel = "sea_level"
        case groundLevel = "grnd_level"
    }
}

struct Wind: Decodable {
    let speed: Float
    let degree: Int
    let gust: Float

    enum CodingKeys: String, CodingKey {
        case speed
        case degree = "deg"
        case gust
    }
}

struct Clouds: Decodable {
    let cloudiness: Int

    enum CodingKeys: String, CodingKey {
        case cloudiness = "all"
    }
}

struct Rain: Decodable {
    let rain1h: Float?
    let rain3h: Float?

    enum CodingKeys: String, CodingKey {
        case rain1h = "1h"
        case rain3h = "3h"
    }
}

struct Snow: Decodable {
    let snow1h: Float?
    let snow3h: Float?

    enum CodingKeys: String, CodingKey {
        case snow1h = "1h"
        case snow3h = "3h"
    }
}

struct Sys: Decodable {
    let type: Int?
    let id: Int?
    let country: String
    let sunrise: Int
    let sunset: Int
}

struct WeatherInfo: Decodable {
    let coordinate: Coordinate
    let weatherConditions: [WeatherConditions]
    let base: String
    let mainInfo: MainInfo
    let visibility: Int
    let wind: Wind
    let clouds: Clouds
    let rain: Rain?
    let snow: Snow?
    let dt: Int
    let sys: Sys
    let timezone: Float
    let cityId: Int
    let cityName: String
    let cod: Int

    enum CodingKeys: String, CodingKey {
        case coordinate = "coord"
        case weatherConditions = "weather"
        case base
        case mainInfo = "main"
        case visibility
        case wind
        case clouds
        case rain
        case snow
        case dt
        case sys
        case timezone
        case cityId = "id"
        case cityName = "name"
        case cod
    }
}
// swift-tools-version: 5.9
// The swift-tools-version declares the minimum version of Swift required to build this package.

import PackageDescription

let package = Package(
    name: "Weather",
    dependencies: [
        // Dependencies declare other packages that this package depends on.
        .package(url: "https://github.com/madmachineio/SwiftIO.git", branch: "main"),
        .package(url: "https://github.com/madmachineio/MadBoards.git", branch: "main"),
        .package(url: "https://github.com/madmachineio/MadDrivers.git", branch: "main"),
        .package(url: "https://github.com/swift-extras/swift-extras-json.git", branch: "main"),
    ],
    targets: [
        // Targets are the basic building blocks of a package, defining a module or a test suite.
        // Targets can depend on other targets in this package and products from dependencies.
        .executableTarget(
            name: "Weather",
            dependencies: [
                "SwiftIO",
                "MadBoards",
                // Use specific library name rather than "MadDrivers" would speed up the build procedure.
                .product(name: "ESP32ATClient", package: "MadDrivers"),
                .product(name: "ExtrasJSON", package: "swift-extras-json"),
            ]),
    ]
)
Code analysis
let response = try esp.httpGet(url: "https://api.openweathermap.org/data/2.5/weather?q=metric&q=YourCity&appid=YourAPIKey", timeout: 30000)
This statement initiates an HTTP GET request to the OpenWeatherMap API, fetching current weather data for a specified city in metric units. Make sure to replace YourCity with the actual city name and YourAPIKey with a valid OpenWeatherMap API key.
OpenWeatherMap, a widely-used weather service, offers a free account registration, providing users with an API key necessary for accessing current weather information.
let weatherInfo = try XJSONDecoder().decode(WeatherInfo.self, from: Array(response.utf8))
Decode the JSON response obtained from an HTTP request using predefined Swift structs, in this case, the WeatherInfo struct.
JSON format is commonly applied in web services for transmitting data and in software or hardware for storing settings. This format organizes information into key-value pairs, where keys serve as labels describing the data type, and values store the actual data.
Here is an example JSON data from the OpenWeatherMap.
{
    "coord": {
        "lon": -76.5074,
        "lat": 38.3004
    },
    "weather": [
        {
            "id": 800,
            "main": "Clear",
            "description": "clear sky",
            "icon": "01n"
        }
    ],
    "base": "stations",
    "main": {
        "temp": -0.9,
        "feels_like": -2.85,
        "temp_min": -2.18,
        "temp_max": 1.47,
        "pressure": 1013,
        "humidity": 89
    },
    "visibility": 10000,
    "wind": {
        "speed": 1.54,
        "deg": 290
    },
    "clouds": {
        "all": 0
    },
    "dt": 1707121229,
    "sys": {
        "type": 2,
        "id": 2011802,
        "country": "US",
        "sunrise": 1707134876,
        "sunset": 1707172323
    },
    "timezone": -18000,
    "id": 4350049,
    "name": "California",
    "cod": 200
}
We'll utilize Swift Extra JSON library for data decoding. JSON, inherently key-value paired, aligns seamlessly with properties and values.
- The predined structs in
Weather.swiftconform to the Decodable protocol, enabling seamless decoding from an external representation, like JSON. - Match JSON keys to corresponding properties in the structs. If they don't match exactly, use the
CodingKeysenum to provide custom mappings. - Use decoder to decode JSON data into the predefined
WeatherInfostruct.
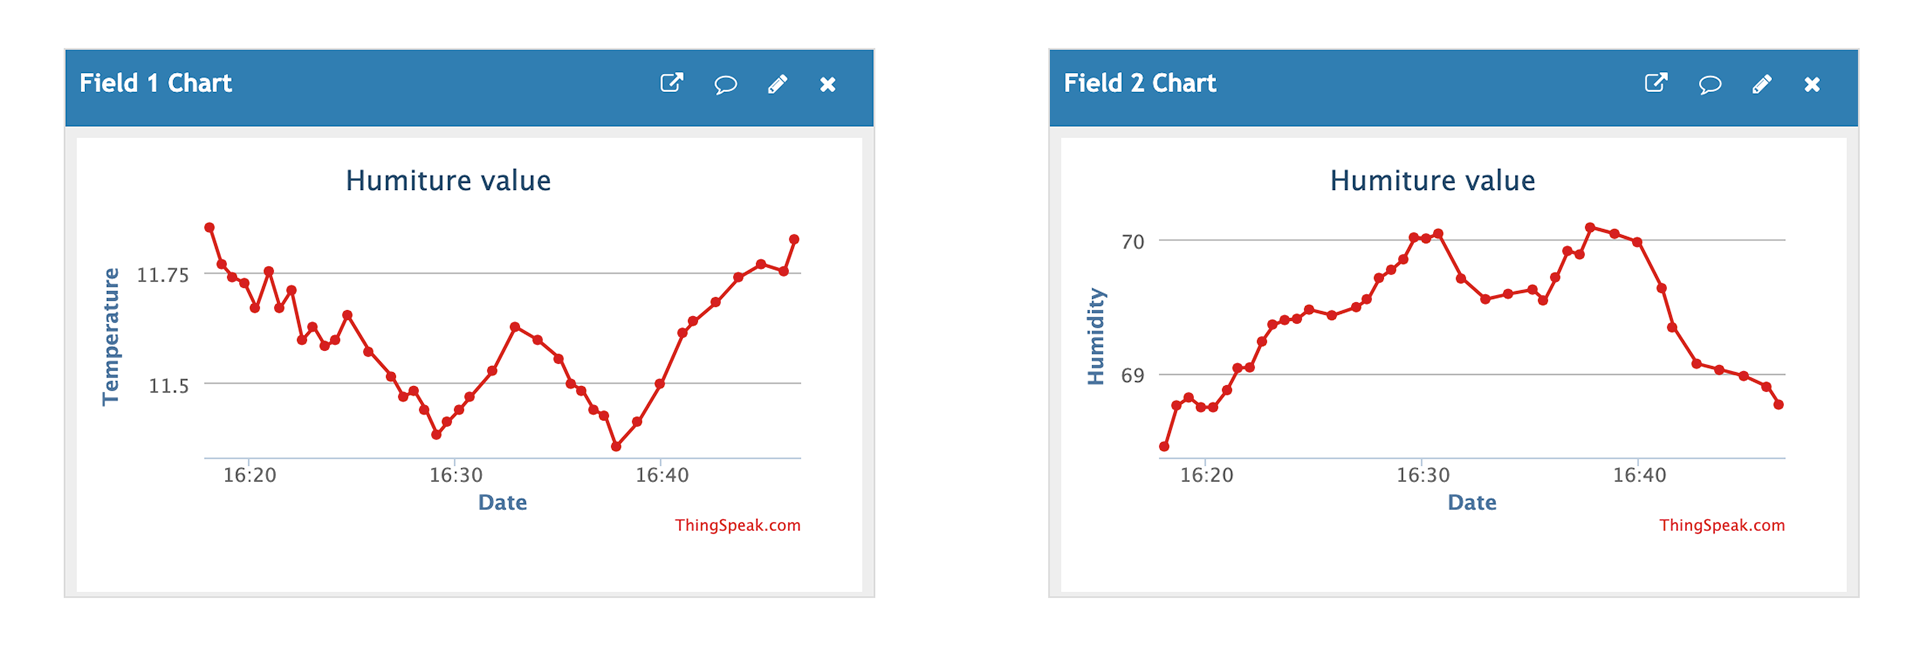
3. Temperature data logger
Let's delve into how HTTP POST request works using ThingSpeak as an example. ThingSpeak is a versatile open-source Internet of Things (IoT) platform designed for collecting, storing, analyzing and visualizing data from IoT devices.
In this project, we'll focus on sending sensor readings to ThingSpeak via HTTP POST requests. By doing so, we'll be able to observe and analyze how the data changes over time.
Project overview
- Connect ESP32 to Wi-Fi.
- Read temperature and humidity from sensor.
- Send sensor data to ThingSpeak using HTTP POST requests.
- Monitor temperature and humidity trends on the ThingSpeak dashboard.
Example code
You can download the project source code here.
- main.swift
- Package.swift
import SwiftIO
import MadBoard
import ESP32ATClient
import SHT3x

let rst = DigitalOut(Id.D24, value: true)
let uart = UART(Id.UART1, baudRate: 115200)
let esp = ESP32ATClient(uart: uart, rst: rst)

let i2c = I2C(Id.I2C0)
let humiture = SHT3x(i2c)

do {
    // If reset failed, you might need to adjust the baudrate.
    try esp.reset()
    print("ESP32 status: \(esp.esp32Status)")

    // Only in 'Station' or 'Station+SoftAP' mode can a connection to an AP be established.
    var wifiMode = ESP32ATClient.WiFiMode.station
    _ = try esp.setWiFiMode(wifiMode)

    wifiMode = try esp.getWiFiMode()
    print("ESP32 WiFi mode: \(wifiMode)")

    // Fill the SSID and password below.
    try esp.joinAP(ssid: "", password: "", timeout: 20000)
    print("ESP32 WiFi status: \(esp.wifiStatus)")

    let ipInfo = try esp.getStationIP()
    print(ipInfo)
} catch {
    print("Error: \(error)")
}

while true {
    sleep(ms: 30_000)
    if esp.wifiStatus == .ready {
        do {
            // Read temperature and humidity values from the sensor.
            let temp = humiture.readCelsius()
            let humidity = humiture.readHumidity()
            // Send the values to ThingSpeak using HTTP POST requests to visualize them.
            _ = try esp.httpPost(url: "https://api.thingspeak.com/update?api_key=YourAPIKey&field1=\(temp)&field2=\(humidity)", headers: ["Content-Type: application/x-www-form-urlencoded"], timeout: 20000)
        } catch {
            print("Http POST Error: \(error)")
        }
    } else {
        _ = try? esp.readLine(timeout: 1000)
        print("WiFi status: \(esp.wifiStatus)")
    }
}
// swift-tools-version: 5.9
// The swift-tools-version declares the minimum version of Swift required to build this package.

import PackageDescription

let package = Package(
    name: "ESP32Demo",
    dependencies: [
        // Dependencies declare other packages that this package depends on.
        .package(url: "https://github.com/madmachineio/SwiftIO.git", branch: "main"),
        .package(url: "https://github.com/madmachineio/MadBoards.git", branch: "main"),
        .package(url: "https://github.com/madmachineio/MadDrivers.git", branch: "main"),
    ],
    targets: [
        // Targets are the basic building blocks of a package, defining a module or a test suite.
        // Targets can depend on other targets in this package and products from dependencies.
        .executableTarget(
            name: "ESP32Demo",
            dependencies: [
                "SwiftIO",
                "MadBoards",
                // Use specific library name rather than "MadDrivers" would speed up the build procedure.
                .product(name: "ESP32ATClient", package: "MadDrivers"),
                .product(name: "SHT3x", package: "MadDrivers"),
            ]),
    ]
)
Code analysis
_ = try esp.httpPost(url: "https://api.thingspeak.com/update?api_key=YourAPIKey&field1=\(temp)&field2=\(humidity)", headers: ["Content-Type: application/x-www-form-urlencoded"], timeout: 20000)
Send temperature and humidity data to ThingSpeak using the provided API key. Ensure to replace YourAPIKey in the URL with your unique API key, generated upon setting up a channel on ThingSpeak.
🔸API
ESP32ATClient
This library enables you to use ESP32 as a client, facilitating the sending of HTTP requests to servers.
init(uart: UART, rst: DigitalOut)
Initialize the EPS32 by specifying the UART and reset pins to which they are connected.
Parameter:
uart: the pins used for UART communication.rst: the DigitalOut pin connected to the ESP32 reset.
func joinAP(ssid: String? = nil, password: String = "", timeout: Int = 20000, autoConnect: Bool = true) throws
Connect to the designated Wi-Fi network.
Parameter:
ssid: the Wi-Fi network name.password: the password for the Wi-Fi network.timeout: the time in milliseconds to wait for the connection to be established.autoConnect: whether the ESP32 should automatically connect to the Wi-Fi network.
func reset() throws
Reset the module.
func setWiFiMode(_ newMode: WiFiMode, autoConnect: Bool = true) throws -> Bool
Set Wi-Fi mode.
Parameter:
newMode: the new Wi-Fi mode:none,.station,.softAP, orstationSoftAP.autoConnect: whether the ESP32 should automatically connect to the Wi-Fi network.
Return value:
- a boolean value indicating the success or failure of setting the Wi-Fi mode.
func getWiFiMode() throws -> WiFiMode
Get current Wi-Fi mode.
Return value:
- a Wi-Fi mode:
none,.station,.softAP, orstationSoftAP.
func getStationIP() throws -> [String]
Query assigned IP address after ESP32 is connected to the Wi-Fi.
Return value:
- an array of strings representing the IP addresses.
func httpGet(url: String, timeout: Int = 5000) throws -> String
Perform an HTTP GET request to the specified URL
Parameter:
url: the URL of the resource you want to retrieve.timeout: the time in milliseconds to wait for the response.
Return value:
- the response or content obtained from the HTTP GET request.
func httpPost(url: String, data: String = "\r\n", headers: [String] = [], timeout: Int = 5000) throws -> String
Send data to a specified server using the HTTP POST method.
Parameter:
url: the server URL.data: the data being sent in the request.headers: HTTP request header.timeout: the time in milliseconds to wait for the response.
Return value:
- the response from the HTTP POST request.
🔸Background
Wi-Fi
You know we're all hooked on Wi-Fi for our daily dose, right? Once your computer or phone taps into Wi-Fi, you're set to surf the web. Ever wondered about the behind-the-scenes magic? The internet is this crazy intricate thing, layers upon layers of complexity. Now, don't worry, we won't drag you through a mind-numbing tech marathon. Instead, let's just take a quick peek into how Wi-Fi does its thing and get a basic idea of what's happening.
Wi-Fi Connection (Neighborhood Move-in)
-
Connecting to Wi-Fi (Moving into a Neighborhood): Imagine your computer as a new resident looking for a cozy neighborhood. To join the community, it learns the secret handshake - the Wi-Fi network name (SSID) and password.
-
Getting an IP address (Getting a Unique Home Address): Once inside, your computer is assigned a unique home address (IP address) by the neighborhood's hosting committee (router). This address helps neighbors (devices) recognize each other. The neighborhood is thoughtfully organized with clear boundaries (subnet mask), ensuring smooth communication among neighbors.
Web Exploration (SendingLetters in the Neighborhood)
-
Entering the Domain Name (Craftinga Letter): Now, let's say you want to send a letter to a pen pal in a different town, just like visiting www.example.com.
-
DNS Resolution (Using the Address Directory): Instead of memorizing complex routes, you consult a friendly address directory (DNS) that translates the pen pal's name into their actual address (IP address).
-
Communicating with the Gateway (Neighborhood Post Office): To send the letter, you visit the neighborhood post office. The postmaster (gateway) checks if your pen pal lives in the same neighborhood (local network). If so, your letter can be hand-delivered. If the pen pal is in a different town (external network), the postmaster (gateway) knows the main roads (external routes) and forwards your letter appropriately.
-
TCP Connection (Setting up Chat Line): Once the letter reaches the pen pal's town, a reliable chat line (TCP connection) is set up, ensuring smooth and efficient communication.
-
HTTP Request (Requesting the Pen Pal's Story): Curious about your pen pal's tales, you ask for their latest story using the universal language of communication (HTTP request).
-
Server Responds (Receiving the Tale): Your pen pal receives the request, finds the story, and sends it back (HTTP response).
-
Rendering the Page (Enjoying the Story): Your imagination (browser) unpacks the story, assembles the sentences, and presents the complete tale on your cozy reading spot (screen).
More info
If you're interested in a deeper understanding of these topics, check out these tutorial videos:
- Overview of how the Internet works
- Crash courses about network overview and Internet data transmission:
- Overview of how Wi-Fi works
🔸New component
ESP32
The ESP32 is widely favored for various IoT applications, offering both Wi-Fi and Bluetooth connectivity. It simplifies complex functionalities like Wi-Fi, TCP/IP, Bluetooth, and HTTP by providing predefined AT commands. In simple terms, AT commands are a set of instructions for devices to communicate, often using serial communication.
In our setup, the ESP32 acts as a Wi-Fi module connected via a UART port. To communicate with it, the SwiftIO Micro simply sends these predefined AT commands.
For an even simpler experience, we've crafted the ESP32ATClient driver. This lets you operate the module effortlessly by using straightforward APIs, eliminating the need to directly handle those commands.
The ESP32 microcontroller supports three main Wi-Fi modes:
- Station (STA): The ESP32 connects to an existing Wi-Fi network (like a router or hotspot) as a client. In this tutorial, we'll dive into station mode.
- Soft Access Point (SoftAP): the ESP32 becomes a Wi-Fi access point (AP), providing its own Wi-Fi network. Other devices can connect to it, similar to connecting to a router.
- Soft Access Point + Station Mode (STA+AP): this mode combines both Station and SoftAP modes.