Movement sensing using accelerometer
You may not have heard of accelerometers, but you must experience them in everyday life. For example, when you rotate your mobile phone, you may find the screen display rotating from portrait to landscape. That's due to the accelerometer inside the phone. It senses the movement and then responds to it accordingly. Now let's take a closer look at it.
Learning goals
- Understand how an accelerometer senses movements.
- Know about acceleration and how it is measured.
- Read accelerations on x, y, z-axis using I2C communication.
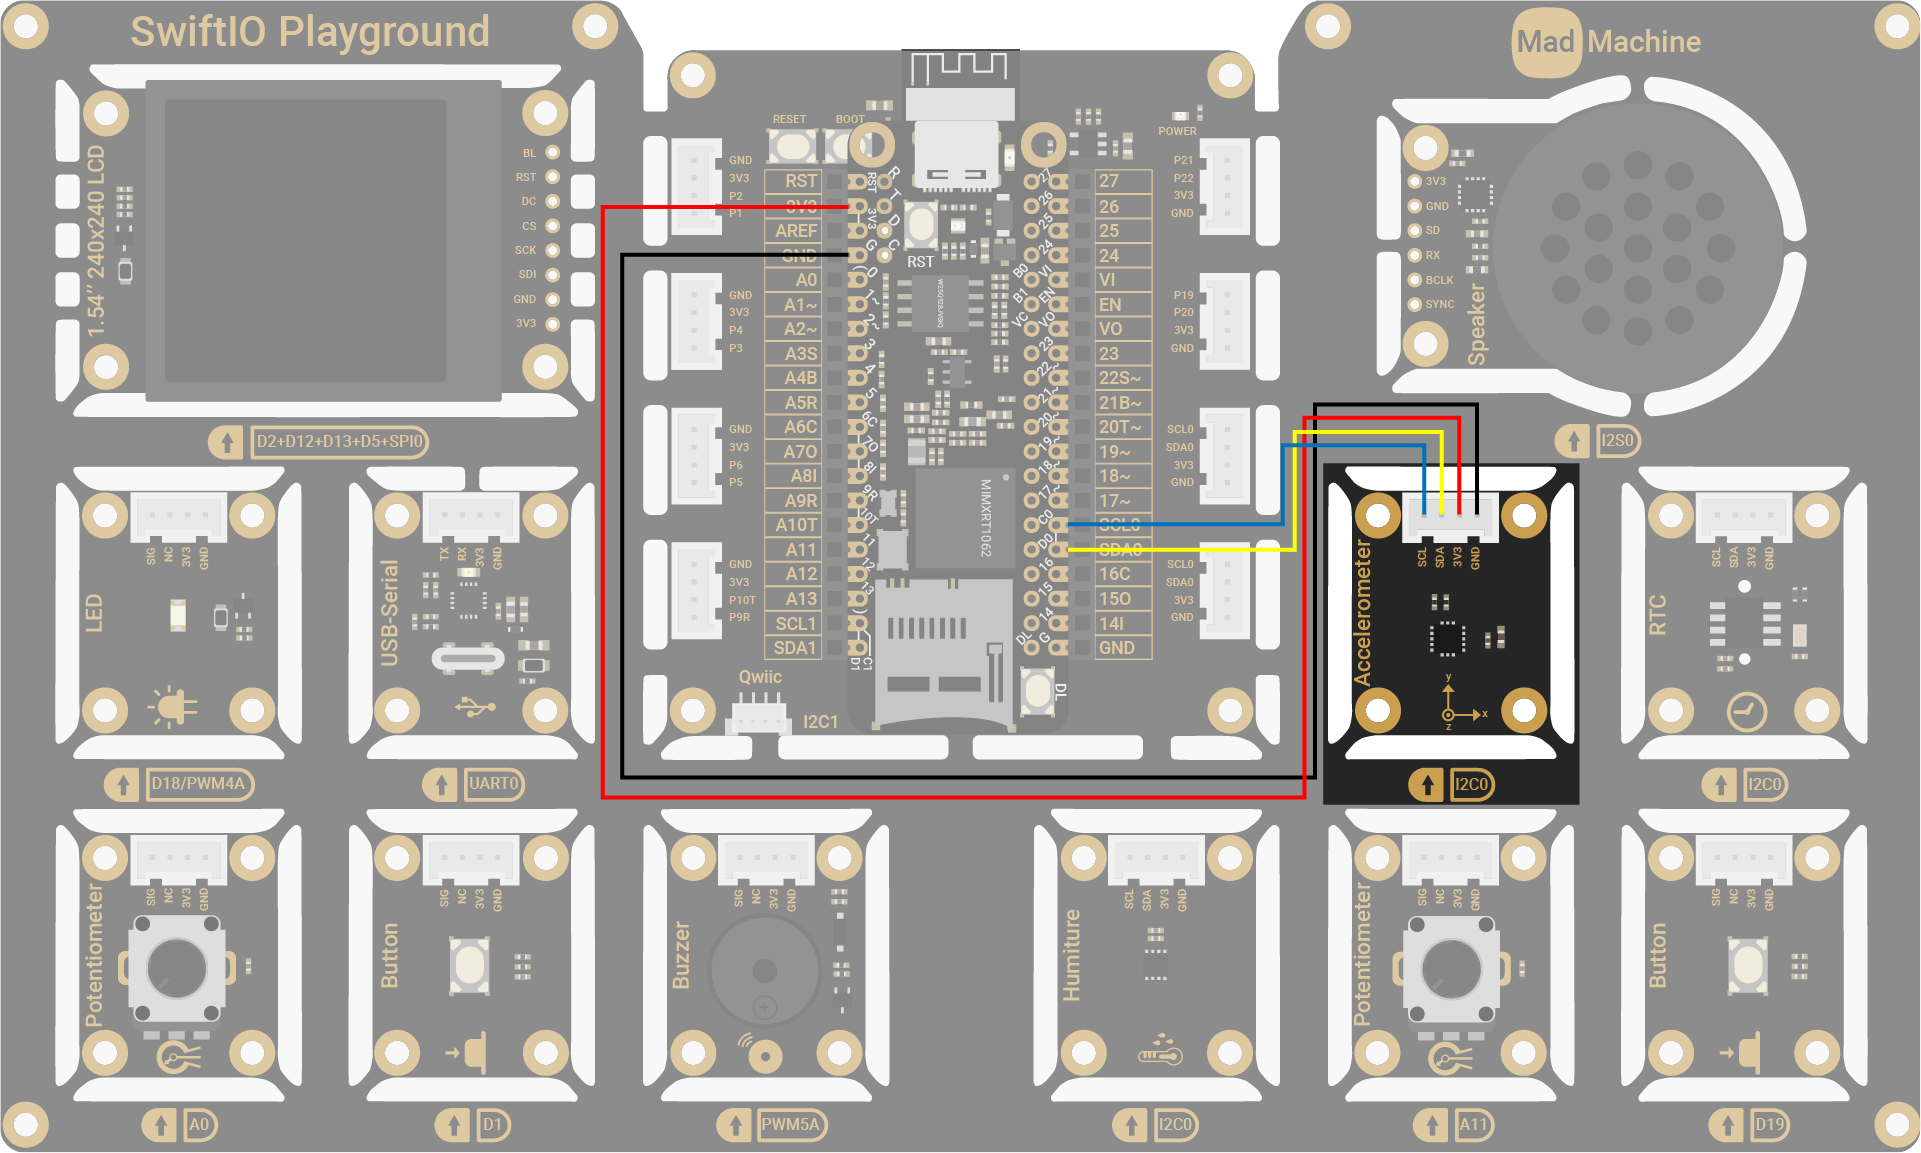
🔸Circuit - Accelerometer
The accelerometer module is connected to I2C0 (SCL0 and SDA0).
| Accelerometer Pin | SwiftIO Micro Pin |
|---|---|
| SCL | I2C0 (SCL0) |
| SDA | I2C0 (SDA0) |
| 3V3 | 3V3 |
| GND | GND |
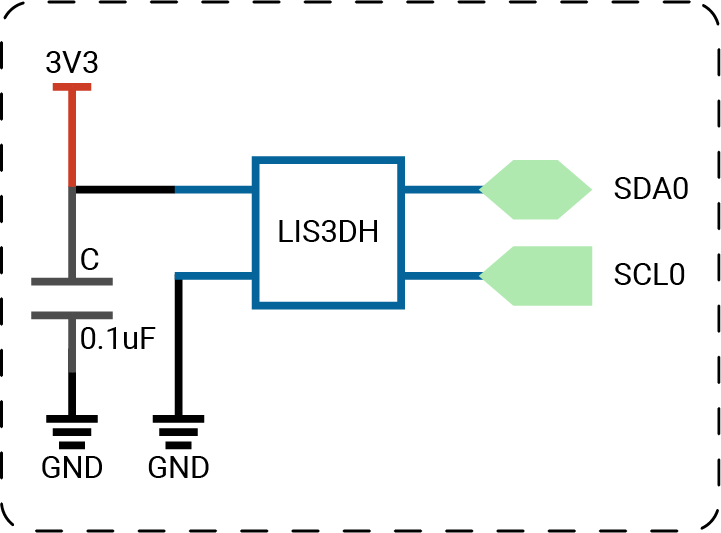
The circuits above are simplified versions for your reference. Download the schematics here.
🔸Projects
1. Reading acceleration
Let's start with the simplest project - read the accelerations and print the values.
Project overview
- The accelerometer reads the accelerations on the x, y, and z axis per second. You can view the values on a serial monitor.
- As you move or tilt your board in different directions, the accelerations change accordingly.
Example code
You can download the project source code here.
- main.swift
- Package.swift
// Import SwiftIO to set the communication and MadBoard to use pin id.
import SwiftIO
import MadBoard
// Import LIS3DH to read the accelerations from the sensor.
import LIS3DH


// Initialize the I2C pins and the sensor.
let i2c = I2C(Id.I2C0)
let accelerometer = LIS3DH(i2c)

// Read the accelerations and each of them.
while true {
    let accelerations = accelerometer.readXYZ()
    print("x: \(accelerations.x)g")
    print("y: \(accelerations.y)g")
    print("z: \(accelerations.z)g")
    print("\n")
    sleep(ms: 1000)
}
// swift-tools-version: 5.9
// The swift-tools-version declares the minimum version of Swift required to build this package.

import PackageDescription

let package = Package(
    name: "Accelerometer",
    dependencies: [
        // Dependencies declare other packages that this package depends on.
        .package(url: "https://github.com/madmachineio/SwiftIO.git", branch: "main"),
        .package(url: "https://github.com/madmachineio/MadBoards.git", branch: "main"),
        .package(url: "https://github.com/madmachineio/MadDrivers.git", branch: "main"),
    ],
    targets: [
        // Targets are the basic building blocks of a package, defining a module or a test suite.
        // Targets can depend on other targets in this package and products from dependencies.
        .executableTarget(
            name: "Accelerometer",
            dependencies: [
                "SwiftIO",
                "MadBoards",
                // Use specific library name rather than "MadDrivers" would speed up the build procedure.
                .product(name: "LIS3DH", package: "MadDrivers"),
            ]),
    ]
)
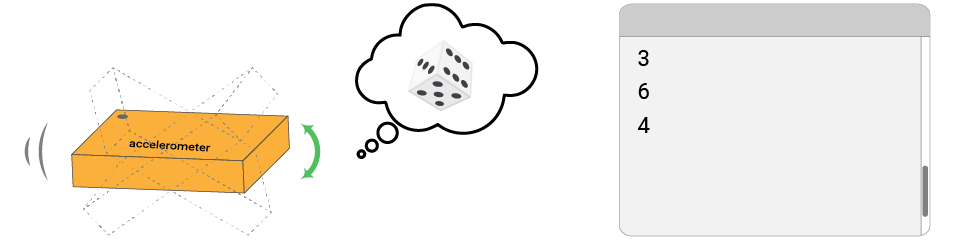
2. Accelerometer dice
Let's build a dice with the accelerometer. You can shake or tilt the sensor to simulate the process of rolling a dice. After that, you put it back on your table or keep it in a horizontal position, you should get a random number from 1 to 6.
Project overview
- Read the current accelerations and compare the readings with predefined thresholds.
- If the readings are bigger, that means you start/are still moving the accelerometer.
- If the readings become smaller than thresholds and it last for a specified period, the accelerometer is kept horizontally. In this case, print a random number from 1 to 6.
Example code
You can download the project source code here.
- main.swift
- Package.swift
// Import SwiftIO to set input and output.
import SwiftIO
// Import MadBoard to use the id of the pins.
import MadBoard
// Import this driver to read accelerations on x, y, z-axis.
import LIS3DH


// Initialize an I2C interface and use it to set the sensor.
let i2c = I2C(Id.I2C0)
let dice = LIS3DH(i2c)

// Initialize an LED used as an indicator when shaking the sensor.
let indicator = DigitalOut(Id.D18)

// Create a variable to store the time after the sensor stops movement.
var steadyCount = 999

// Read accelerations to judge if the sensor is in motion.
// Once the movement stops, a random number prints out.
while true {
    let diceValue = dice.readXYZ()

    if abs(diceValue.x) > 0.3 || abs(diceValue.y) > 0.3 {
        indicator.high()
        steadyCount = 0
    } else {
        steadyCount += 1
        if steadyCount == 50 {
            indicator.low()
            print(Int.random(in: 1...6))
        }
    }

    sleep(ms: 5)
}
// swift-tools-version: 5.9
// The swift-tools-version declares the minimum version of Swift required to build this package.

import PackageDescription

let package = Package(
    name: "AccelerometerDice",
    dependencies: [
        // Dependencies declare other packages that this package depends on.
        .package(url: "https://github.com/madmachineio/SwiftIO.git", branch: "main"),
        .package(url: "https://github.com/madmachineio/MadBoards.git", branch: "main"),
        .package(url: "https://github.com/madmachineio/MadDrivers.git", branch: "main"),
    ],
    targets: [
        // Targets are the basic building blocks of a package, defining a module or a test suite.
        // Targets can depend on other targets in this package and products from dependencies.
        .executableTarget(
            name: "AccelerometerDice",
            dependencies: [
                "SwiftIO",
                "MadBoards",
                // Use specific library name rather than "MadDrivers" would speed up the build procedure.
                .product(name: "LIS3DH", package: "MadDrivers"),
            ]),
    ]
)
Code analysis
let indicator = DigitalOut(Id.D18)
This LED is served as an indicator when shaking the sensor.
var steadyCount = 999
This statement declares a new variable used to store the time. While you shake the sensor, the accelerations change. This count is used to determine if the sensor comes to a horizontal position after a movement.
if abs(diceValue.x) > 0.3 || abs(diceValue.y) > 0.3 {
    indicator.high()
    steadyCount = 0
} else {
    steadyCount += 1
    if steadyCount == 50 {
        indicator.low()
        print(Int.random(in: 1...6))
    }
}
An if-else statement is used to judge the sensor's state.
-
The accelerations should increase in magnitude when you shake the sensor. Since the accelerations have directions, you need to use
absto get absolute values. During that time, you turn on the LED as an indicator. Besides, the variablesteadyCountis set to 0 and always be 0 when the sensor is still in motion. -
Once you stop shaking the sensor, the accelerations on the x and y-axis decrease and should be lower than the threshold. Then the count starts to increase until it exceeds the predefined value.
- If so, it means the sensor is indeed kept in a horizontal position. This is similar to the period after a dice is thrown. At last, you should see a number printed on your serial window.
- After it,
steadyCountcontinues to increase and is always bigger than 50. So it won't generate a new number.
In this exercise, the key point is to decide when the sensor is no longer in motion. Here you store the time to make sure the state lasts for a certain period.
3. Accelerometer lock
Let's try a password-guessing game!
There is a random password that consists of several movement directions. You will need to move/tilt the board in specified directions (left/right/forward/backward) to match the password within a given time. If you succeed, the red LED will turn on.
Project overview
- A password that consists of 3 movement directions (left/right/forward/backward) is generated automatically in the beginning.
- Hold your board. Tilt/move it in a certain direction. Meanwhile, the board starts timing. After each movement, keep it horizontal.
- If the direction doesn't match the first in the password, try a new movement.
- If the direction is correct, the LED blinks once and you continue with the second one.
- If all directions are correct, you'll hear a beep.
- If there are any wrong directions, restart from the first one.
- If the time is out and you fail to guess the password, reset the password. You will hear a beep with a higher pitch as a notification.
You can also view the messages on a serial monitor for reference.
Example code
You can download the project source code here.
- main.swift
- Package.swift
// Unlock to turn on the LED.
// The password consits of 3 random tilt directions (left/right/forward/backward).
// Tilt your board and try to guess the password.
// The LED turns on for 1s as an indicator if a move matches.
// Any unmatched move will cause the game to restart.
// After time is up and you haven't unlock it, the password will be changed.
// Open the serial monitor for more notification during the game.

// Import SwiftIO to set the communication and MadBoard to use pin id.
import SwiftIO
import MadBoard
// Import LIS3DH to read the accelerations from the sensor.
import LIS3DH


// Initialize the I2C pins and the sensor.
let i2c = I2C(Id.I2C0)
let accelerometer = LIS3DH(i2c)

// Initialize LED and buzzer as indicators.
let led = DigitalOut(Id.D18)
let buzzer = PWMOut(Id.PWM5A)

// Initialize the button to change the password.
let resetButton = DigitalIn(Id.D1)

// Initialize the timer with time limit of 30ms.
let timer = Timer(period: 30_000)

// Generate 3 random tilt directions as the password.
var password = [Direction](repeating: .left, count: 3)
updatePassword()

// Keep track of the index of direction.
var passwordIndex = 0

var reset = false
var start = false

// If time is up, reset the game.
timer.setInterrupt(start: false) {
    reset = true
}

print("Tilt/move your board to start.")

while true {
    if passwordIndex < password.count {
        if let direction = getDirection(accelerometer.readXYZ()) {
            // After the first movement, start the timer.
            if !start {
                timer.start()
                start = true
            }

            // If the movement matches the desired one, generate a beep as an indicator.
            if direction == password[passwordIndex] {
                passwordIndex += 1
                print("Correct!")
                beep(500)
            } else {
                // If not, restart from the first direction.
                passwordIndex = 0
                print("Wrong! Restart from the first one...")
            }
        }
    } else if passwordIndex == password.count {
        // If all 3 directions are matched, turn on the LED.
        led.high()
        print("Unlocked!")
        timer.stop()
        // End the game.
        passwordIndex += 1
    }

    // If reset button is pressed, it's time to reset the game.
    if resetButton.read() {
        reset = true
    }

    // Generate 3 random directions as a new password and reset the game.
    // The buzzer will beep as an indicator.
    if reset {
        updatePassword()
        timer.stop()

        passwordIndex = 0
        start = false
        reset = false

        led.low()
        beep(1000)

        print("Timeout or reset button is pressed. Password is reset. Tilt/move your board to restart.")
    }

    sleep(ms: 20)
}

// Generate a short beep.
func beep(_ frequency: Int) {
    buzzer.set(frequency: frequency, dutycycle: 0.5)
    sleep(ms: 300)
    buzzer.suspend()
}

// Replace the previous password with a new one.
func updatePassword() {
    for i in 0..<password.count {
        password[i] = Direction(rawValue: Int.random(in: 0..<4))!
    }
}

// Decide the tilt direction depending on the xyz accelerations.
func getDirection(_ values: (x: Float, y: Float, z: Float)) -> Direction? {
    if values.x > 0.5 {
        return .left
    } else if values.x < -0.5 {
        return .right
    }

    if values.y > 0.5 {
        return .backward
    } else if values.y < -0.5 {
        return .forward
    }

    return nil
}

enum Direction: Int {
    case left
    case right
    case forward
    case backward
}
// swift-tools-version: 5.9
// The swift-tools-version declares the minimum version of Swift required to build this package.

import PackageDescription

let package = Package(
    name: "AccelerometerLock",
    dependencies: [
        // Dependencies declare other packages that this package depends on.
        .package(url: "https://github.com/madmachineio/SwiftIO.git", branch: "main"),
        .package(url: "https://github.com/madmachineio/MadBoards.git", branch: "main"),
        .package(url: "https://github.com/madmachineio/MadDrivers.git", branch: "main"),
    ],
    targets: [
        // Targets are the basic building blocks of a package, defining a module or a test suite.
        // Targets can depend on other targets in this package and products from dependencies.
        .executableTarget(
            name: "AccelerometerLock",
            dependencies: [
                "SwiftIO",
                "MadBoards",
                // Use specific library name rather than "MadDrivers" would speed up the build procedure.
                .product(name: "LIS3DH", package: "MadDrivers"),
            ]),
    ]
)
🔸API
LIS3DH
It provides predefined methods for you to get readings from the LIS3DH accelerometer.
| Method | Explanation |
|---|---|
init(_:address:) | Initialize the sensor to start the communication. Parameters: - i2c: I2C interface that the sensor connects to. - address: the sensor's address. 0x18 by default. |
readXYZ() | Read the acceleration on 3-axis. Return value: Accelerations on x, y, z-axis. |
🔸New component
Accelerometer
Overview
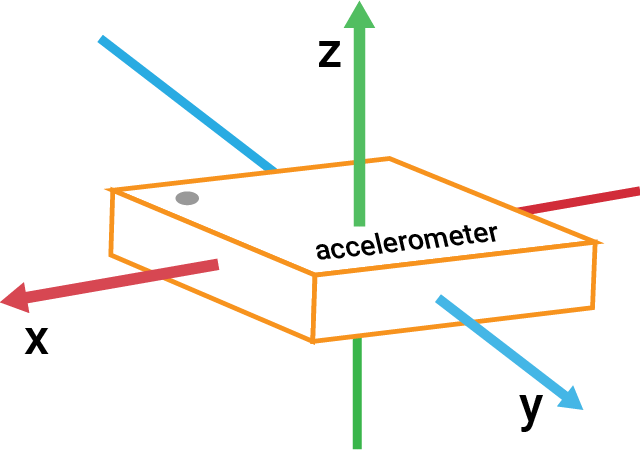
The accelerometer, aka 3-axis accelerometer, measures accelerations, changes of velocity with time, and the direction of movement of an object on x, y, and z-axis. It can detect changes in motion, including vibration, rotation, and changes in linear acceleration. They can also detect the direction and magnitude of gravitational forces acting on the object.
Acceleration is measured in meters per second squared (m/s2). It has both magnitude and direction and can be either positive or negative depending on the direction of the force causing the acceleration.
On Earth, the acceleration due to gravity is approximately 9.8 m/s2, which is often referred to as 1g. When an accelerometer measures acceleration, it typically expresses the results in units of g.
How does an accelerometer work
The basic principle behind an accelerometer is the measurement of changes in force and motion. It contains a mass suspended by a set of springs or beams. When the object that contains the accelerometer experiences acceleration, the mass inside the sensor moves in response to the force, causing a change in the capacitance or voltage output of the sensor. This change is then measured and used to calculate the acceleration.
To better understand how the accelerometer works, let's imagine a small ball inside a vacuum box. There are several situations:
- There is no gravity in a vacuum box, so the ball remains stationary in the center of the box.
- When the box is suddenly moved to the left, the ball inside the box would experience a force due to its inertia, which would cause it to move in the opposite direction. This is similar to what happens when you are in a car or on a bus that suddenly accelerates or stops - your body experiences a force in the opposite direction of the motion.
- If air comes into the box, the ball will fall due to gravity.
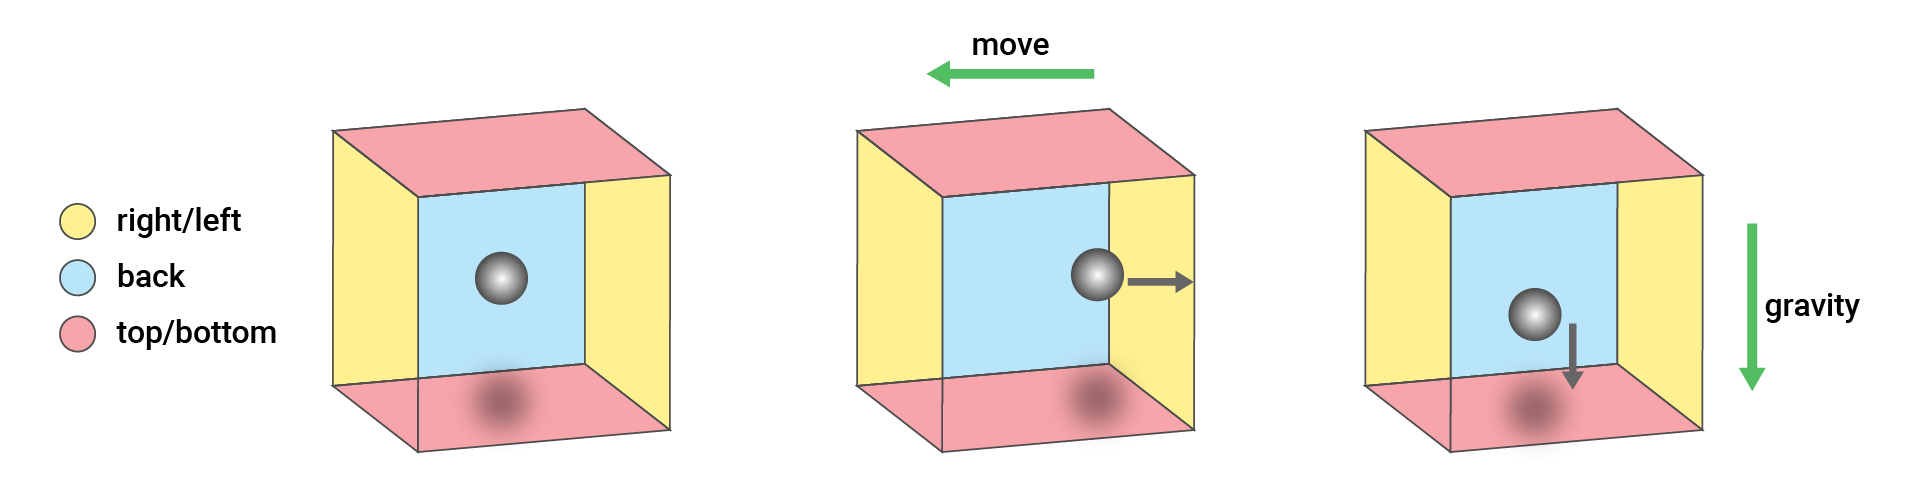
Now let's go back to the sensor.
- When the accelerometer sensor is at rest and not moving, it will primarily detect the force of gravity. When the sensor faces up on the table, it gets a force downwards on the z-axis. When the sensor is perpendicular to the table, there will be a force on the x or y-axis.

- When the accelerometer is in motion, it will also detect inertial forces in addition to the force of gravity.
LIS3DH
The accelerometer LIS3DH supports I2C and SPI communication, but the module on your kit only connects to the I2C interface. The raw values provided by the sensor range from -32768 to 32767 (16-bit). Then they will be converted to the acceleration value according to the measurement range. The sensor provides several measurement ranges: ±2g, ±4g, ±8g, ±16g.