Temperature and humidity measurement
What's the temperature in your place at present? In this tutorial, you will get the readings using your board and a humiture sensor.
Learning goals
- Roughly understand the I2C communication.
- Learn about the data systems: hexadecimal, binary, and decimal.
- Read temperature and humidity from the sensor using I2C communication.
- Learn to import libraries to simplify your coding process.
- Learn how to create a sensor driver.
🔸Circuit - Humiture sensor
The humiture sensor is connected to I2C0 (pin SCL0 and SDA0).

| Humiture Pin | SwiftIO Micro Pin |
|---|---|
| SCL | I2C0 (SCL0) |
| SDA | I2C0 (SDA0) |
| 3V3 | 3V3 |
| GND | GND |
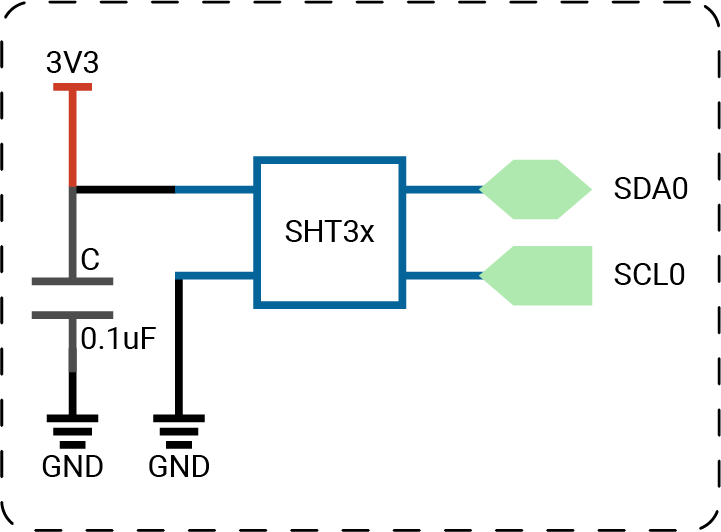
The circuits above are simplified versions for your reference. Download the schematics here.
🔸Projects
1. Reading temperature and humidity
Let's use the humiture sensor to get the temperature and humidity.
Project overview
- After you download the code, the sensor begins to take a measurement every second.
- You can see the temperature and humidity values printed on the serial monitor.
- If you put your finger next to the sensor, the two values change.
Example code
You can download the project source code here.
- main.swift
- Package.swift
// Import SwiftIO to use I2C communication and MadBoard to use pin id.
import SwiftIO
import MadBoard
// Import SHT3x to use its functionalities to read values.
import SHT3x


// Initialize the I2C interface and use it to initialize the sensor.
let i2c = I2C(Id.I2C0)
let humiture = SHT3x(i2c)

// Read the temperature and humidity and print their values out.
// Stop for 1s and repeat it.
while true {
    let temp = humiture.readCelsius()
    let humidity = humiture.readHumidity()
    print("Temperature: \(temp)C")
    print("Humidity: \(humidity)%")
    sleep(ms: 1000)
}
// swift-tools-version: 5.9
// The swift-tools-version declares the minimum version of Swift required to build this package.

import PackageDescription

let package = Package(
    name: "Humiture",
    dependencies: [
        // Dependencies declare other packages that this package depends on.
        .package(url: "https://github.com/madmachineio/SwiftIO.git", branch: "main"),
        .package(url: "https://github.com/madmachineio/MadBoards.git", branch: "main"),
        .package(url: "https://github.com/madmachineio/MadDrivers.git", branch: "main"),
    ],
    targets: [
        // Targets are the basic building blocks of a package, defining a module or a test suite.
        // Targets can depend on other targets in this package and products from dependencies.
        .executableTarget(
            name: "Humiture",
            dependencies: [
                "SwiftIO",
                "MadBoards",
                // Use specific library name rather than "MadDrivers" would speed up the build procedure.
                .product(name: "SHT3x", package: "MadDrivers"),
            ]),
    ]
)
Code analysis
- main.swift
- Package.swift
import SHT3x
MadDrivers contains drivers for different devices. It is added to your project by default when creating a new project.
SHT3x is one of them. So you can import it to your project to use its functionalities to communicate with the sensor.
let i2c = I2C(Id.I2C0)
let humiture = SHT3x(i2c)
At first, you initialize an I2C interface for communication. Its default speed satisfies the needs of the sensor, so you can ignore it.
The class SHT3x needs the I2C pin to which the sensor is connected. So you pass the i2c instance created above. The device address is configured by default, and you don't need to change it.
let temp = humiture.readCelsius()
let humidity = humiture.readHumidity()
Use the two instance methods of SHT3x to read temperature and humidity values. As you can see, with a predefined driver, reading from sensors can be so easy!
print("Temperature: \(temp)C")
print("Humidity: \(humidity)%")
Print the value out.
- The content is a string, so you add double quotation marks.
- Then you need string interpolation to combine the constant and the expression. You add the constant name
tempas a placeholder after a backslash and between a pair of parentheses. It will be replaced by its exact value later.
Let's look at the file Package.swift.
This file defines the content of this package. You may notice the two highlighted statements. You will need to add these two lines when using other libraries.
- All drivers are included in
MadDrivers, so you need to specify its URL in the dependencies as shown above. - As you only need SHT3x in it, you can specify it. So only SHT3x will be compiled when building your project, which will save a lot of time.
2. Average temperature
In this project, you'll decide when the sensor starts to measure temperature.
Project overview
- Press the button D1 to start temperature measurement.
- The red LED will turn on as a notification.
- The sensor will read several times during a short period to get an average reading.
- Print the temperature reading.
- Turn on the LED.
- Wait for the next button press to start measurement.
Example code
You can download the project source code here.
- main.swift
- Package.swift
// Measure the temperature and get an average reading after a button press.

// Import SwiftIO to use I2C communication and MadBoard to use pin id.
import SwiftIO
import MadBoard
// Import SHT3x to use its functionalities to read values.
import SHT3x


// Initialize the I2C interface and use it to initialize the sensor.
let i2c = I2C(Id.I2C0)
let humiture = SHT3x(i2c)

// Initialize the LED indicator pin.
let led = DigitalOut(Id.D18)
// Initialize the button pin.
let button = DigitalIn(Id.D1)

// Decide if it's time to read temperature.
var startMeasurement = false

while true {
    // If button is pressed, update the state.
    if button.read() {
        startMeasurement = true
    }

    // If the button has been pressed and is released, time to measure the temperature.
    if startMeasurement && !button.read() {
        // Turn on the LED as an indicator.
        led.high()
        // Read the value 20 times to calculate the average.
        var sum: Float = 0
        for _ in 0..<20 {
            sum += humiture.readCelsius()
            sleep(ms: 3)
        }

        // Print the average temperature in celsius.
        print("Temperature: \(sum / 20.0)C")
        startMeasurement = false
        // Turn off the indicator.
        led.low()
    }

    sleep(ms: 20)
}
// swift-tools-version: 5.9
// The swift-tools-version declares the minimum version of Swift required to build this package.

import PackageDescription

let package = Package(
    name: "AverageTemperature",
    dependencies: [
        // Dependencies declare other packages that this package depends on.
        .package(url: "https://github.com/madmachineio/SwiftIO.git", branch: "main"),
        .package(url: "https://github.com/madmachineio/MadBoards.git", branch: "main"),
        .package(url: "https://github.com/madmachineio/MadDrivers.git", branch: "main"),
    ],
    targets: [
        // Targets are the basic building blocks of a package, defining a module or a test suite.
        // Targets can depend on other targets in this package and products from dependencies.
        .executableTarget(
            name: "AverageTemperature",
            dependencies: [
                "SwiftIO",
                "MadBoards",
                // Use specific library name rather than "MadDrivers" would speed up the build procedure.
                .product(name: "SHT3x", package: "MadDrivers"),
            ]),
    ]
)
🔸API
I2C
This class controls the I2C communication between your board and sensorss. The data is sent or read in bytes.
| Method | Explanation |
|---|---|
init(_:speed:) | Initialize an I2C interface for the communication. Parameter: - idName: the id of the I2C pin. - speed: the clock speed for the I2C communication, standard (100kbps) by default. |
write(_:count:to:) | Send data to the specified slave device. Parameter: - data: an array of bytes sent to slave device. - count: the count of bytes. By default, it's nil which means all bytes in data will be sent. Be sure the count should be smaller than the array count. - to: the address of the slave device. Return value: A result indicating whether the communication is finished successfully or a type of error. |
read(into:count:from:) | Read data from the specified slave device. Parameter: - into: the buffer to store the coming data. It needs an UInt8 array which is passed as inout in order to be changed. - count: number of bytes received from device. - from: the address of the slave device. Return value: A result indicating whether the communication is finished successfully or a type of error. |
SHT3x
This is the driver for SHT3x sensor. You'll use it read temperature and humidity directly from the sensor.
| Method | Explanation |
|---|---|
init(_:address:) | Initialize a SHT3x instance. Parameter: - i2c: an I2C pin. - address: the device address, 0x44 by default. |
readCelsius() | Read temperature in Celcius. |
readHumidity() | Read relative humidity. |
🔸Background
What is communication protocol?
So far, you have learned simple input and output. It allows you to read or set the voltage on specified pins to communicate with some components. For example, LEDs need true (1) to be on and false (0) to be off, buttons read true if pressed and false if released.
However, there are much more advanced devices involving tons of data. It would be such an enormous project to control the signals manually. Luckily, you can simplify the process with the help of different communication protocols.
Communication protocols refer to the set of rules and standards that govern the exchange of information between two or more systems, devices or entities. Communication protocols define various aspects of the communication process, such as the format and structure of messages, the encoding and decoding of data, the authentication and encryption of data, error detection and correction, flow control, and the handling of different types of errors or failures.
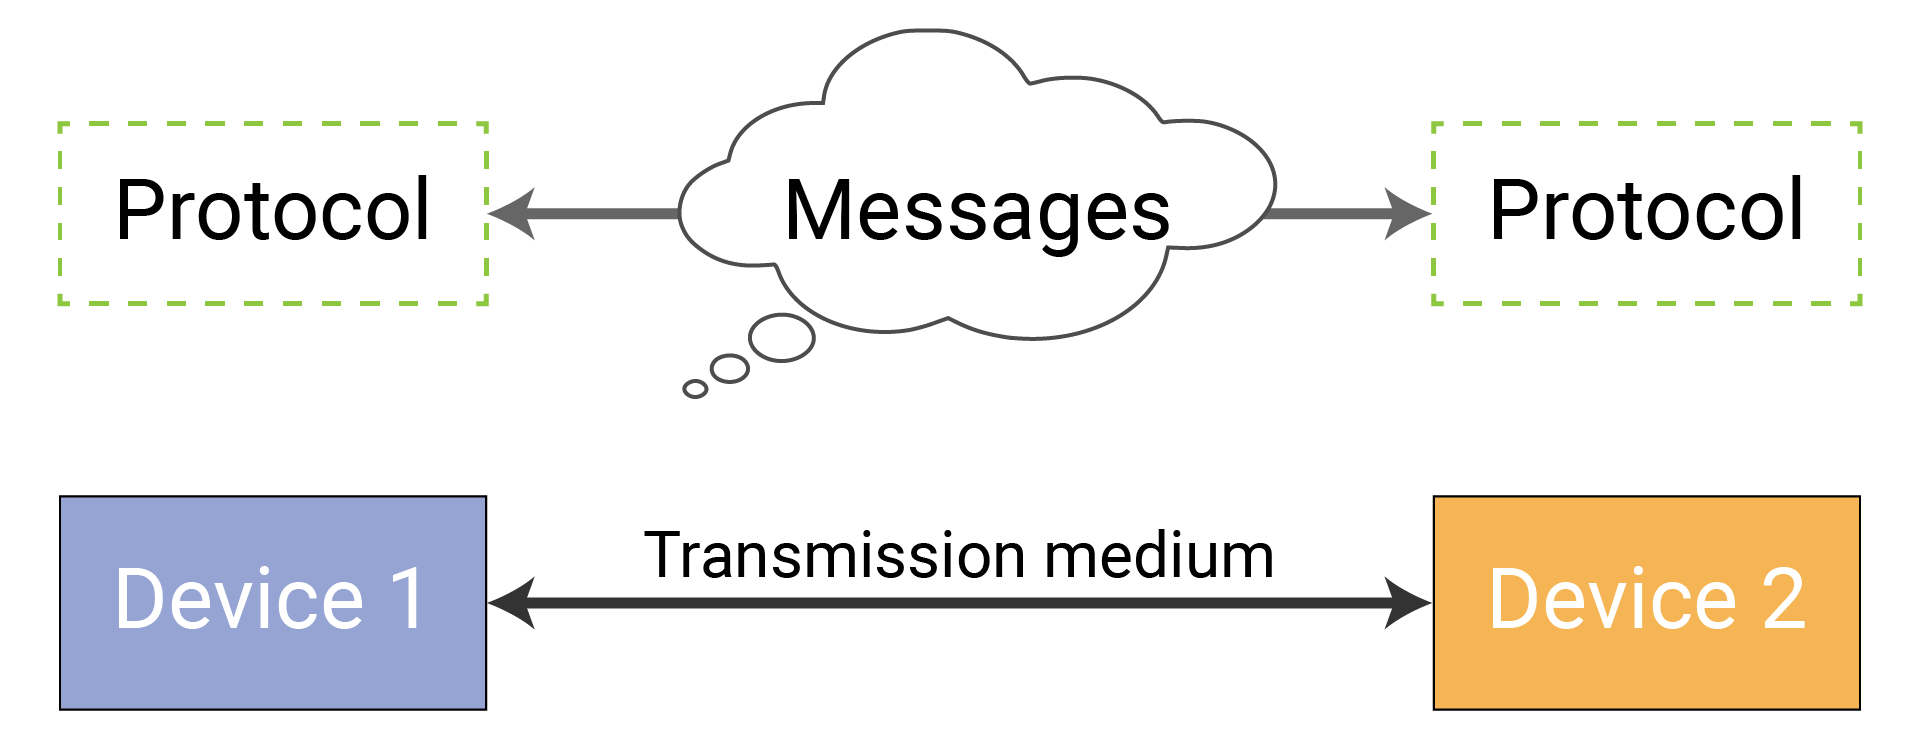
Imagine you meet with a person who speaks a different language from you. It's almost impossible to understand what that person is talking about. The communication protocols are quite similar. Only the devices that adopt the same protocol can communicate with each other effectively and efficiently.
So let's dive into some commonly used communication protocols in the microcontroller world. In this tutorial, you are going to learn about I2C.
What is I2C protocol?
I2C (Inter-integrated circuit) is a two-wire protocol that allows multiple slave devices to communicate with one master device.
It is designed for short-distance communication, typically on a single PCB (printed circuit board). Longer bus lines can have more noise and crosstalk that can affect the signal integrity and cause errors.
I2C bus
The I2C bus consists of two lines:
- SCL (serial clock) carries the clock signal generated by the master device. With a preset speed, the devices know the time for each transmission and can infer if it completes. Thus, it ensures synchronous data transmission between devices. There are several speed modes: standard (100kbps), fast (400kbps), fastPlus (1Mbps).
- SDA (serial data) is the data line. Both master and slave devices send data over the SDA line. The data is sent in bytes.
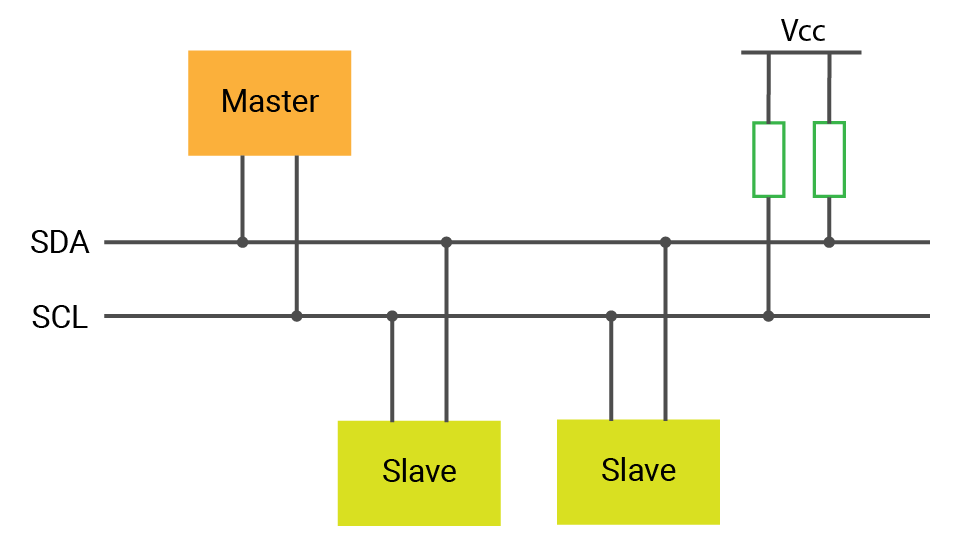
Master and slave device
During communications, a master device controls the communication process. It decides when the transmission starts and ends. Slave devices respond to the master device once it receives the signal. Usually, there would be only one master device but multiple slave devices.
Address
Why could only two wires support multiple devices without confusion?
This is because each I2C device has a unique address. It's usually decided when designing the hardware and will be written on its datasheet.
The master device can initiate communication with a specific slave device by sending its address, and the slave device will respond if it matches the address. Then, the master device can send or request data from the slave device, which is transmitted on the SDA line. Other devices will wait until they are called.
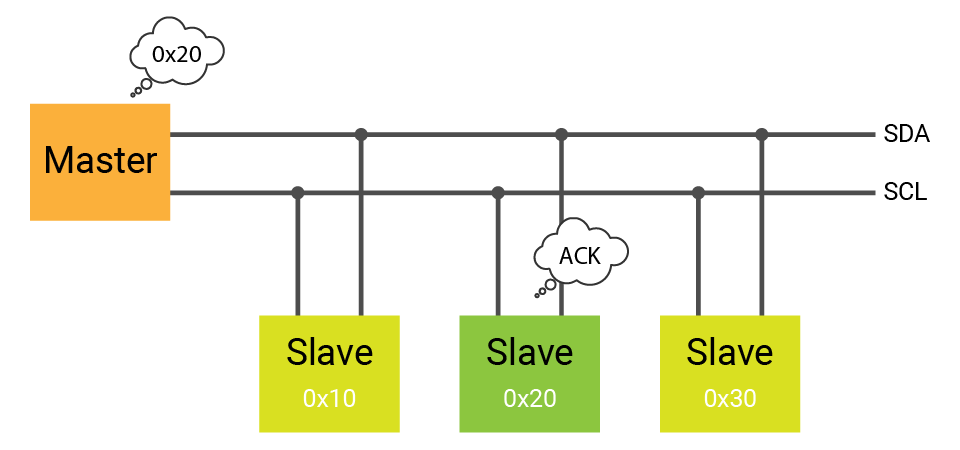
Some devices may have several address options in case the devices you use happen to share the same address.
Data transmission
Each communication protocol has its own rules that define how the data is transmitted between devices, such as the order in which data is sent, the timing of the transmission, and the voltage levels used to represent the data. If you want to know the details of how the data is transferred over the I2C bus, you can read this article.
I2C pull-up resistor
Earlier in the tutorial, you looked at the push-pull and open-drain configurations. I2C bus uses open-drain output, which means it can pull the output voltage to a low state, but does not actively drive it to a high state, hence it needs external pull-up resistors.
By default, the I2C interfaces on the SwiftIO Micro add resistors. So you don't have to add external pull-up resistors when connecting other I2C devices.
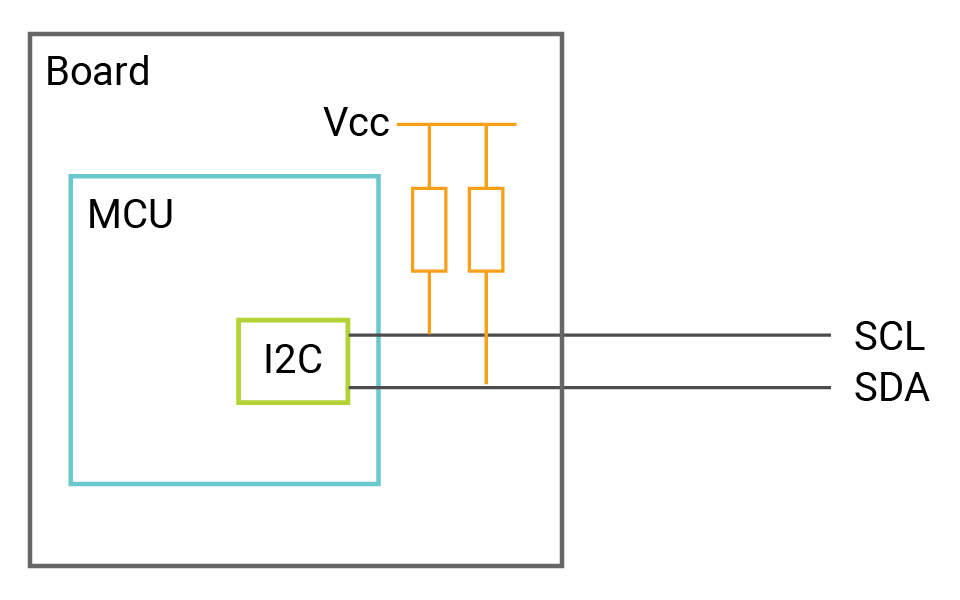
Here is more info about how pull-up resistor will affect I2C communications.
Peripheral - I2C
An I2C peripheral is a built-in hardware module that provides interfaces for the MCU to communicate with other digital devices over the I2C protocol.
It allows MCU to communicate with one or more I2C peripherals, such as sensors, memory devices, or other MCUs, which can act as either master or slave devices. In the case of the SwiftIO Micro, it will always act as the master device, while the other devices connected to it will act as slaves.
The I2C peripheral typically provides a set of registers that can be programmed to configure the I2C interface, such as the baud rate, clock speed, and data format. The MCU firmware (SwiftIO) then uses these registers to control the I2C communication with other devices. Finally, you can use the provided APIs to read and write data over the I2C bus.
🔸New component
Humiture sensor
Humiture sensor allows you to measure both the temperature and humidity. SHT3x is one kind of temperature and humidity sensor and uses I2C to communicate with your board.

This kind of sensor contains components sensitive to temperature and humidity. For example, for temperature measurement, a thermistor is commonly used. Its resistance changes with the temperature. As for humidity, the sensing element, a polymer in most cases, changes its conductivity due to water vapor content in the air.
After the sensor detects changes in temperature and humidity, it converts these changes into electrical signals which can be measured and processed. The raw electrical signals are usually calibrated against known values to ensure accuracy.
Then you can use the formula provided on its datasheet to calculate the temperature in Celsius/Fahrenheit and relative humidity in percentage. Relative humidity (RH for short) describes the amount of water vapor in the air in percentage compared to the maximum amount at the same temperature.
🔸New concept
Number system
The number system is the way used to represent numbers. The Decimal number system (base-10) is what you use in everyday life. The ten digits are from 0 to 9, and for larger values, you get more digits on units, tens, hundreds, thousands and so on. Besides, there are two more common types:
-
Binary is the base-2 number system. Only two digits (0 and 1) are used to represent all numbers. The data starts with the prefix 0b. For a binary number, each digit is a bit. A byte consists of 8 bits.
-
Hexadecimal is the base-16 number system. The data always starts with the prefix 0x. It used 16 symbols, digits 0 to 9, and letters A to F to represent all numbers. A to F is equivalent respectively to 10 to 15. Hexadecimal provides a more convenient way to represent those long binaries.
Take decimal number 48 for example, it's equivalent to 0b00110000 in binary and 0x30 in hexadecimal.

🔸Go further
How to write a driver
With a sensor driver, you can simply import the library, initialize the sensor, and start reading data from it. This can save a lot of time and effort in programming your project.
Now take the library SHT3x for example, let's see how I2C works and how to create a driver.
BTW, you can find its datasheet here. The datasheet lists all commands to configure the sensor and the ways to read values.
❖ In summary
-
Understand the sensor: to create a sensor driver, you should first understand how the sensor works and how to communicate with it (I2C/SPI/UART).
-
Decide APIs for the driver: For a sensor driver, the APIs usually include:
- initializer,
- data reading methods (read temperature for SHT3x),
- control methods (reset the sensor...),
- configuration methods (set sensor sample rate...).
Then these APIs normally involve reading and writing registers to control the behavior of the sensor and retrieve data from it.
- To write register values, MCUs typically send a message that includes the register address and the data to be written.
- To read register values, MCUs send a message containing the register address, and the sensor responds with the data stored in that register.
These reading and writing processes require low-level communication protocols such as I2C, SPI...
-
Write driver code: when developing your own driver code, you'll usually not start from zero. You can find example drivers provided by sensor manufacturers or some open-source libraries.
❖ SHT3x in detail
Let's look at each part of the library in detail.
Click to view source code of the SHT3x driver.
import SwiftIO

final public class SHT3x {

    private let i2c: I2C
    private let address: UInt8

    private var readBuffer = [UInt8](repeating: 0, count: 6)

    // Initialize the I2C bus and reset the sensor.
    public init(_ i2c: I2C, address: UInt8 = 0x44) {
        self.i2c = i2c
        self.address = address

        reset()
    }
    // Reset the sensor.
    public func reset() {
        sleep(ms: 2)
        try? writeValue(.softReset)
        sleep(ms: 2)
    }

    // Get the temperature in Celcius.
    public func readCelsius() -> Float {
        try? getSensorData(into: &readBuffer)
        let rawTemp = UInt16(readBuffer[0]) << 8 | UInt16(readBuffer[1])
        return 175.0 * Float(rawTemp) / 65535.0 - 45.0
    }

    // Read the temperature in Fahrenheit.
    public func readFahrenheit() -> Float {
        try? getSensorData(into: &readBuffer)
        let rawTemp = UInt16(readBuffer[0]) << 8 | UInt16(readBuffer[1])
        return 315.0 * Float(rawTemp) / 65535.0 - 49.0
    }

    // Read the current relative humidity.
    public func readHumidity() -> Float {
        try? getSensorData(into: &readBuffer)
        let rawHumi = UInt16(readBuffer[3]) << 8 | UInt16(readBuffer[4])
        return 100.0 * Float(rawHumi) / 65535.0
    }
}

extension SHT3x {
    // Some common command with 16-bit data used to communicate with the sensor.
    private enum Command: UInt16 {
        case readStatus     = 0xF32D
        case clearStatus    = 0x3041
        case softReset      = 0x30A2
        case heaterEnable   = 0x306D
        case heaterDisable  = 0x3066

        case measureHigh    = 0x2400
        case measureMedium  = 0x240B
        case measureLow     = 0x2416

        case measureStretchHigh     = 0x2C06
        case measureStretchMedium   = 0x2C0D
        case measureStretchLow      = 0x2C10
    }

    // Split the command into two bytes and send them to the sensor.
    private func writeValue(_ command: Command) throws {
        let value = command.rawValue
        let result = i2c.write([UInt8(value >> 8), UInt8(value & 0xFF)], to: address)
        if case .failure(let err) = result {
            throw err
        }
    }

    // Read
    private func readValue(into buffer: inout [UInt8]) throws {
        for i in 0..<buffer.count {
            buffer[i] = 0
        }
        let result = i2c.read(into: &buffer, from: address)
        if case .failure(let err) = result {
            throw err
        }
    }

    private func getSensorData(into buffer: inout [UInt8]) throws {
        try writeValue(.measureMedium)
        sleep(ms: 8)
        try readValue(into: &buffer)
    }
}
import SwiftIO
Import the SwiftIO library to use the I2C class to read or write data.
final public class SHT3x {
}
As you know, a class is like a template for all its instances who share the same properties and methods. You have used some built-in classes in SwiftIO library. Now you will define a new class. The statement needs the keyword class, followed by a class name SHT3x. This class is used to group all the common usages related to the sensor SHT3x.
Class is of reference type. If you create an instance sensor and assign it to another constant sht3x, in fact they point to the same one. If you change sht3x, sensor will also change, and vice versa. Like a file on your computer, even if you create multiple shortcuts on several locations, they all refer to the original file. That is why the class is usually used in your projects. Since the corresponding hardware is unique, any setting will cause hardware changes.
The keyword public decides the access control of your class. This class should be accessible to other projects in order to call all its methods, so it's public. private means it is accessible only within its type, such as the enum Command used only within this class.
What's more, a class with the keyword final cannot be inherited any longer.
private let i2c: I2C
private let address: UInt8
The variable or constant inside a class is called property. It must be initialized with a value. The two properties above don't have an initial value and thus need an initializer.
private var readBuffer = [UInt8](repeating: 0, count: 6)
This statement creates a buffer to store the reading values during I2C communication. The buffer needs to be a UInt8 array.
- The parameter
repeatingsets the default value for the array. countis decided by the number of bytes the sensor will send. According to the datasheet, it is 6.
In this way, you get an array with 6 bytes whose values are all 0. This is a simple way to assign the array elements with the same default value. Later, these elements will be replaced with readings.
Let's talk about some data types. A UInt8 is an 8-bit unsigned integer from 0 to 255. An Int8 refers to an 8-bit signed integer from -128 to 127, whose first bit serves as a sign. Similarly, a UInt16 is a 16-bit unsigned integer from 0 to 65535.
public init(_ i2c: I2C, address: UInt8 = 0x44) {
    self.i2c = i2c
    self.address = address
    reset()
}
The method or property inside a class also needs to be public to be accessible to other projects. The method init is used to create instances, so it is also public. An initializer is a special kind of function. It allows you to assign values to the properties and perform some setups when creating an instance.
This initializer takes two parameters:
- The first one, of course, is the I2C pin that the sensor connects.
- The address of this sensor is usually the same (0x44) and thus passed with a default value. In this way, you don't need to set it when initializing a sensor instance. If the address happens to be different, you can pass the address value then.
self is used to refer to the instance itself, as the parameter names are the same as the property names. Then use dot syntax to access the property and assign the parameter value to the property.
The method inside a class can be directly used without dot syntax, as the method reset here. After initializing a new instance of SHT3x, the I2C gets ready to communicate with the sensor and the sensor is reset.
public func reset() {
    sleep(ms: 2)
    try? writeValue(.softReset)
    sleep(ms: 2)
}
The method reset allows you to reset the sensor and reload its default settings. It is generated by the soft reset command. The way of resetting is decided by the sensor and usually written on its datasheet or sample code.
writeValue is a newly defined method to send commands via I2C bus easily. As it is a throwing function, you can add try? before it if you don't care about the error. You will look into it in detail later.
public func readCelsius() -> Float {
    try? getSensorData(into: &readBuffer)
    let rawTemp = UInt16(readBuffer[0]) << 8 | UInt16(readBuffer[1])
    return 175.0 * Float(rawTemp) / 65535.0 - 45.0
}
This method needs no parameter and returns a Float.
A function (or method) with return values has the symbol ->, followed by the data type of the value. It contains a statement with return keyword and the value. The return statement should be at the end since the statements after it will be skipped and never be executed.
The method readCelsius gives you the temperature in Celsius. It will
- send a measurement command to the sensor. Then read 6 bytes from the sensor into the
readBufferusing I2C communication. - combine two bytes in the array into a UInt16 which represents a raw temperature value. According to the datasheet, the first two bytes are temperature readings. The fourth and fifth are humidity readings.
- convert the raw value into degree Celsius using the formula provided on the datasheet.
The instance methods readFahrenheit, readHumidity work similarly. And finally, one returns the temperature in Fahrenheit, and the other returns the relative humidity in percentage.
extension SHT3x {
}
This extension adds new functionalities to the corresponding class. One of its advantages is to organize your code and group different parts of code. For instance, here all public methods are in the class itself, and some private methods for internal use are written in the extension. It's a way to organize your code. You could, of course, write all code in the class without an extension.
private enum Command: UInt16 {
    case readStatus = 0xF32D
    ...
}
Enumeration, usually called enum, is a type that contains a group of related values.
- It starts with the keyword enum, followed by an enumeration name.
UInt16tells the data type of case values.- Inside the curly brackets, you put a series of cases. Each case is attached to a default value, called raw value. To use a case, you use dot syntax, like
Command.readStatus.
The enum Command contains some commands for the sensor according to the datasheet for easier reference. The sensor provides so many different commands. If you directly send 0xF32D to the sensor, you may be confused about what it is for when you come back to this code in the future. So an enum is a great choice to list them all together. Each case tells the command usage, followed by a raw value which is the data sent to the sensor.
private func writeValue(_ command: Command) throws {
}
This method sends data over the I2C bus. It takes a parameter command which is of Command type. With the keyword throws after parameter, it can throw an error and propagates it to where it is called.
Let's take a look at the statements in it.
let value = command.rawValue
The constant value stores the raw value of the command. The enum case needs also dot syntax to get the raw value. The raw value is UInt16 so value is inferred to be UInt16 by Swift.
let result = i2c.write([UInt8(value >> 8), UInt8(value & 0xFF)], to: address)
write of the I2C class takes a byte array as the parameter. So you need to separate value into 2 bytes using bitwise operations.
Click to see brief explanations about these bitwise operations.
| Symbol | Meaning | Diagram |
|---|---|---|
| << | left shift: all bits will move to the left, and 0 will be added to the empty bits on the right. |  |
| >> | right shift: all bits will move to the right, and 0 will be added to the empty bits on the left. | 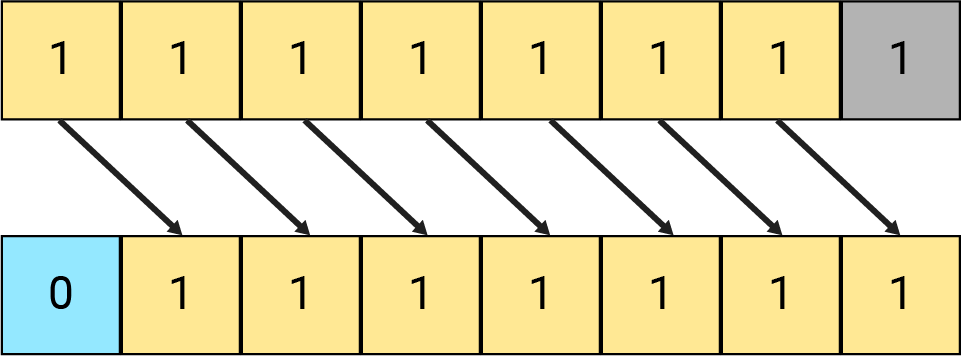 |
| & | bitwise AND operator: it will calculate each corresponding bit of two data. Only if both two bits are 1, the result will be 1, or it will be 0. |  |
| | | bitwise OR operator: it will calculate each corresponding bit of two data. If either of the bits is 1, the result will be 1. |  |
UInt8(value >> 8)

The value is 16-bit. In this statement,
- The bits will move to the right at first. So the original 8 bits on the right (marked with grey) are discarded.
- Then the 8 bits on the right are replaced by the original 8 bits on the left. The empty 8 bits on the left (marked with red) are completed with 0.
- Then it's changed to UInt8 and discards the eight bits on the right.
In this way, you get the first byte for I2C communication.
UInt8(value & 0xFF)

It does bitwise AND operation with 0x00FF (0b1111 1111). So the left 8 bits of result would be the same as those of the original data. The 8 bits on the right all become 0. After it is changed to UInt8, you get the second byte.
Back to the method write. The data array contains the two bytes, and they'll be both sent to the sensor. So the parameter count is not specified. address is the sensor address 0x44 specified above.
write returns a Result type data. It tells you whether the communication was completed or failed. Here is a detailed article about Result.
if case .failure(let err) = result {
    throw err
}
If the data is sent successfully, that's great. But if it fails, you may want to know the error, so in this case, you only care about the failure case.
Here, the error will not be handled in method writeValue, so you just throw the error and make it a throwing method. The error will be handled later when you call this method.
This mechanism is indeed so complicated. But the communication between devices may fail due to many unexpected factors, which will cause wrong data. With error handling, you can check if an error occurs and why it happens. Your projects thus become more stable and secure.
private func readValue(into buffer: inout [UInt8]) throws {
    for i in 0..<buffer.count {
        buffer[i] = 0
    }
    let result = i2c.read(into: &buffer, from: address)
    if case .failure(let err) = result {
        throw err
    }
}
This method reads bytes from the sensor over an I2C bus. The parameter buffer is an inout parameter to allow it to be changed inside the method.
At first, you will change all data in the buffer to 0. Therefore, if the communication meets problems and doesn't give values, all bytes are still 0. You can immediately know there is an error.
The method read of I2C stores the bytes sent from sensor into a buffer.
- The buffer is marked with
&as an inout parameter. - The parameter
countis not specifed as the buffer is 6 bytes long and equals the count to be read. - The third parameter is still the sensor address above.
The values needed have already been read into the buffer. So as for the result, the success case can still be ignored, you check only the failure case and throw it if there is an error.
BTW, the method writeValue and readValue are two methods used for I2C communication between your board and the sensor. As all desired values are passed in as parameters, they are independent of other methods or properties. Thus, you can easily reuse them in any of your drivers for other sensors.
private func getSensorData(into buffer: inout [UInt8]) throws {
    try writeValue(.measureMedium)
    sleep(ms: 8)
    try readValue(into: &buffer)
}
This method sends measurement command to the sensor to get 6 bytes of data. writeValue and readValue all throwing methods. But the error won't be handled here again and you will use the keyword try to propagate the error to the method that calls it.
For example, the method readCelsius calls this method. It uses the try? to handle the error, which will return an optional. In this case, the error is not handled to make this method much easier to use. Or you always need to unwrap the readings.
Since this is a general-purpose library and we don't know the specific situation where the library will be used, it's hard to decide when and how the error needs to be handled. Besides, it's not that frequent for this sensor to get wrong readings. If you want to make your project more secure, you could modify how the error will be handled in the method readCelsius.
Don't worry if you do not quite understand the code above. You just need to import it to your project. Here, we want you to know how to use I2C communication and give you a general idea of how to write a driver for a sensor.
As you see, it's not easy to configure the sensor and get readings from it. With existing drivers, coding becomes much easier.