RTC
Have you wanted to interact with time in your microcontroller projects? With the help of Real-Time Clocks (RTC), you can create all sorts of time-based projects, from scheduling tasks and creating alarms to building automatic systems. In this tutorial, you'll explore the basics of RTCs and dive into some exciting projects that use RTCs.
Learning goals
- Understand how RTCs work.
- Communicate with RTC via I2C bus to set and read the time.
🔸Circuit - RTC
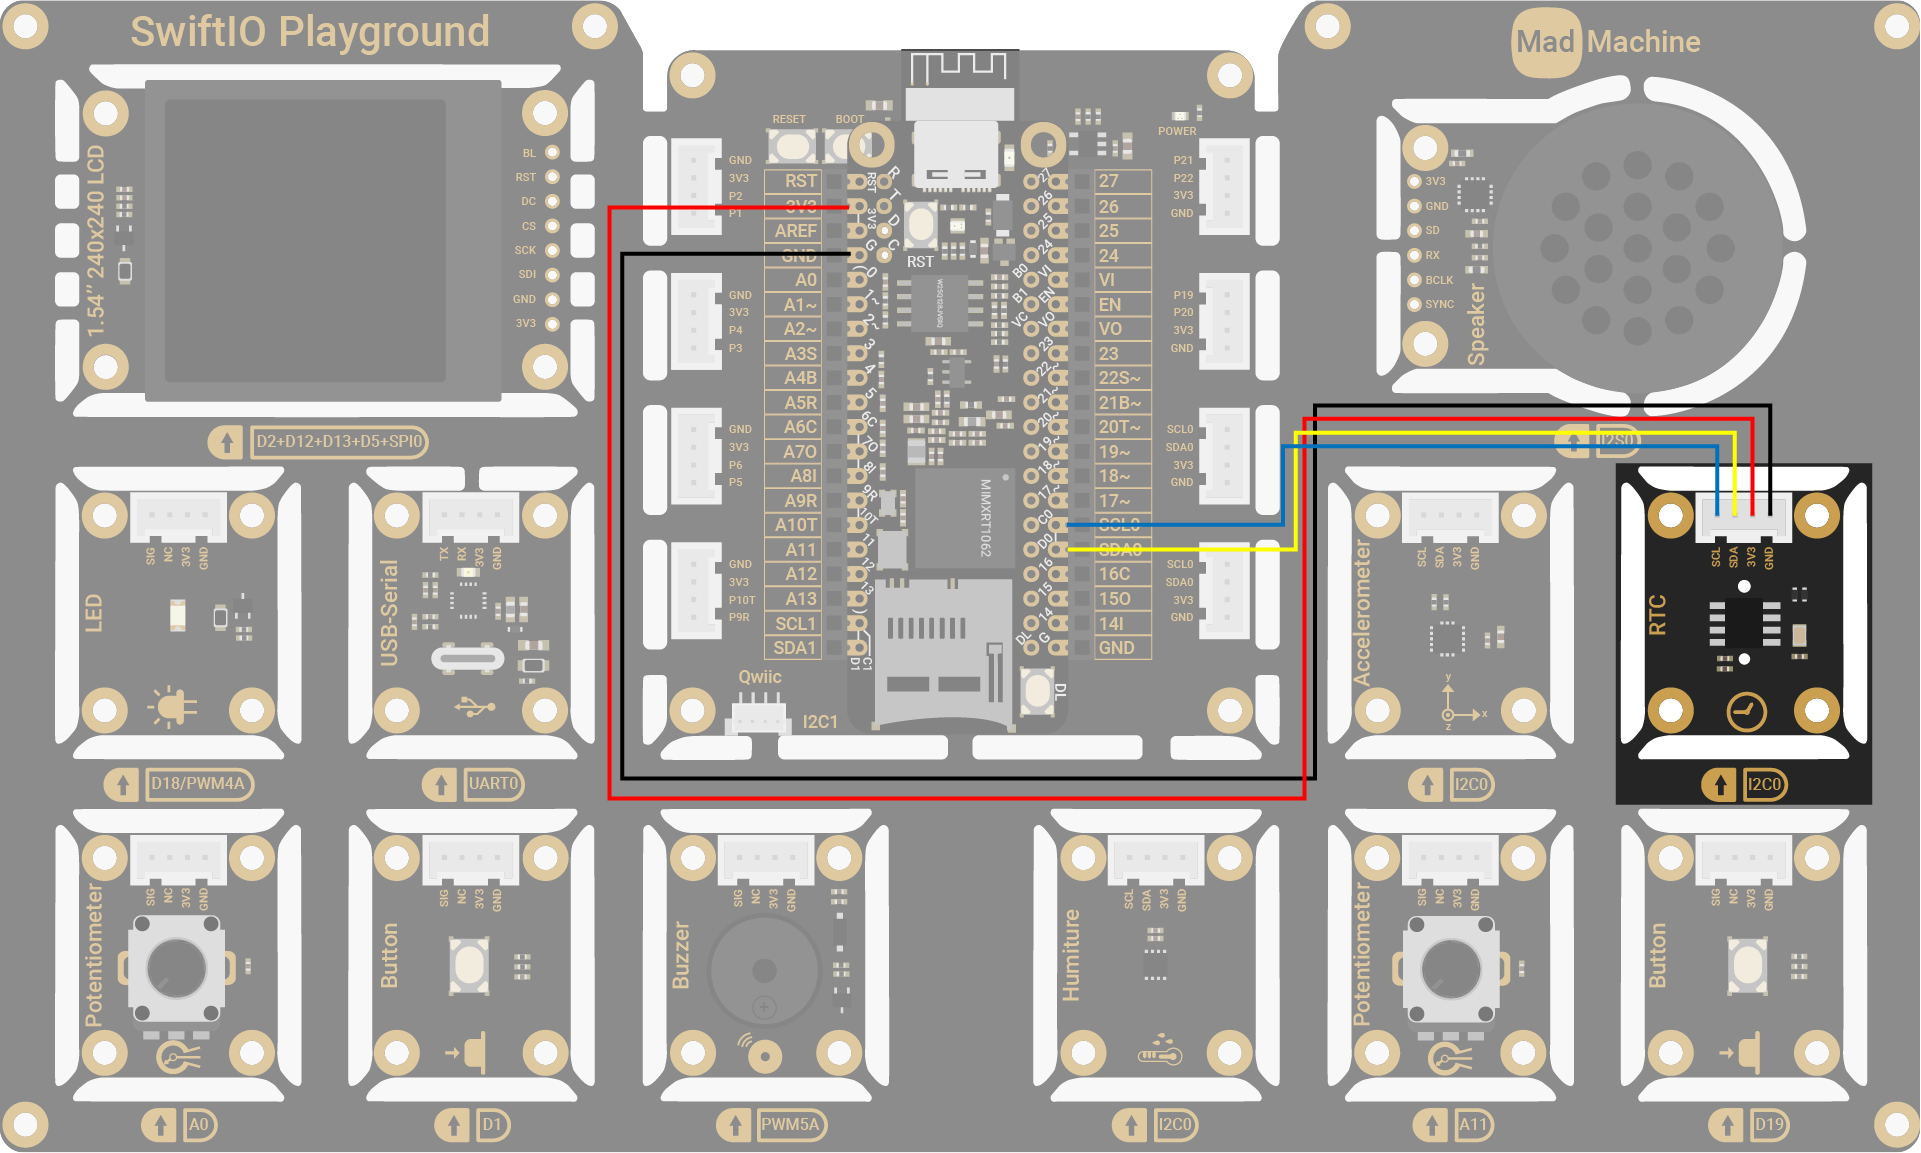
The RTC module is connected to I2C0 (SCL0 and SDA0).

| RTC Pin | SwiftIO Micro Pin |
|---|---|
| SCL | I2C0 (SCL0) |
| SDA | I2C0 (SDA0) |
| 3V3 | 3V3 |
| GND | GND |

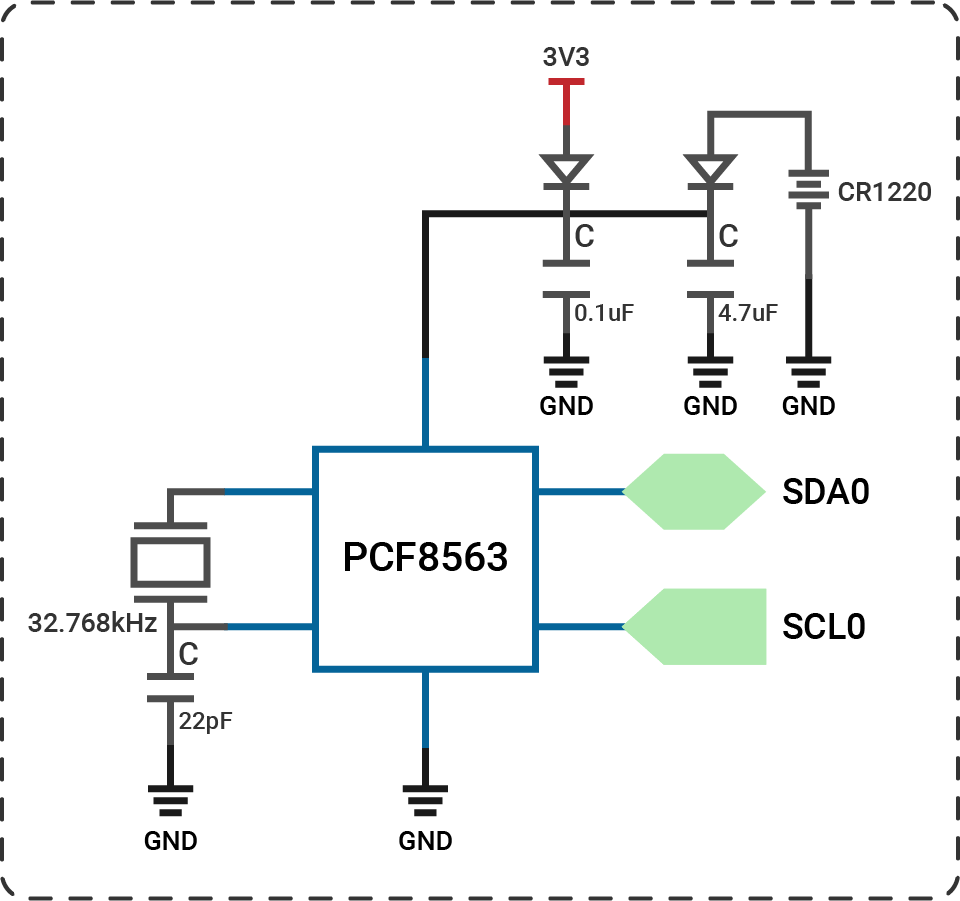
The circuits above are simplified versions for your reference. Download the schematics here.
🔸Projects
1. Reading time
As usual, your first project is to read values, in this case, the current time from the sensor and view it in the serial monitor.
Project overview
- Update RTC time if the module has lost power.
- Read the current time.
- Format the time from the RTC and print it.
Example code
You can download the project source code here.
- main.swift
- Package.swift
// Read current time from the RTC and print it every second.

import SwiftIO
import MadBoard
import PCF8563


let i2c = I2C(Id.I2C0)
let rtc = PCF8563(i2c)

let daysOfWeek = [
    "Monday", "Tuesday", "Wednesday",
    "Thursday", "Friday", "Saturday",
    "Sunday"
]

// Please use current time to adjust the RTC time if it has been lost power.
// The day of week is from 0 to 6. In this case, 0 refers to Monday.
let currentTime = PCF8563.Time(
    year: 2023, month: 4, day: 9, hour: 10,
    minute: 26, second: 0, dayOfWeek: 6
)
// If the RTC has lost power, its time will be updated.
// If not, its time should be accurate and thus won't be changed.
// If you indeed need to adjust it, set the parameter `update` to `true`.
// rtc.setTime(currentTime, update: true)
rtc.setTime(currentTime)

while true {
    let time = rtc.readTime()
    print(formatDateTime(time))
    sleep(ms: 1000)
}

// Add leading zero if number is one-digit.
// For example, number 1 will be 01.
func formatNum(_ number: UInt8) -> String {
    return number < 10 ? "0\(number)" : "\(number)"
}

// Format the date and time, i.e. 2023/03/01 Wednesday 16:20:00.
func formatDateTime(_ time: PCF8563.Time) -> String {
    var string = ""
    string += "\(time.year)" + "/" + formatNum(time.month) + "/" + formatNum(time.day)
    string += " " + daysOfWeek[Int(time.dayOfWeek)] + " "
    string += formatNum(time.hour) + ":" + formatNum(time.minute) + ":" + formatNum(time.second)
    return string
}
// swift-tools-version: 5.9
// The swift-tools-version declares the minimum version of Swift required to build this package.

import PackageDescription

let package = Package(
    name: "ReadingTime",
    dependencies: [
        // Dependencies declare other packages that this package depends on.
        .package(url: "https://github.com/madmachineio/SwiftIO.git", branch: "main"),
        .package(url: "https://github.com/madmachineio/MadBoards.git", branch: "main"),
        .package(url: "https://github.com/madmachineio/MadDrivers.git", branch: "main"),
    ],
    targets: [
        // Targets are the basic building blocks of a package, defining a module or a test suite.
        // Targets can depend on other targets in this package and products from dependencies.
        .executableTarget(
            name: "ReadingTime",
            dependencies: [
                "SwiftIO",
                "MadBoards",
                // Use specific library name rather than "MadDrivers" would speed up the build procedure.
                .product(name: "PCF8563", package: "MadDrivers"),
            ]),
    ]
)
2. Blinking using RTC
In this project, let's blink an LED based on the time from RTC.
Project overview
- Read the current time from RTC.
- Set digital output according to the second: 0s high level, 1s low level, 2s high level... The LED thus blinks every second.
Example code
You can download the project source code here.
- main.swift
- Package.swift
// Blink LED every second.

import SwiftIO
import MadBoard
import PCF8563


let i2c = I2C(Id.I2C0)
let rtc = PCF8563(i2c)
let led = DigitalOut(Id.D18)

while true {
    let time = rtc.readTime()
    led.write(time.second % 2 == 0)
    sleep(ms: 10)
}
// swift-tools-version: 5.9
// The swift-tools-version declares the minimum version of Swift required to build this package.

import PackageDescription

let package = Package(
    name: "BlinkUsingRTC",
    dependencies: [
        // Dependencies declare other packages that this package depends on.
        .package(url: "https://github.com/madmachineio/SwiftIO.git", branch: "main"),
        .package(url: "https://github.com/madmachineio/MadBoards.git", branch: "main"),
        .package(url: "https://github.com/madmachineio/MadDrivers.git", branch: "main"),
    ],
    targets: [
        // Targets are the basic building blocks of a package, defining a module or a test suite.
        // Targets can depend on other targets in this package and products from dependencies.
        .executableTarget(
            name: "BlinkUsingRTC",
            dependencies: [
                "SwiftIO",
                "MadBoards",
                // Use specific library name rather than "MadDrivers" would speed up the build procedure.
                .product(name: "PCF8563", package: "MadDrivers")
            ]),
    ]
)
3. Alarm clock
In this project, you'll set an alarm on the RTC.
PCF8563 provides built-in alarm and timer functions that can be set to trigger at a specific time, but the driver doesn't provide the related functions. Despite this, you can also implement alarms on your own in your code. You can use the current time provided by the RTC and compare it to the time at which you want the alarm to trigger.
Project overview
- Set a desired alarm time.
- Get the current time from RTC.
- Compare the current time to the desired alarm time.
- If the current time matches the alarm time, the buzzer starts buzzing and the LED turns on.
- After a specified time or if you press the stop button, the sound stops and the LED turns off.

Example code
You can download the project source code here.
- main.swift
- Package.swift
// Set an alarm. It will go off at the specified time.
// You can press the button to stop the sound.

import SwiftIO
import MadBoard
import PCF8563


let i2c = I2C(Id.I2C0)
let rtc = PCF8563(i2c)

let led = DigitalOut(Id.D18)
let buzzer = PWMOut(Id.PWM5A)

// Stop the alarm after it goes off.
let stopButton = DigitalIn(Id.D1)

// Set the alarm time.
let alarm = AlarmTime(hour: 10, minute: 40)
// Calculate the time when the alarm will stop sounding.
let stopAlarm = getStopAlarm(alarm, after: 1)
var isAlarmed = false

while true {
    let time = rtc.readTime()

    if isAlarmed {
        // After the alarm clock goes off,
        // if it's time to stop sounding or you press the stop button,
        // stop the sound and turn off the LED.
        if stopAlarm.isTimeUp(time) || stopButton.read() {
            print("Current time: \(time)")
            led.low()
            buzzer.suspend()
            isAlarmed = false
        }
    } else {
        // If the time comes, start the sound and turn on the LED.
        if alarm.isTimeUp(time) {
            print("Current time: \(time)")
            led.high()
            buzzer.set(frequency: 500, dutycycle: 0.5)
            isAlarmed = true
        }
    }

    sleep(ms: 10)
}

// Calculate the time for alarm to stop sounding after specified minutes.
func getStopAlarm(_ alarm: AlarmTime, after min: Int) -> AlarmTime {
    var stopMinute = alarm.minute + min
    var stopHour = alarm.hour

    if stopMinute >= 60 {
        stopMinute -= 60
        stopHour = stopHour == 23 ? 0 : stopHour + 1
    }

    return AlarmTime(hour: stopHour, minute: stopMinute)
}

struct AlarmTime {
    let hour: Int
    let minute: Int

    // Check if the set time comes.
    func isTimeUp(_ time: PCF8563.Time) -> Bool {
        return time.hour == hour && time.minute == minute && time.second == 0
    }
}
// swift-tools-version: 5.9
// The swift-tools-version declares the minimum version of Swift required to build this package.

import PackageDescription

let package = Package(
    name: "Alarm",
    dependencies: [
        // Dependencies declare other packages that this package depends on.
        .package(url: "https://github.com/madmachineio/SwiftIO.git", branch: "main"),
        .package(url: "https://github.com/madmachineio/MadBoards.git", branch: "main"),
        .package(url: "https://github.com/madmachineio/MadDrivers.git", branch: "main"),
    ],
    targets: [
        // Targets are the basic building blocks of a package, defining a module or a test suite.
        // Targets can depend on other targets in this package and products from dependencies.
        .executableTarget(
            name: "Alarm",
            dependencies: [
                "SwiftIO",
                "MadBoards",
                // Use specific library name rather than "MadDrivers" would speed up the build procedure.
                .product(name: "PCF8563", package: "MadDrivers"),
            ]),
    ]
)
🔸API
PCF8563
Tt allows you to set and read RTC time.
| Method | Explanation |
|---|---|
init(_:address:) | Initialize the sensor using I2C communication. Parameters: - i2c: I2C interface that the sensor connects to. - address: the sensor's address. |
setTime(_:update:) | Update the RTC time if it has lost power. If not, the time has been previously set and thus won't be updated, unless you set update to true to recalibrate the RTC. Parameters: - time: current time: year, month, day, hour, minute, and second. - update: whether to update the RTC even if it hasn't lost power. |
readTime() | Read the current time from the RTC. Return value: Date and time including year, month, day, day of week, hour, minute, and second. |
🔸New component
RTC
RTC (real-time clock) is a hardware component that is used to keep track of the current time and date.

RTC keeps time by counting the cycles of its crystal oscillator, a small, precise electronic component that generates stable pulses. By counting the number of pulses that occur in a given time period, the RTC can accurately determine the current time and date.
RTC typically requires a small battery for backup power, which allows it to continue keeping track of time even when the main power source is turned off. The battery is usually a small, long-lasting lithium coin cell that can provide backup power for several years.

If the battery is removed or runs out of power, the RTC will lose power and stop keeping time. In this case, the RTC will reset to a default time value when power is restored. This can result in inaccurate time.
Normally, you can set the current time and date of the RTC by updating its internal registers through software. This allows you to synchronize the RTC with the current time and date when the system is first booted up, or at any time when the time needs to be corrected.
The initial design of the RTC assumed that the year value would be represented using two digits, and that the century value would be fixed at either 19 (for the 1900s) or 20 (for the 2000s). This is because when the RTC was first developed, it was assumed that its useful lifespan would not extend beyond the year 1999, and that it would not need to support dates beyond that point. (Maybe you heard of the so-called "Y2K bug".)
As a result, many older RTCs are designed to interpret the year value as an offset from either 1900 or 2000, depending on the specific chip and manufacturer. For example, a year value of 21 would be interpreted as the year 2021 in an RTC that uses a fixed century value of 20, or the year 1921 in an RTC that uses a fixed century value of 19.
While RTCs are designed to keep accurate time over long periods of time, they are not perfect and may still have some level of error or drift. Therefore, there are also other methods used to achieve accurate timekeeping, such as the use of Network Time Protocol (NTP) or Global Positioning System (GPS) signals.
PCF8563 is one of the commonly-used RTCs and is optimized for low power consumption. It provides the following time and date information: year, month, day, weekday, hours, minutes, and seconds. It can be easily interfaced with microcontrollers using the I2C communication protocol.
BTW, the RTC module on your kit doesn't come with a battery, so it needs to be calibrated after inserting the battery.